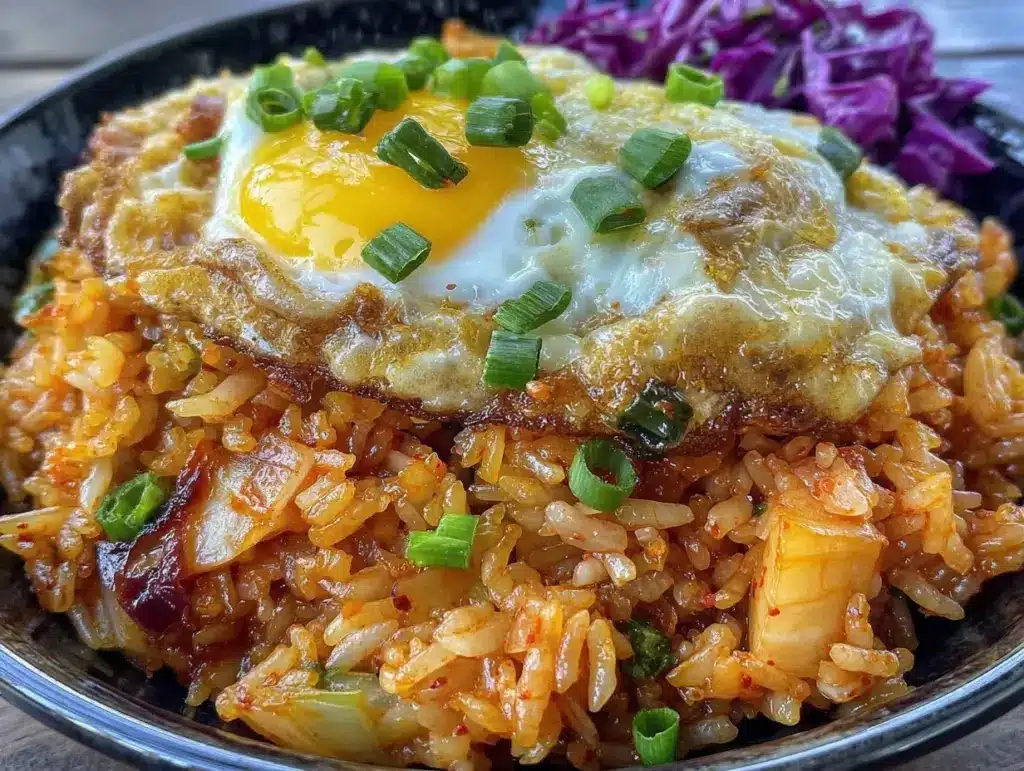
“Hey, you gotta try this,” my friend texted me around midnight, and honestly, I was skeptical. Kimchi fried rice? At that hour? But that message led me into my kitchen, half-expecting a quick snack but ending up with something so crispy, spicy, and satisfying it felt like a quiet celebration of all the chaotic days. The sizzle of the rice hitting the hot pan, the tangy aroma of kimchi blending with toasted sesame oil, and that perfect, fiery fried egg on top—it all came together like a little miracle.
I had always thought kimchi fried rice was just a quick fix, maybe something you tossed together when you weren’t feeling like cooking. But this recipe, with its crispy edges and that spicy fried egg crowning the whole dish, turned my casual skepticism into genuine obsession. I made it again the very next day for lunch, and then twice more that week. There’s something about that crunch paired with the creamy yolk that just hits differently.
It’s the kind of meal that feels both thrilling and comforting—you know, like a late-night chat with a friend you haven’t seen in a while. The flavors are bold but familiar, and every bite tells a story of simple ingredients treated with a little extra love and care. I haven’t looked back since discovering this crispy kimchi fried rice with spicy fried egg recipe. It’s my go-to for when I want a reset, a little warmth, and a whole lot of flavor in one bowl.
Why You’ll Love This Crispy Kimchi Fried Rice with Spicy Fried Egg Recipe
From the first time I whipped up this crispy kimchi fried rice with spicy fried egg, I knew it wasn’t your average fried rice. Having tested many variations, here’s why this one stands out and why you’ll want to keep it in your recipe stash:
- Quick & Easy: Ready in under 25 minutes, perfect for busy weeknights or those spontaneous cravings when you’re low on time but need big flavor.
- Simple Ingredients: Mostly pantry staples and fridge regulars like day-old rice and kimchi—no last-minute grocery runs required.
- Perfect for Any Occasion: Whether it’s a solo dinner, casual lunch, or impressing friends with minimal effort, this dish fits the bill.
- Crowd-Pleaser: The spicy fried egg on top always sparks curiosity and gets rave reviews from both kids and adults alike.
- Unbelievably Delicious: The crispy rice edges combined with the tang of fermented kimchi and the kick from gochujang create a harmony that’s downright addictive.
What makes this recipe different? It’s all about the crispiness and balance. I like to press the rice into the pan and let it brown undisturbed to get those little crunchy bits that add texture. The spicy fried egg isn’t just a garnish—it adds creaminess and heat that complements the tangy, savory rice perfectly. Honestly, it’s a little magic trick I picked up from a street food stall video and tweaked until it felt like home.
This isn’t just another kimchi fried rice—it’s the best crispy kimchi fried rice with a spicy fried egg you’ll ever make, promising a satisfying meal that comforts and excites your palate at the same time.
What Ingredients You Will Need for Crispy Kimchi Fried Rice with Spicy Fried Egg
This recipe uses simple, wholesome ingredients to deliver bold flavor and satisfying texture without the fuss. Most of these are pantry staples or easy to find at any grocery store or Asian market.
- Day-old cooked white rice (about 3 cups / 600g) – Using cold, day-old rice is key for that crispy texture. Fresh rice tends to be too soft and sticky.
- Kimchi (1 cup / 150g, chopped) – I recommend a well-fermented kimchi for the best tangy flavor. If fresh kimchi is too spicy for you, rinse it lightly.
- Vegetable oil (2 tbsp) – For frying the rice to a perfect crisp.
- Sesame oil (1 tbsp) – Adds that irresistible toasted aroma.
- Gochujang (Korean chili paste) (1 tbsp) – Gives the dish its signature spicy kick. Adjust to taste.
- Garlic (3 cloves, minced) – Fresh garlic brings savory depth.
- Green onions (2 stalks, thinly sliced) – For freshness and color.
- Soy sauce (1 tbsp) – Adds umami and saltiness.
- Eggs (4 large) – For the spicy fried eggs on top.
- Gochugaru (Korean chili flakes) (1 tsp, optional) – Sprinkle on the eggs for extra heat.
- Salt and black pepper – To taste.
If you want to swap ingredients, you can use brown rice or cauliflower rice for a healthier twist, but the texture will change a bit. For a vegan version, skip the eggs or replace them with fried tofu or a savory mushroom topping. I usually go with O Organics soy sauce and Mother In Law’s gochujang—they’re reliable and flavorful brands in my kitchen.
Equipment Needed
To make this crispy kimchi fried rice with spicy fried egg, you don’t need much—just the basics, but a few tools do make the process smoother:
- Large non-stick skillet or cast-iron pan: Essential for getting that perfect crispy bottom on the rice. A cast-iron pan really shines here if you have one.
- Spatula: A sturdy spatula helps to press the rice down and flip the egg without breaking the yolk.
- Mixing bowl: For combining the rice with kimchi and sauces before frying.
- Knife and cutting board: For chopping kimchi and green onions.
If you don’t have a cast-iron, a heavy-bottomed skillet works fine. I’ve made this recipe using a simple non-stick pan and still got good results, though the cast-iron gives that unbeatable crust. Also, keep your spatula handy and seasoned—avoid plastic ones that can melt if the pan gets hot.
Preparation Method for Crispy Kimchi Fried Rice with Spicy Fried Egg
- Prepare the rice: Break up your cold, day-old rice with your hands or a fork to separate any clumps. This helps the rice fry evenly and get crispy. (5 minutes)
- Mix kimchi and sauce: In a mixing bowl, combine the chopped kimchi, gochujang, soy sauce, and minced garlic. Stir well so the flavors meld together. (3 minutes)
- Combine rice and kimchi mixture: Add the rice to the bowl and toss thoroughly until every grain is coated with the spicy kimchi paste. (3 minutes)
- Heat the pan: Place your skillet or cast-iron pan over medium-high heat and add the vegetable oil. Let it get hot enough so the oil shimmers but doesn’t smoke. (2 minutes)
- Fry the rice: Spread the rice mixture evenly in the pan and press it down firmly with your spatula. Let it cook undisturbed for about 4-5 minutes until the bottom is golden and crispy. Avoid stirring too soon! (5 minutes)
- Flip for even crisping: Carefully flip sections of the rice to crisp the other side, or stir gently and press down again for another 3-4 minutes. You’re aiming for that crunchy texture throughout. (4 minutes)
- Add green onions: Sprinkle sliced green onions over the rice and give everything a gentle toss to combine and finish cooking. Taste and adjust seasoning with salt or pepper if needed. (2 minutes)
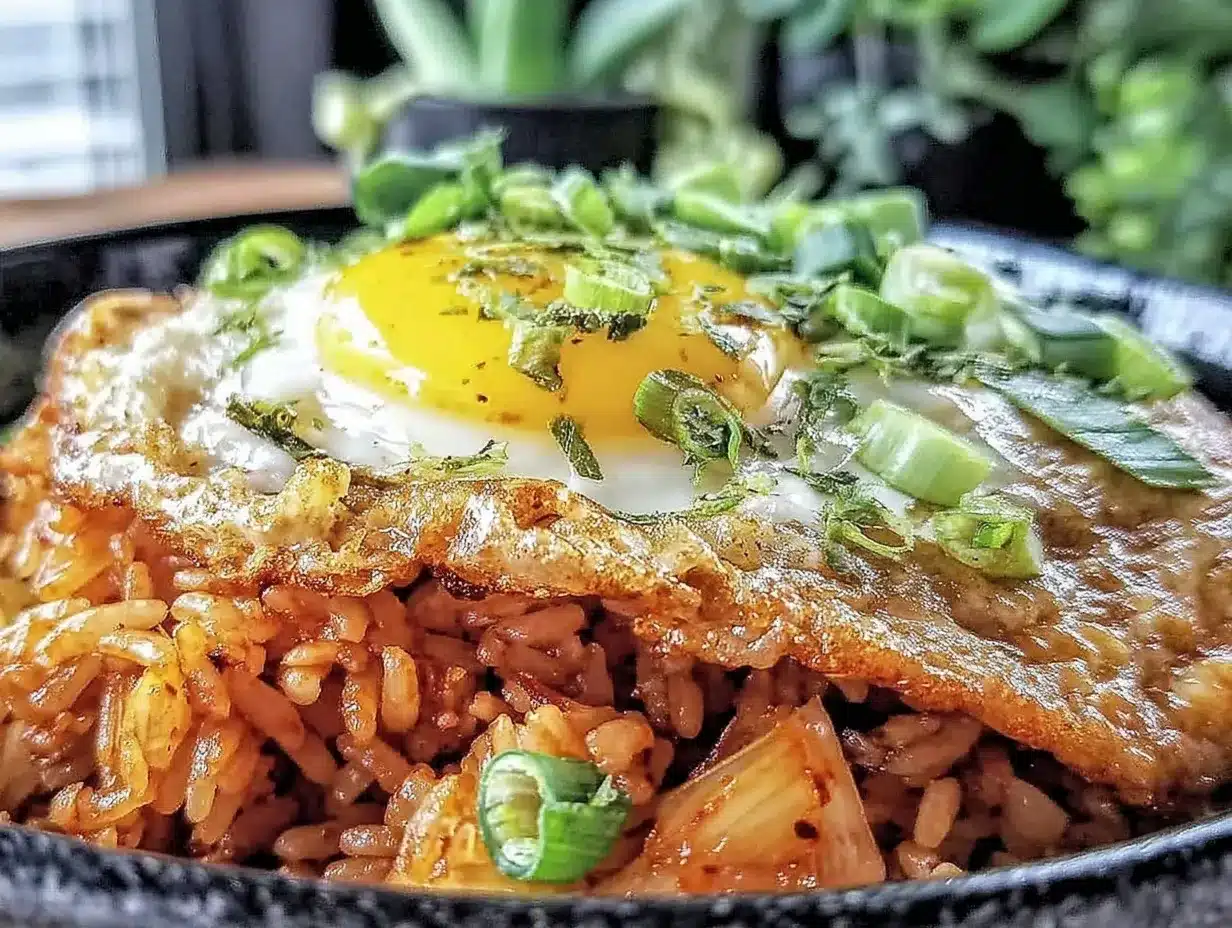
- Fry the eggs: In a separate small pan, heat a teaspoon of vegetable oil over medium heat. Crack in an egg and cook sunny-side-up until the whites are set but the yolk is still runny, about 2-3 minutes. Sprinkle with gochugaru and a pinch of salt for that spicy finish. Repeat for all eggs. (6 minutes)
- Plate and serve: Scoop the crispy kimchi fried rice onto plates and top each serving with a spicy fried egg. Serve immediately for best texture. (2 minutes)
Pro tip: If you want extra crunch, don’t be shy about letting the rice sit longer without stirring. It’s a balancing act between crispy bits and fluffy rice, but worth the patience. Also, keep your heat medium-high but not so hot it burns the rice before it crisps.
Cooking Tips & Techniques
Getting that perfect crispy kimchi fried rice with spicy fried egg is all about timing and temperature. Here are some hard-earned tips I’ve picked up:
- Use day-old rice: Freshly cooked rice is too moist and will clump. Cold rice dries out a bit, making it perfect for frying crisp.
- Don’t overcrowd the pan: Give the rice room to crisp. If your pan is too small, work in batches.
- Press down firmly: Pressing the rice into the pan helps create that golden crust. Resist the urge to stir too early!
- Control your heat: Medium-high works best. Too high, and you’ll burn the rice; too low, and it won’t crisp.
- Spicy fried egg mastery: Use fresh eggs and a non-stick pan. Cook the whites fully but keep the yolk runny for that creamy texture that contrasts the crispy rice.
- Adjust spice levels: Gochujang and gochugaru can be intense—start small and add more if you want extra heat.
- Multitasking: While the rice crisps, use the time to prep your eggs or chop green onions to streamline cooking.
- Don’t rinse kimchi: The brine adds flavor and moisture. If you want less heat or tang, rinse lightly but not too much.
Once, I burned a batch by turning the heat up too high—lesson learned! Patience is key here to make sure the rice crisps evenly without scorching. Also, if you’re curious about other crispy rice dishes, you might enjoy my crispy smashed potatoes with garlic aioli for a different kind of crunch.
Variations & Adaptations
One of the best things about this recipe is how adaptable it is. Here are a few ways you can make it your own:
- Vegetarian/Vegan: Skip the eggs or replace them with pan-fried tofu slices seasoned with a splash of soy sauce and chili flakes. Use tamari for gluten-free soy sauce.
- Protein Boost: Add diced cooked chicken, shrimp, or beef to the rice for a heartier meal. Leftover grilled meats work great.
- Low-Carb Option: Swap the rice for cauliflower rice. Cook it a bit less to keep some texture and add kimchi and spices as usual.
- Seasonal Twist: In warmer months, toss in fresh herbs like cilantro or Thai basil. I once added thinly sliced cucumber on the side for a refreshing crunch.
- Flavor Variations: Mix in a spoonful of miso paste or a splash of fish sauce for deeper umami flavor.
On a whim, I tried swapping the fried egg for a soft poached egg once—still delicious but missing that crispy edge I love. For a side dish with similar bold flavors, pairing it with Asian sesame green beans adds a fresh, crunchy contrast.
Serving & Storage Suggestions
This crispy kimchi fried rice with spicy fried egg is best served hot and fresh, so the rice stays crunchy, and the egg yolk is perfectly runny. I like to plate it simply with a sprinkle of extra green onions and a dash of toasted sesame seeds for that final touch.
For drinks, a cold glass of iced green tea or a light lager pairs nicely, cutting through the richness and spice. If you want to round out the meal, try serving with a side of quick pickled vegetables or a light soup like my creamy butternut squash soup for a cozy balance.
Leftovers keep well in the fridge for up to 2 days. When reheating, use a hot skillet to crisp the rice again rather than the microwave, which often makes it soggy. Reheat the egg separately or fry a fresh one for best results.
Over time, the flavors in the rice meld and deepen, so reheated versions can be even tastier if you don’t mind losing a bit of crispiness. Just avoid storing the fried egg longer than a day to keep food safety and taste optimized.
Nutritional Information & Benefits
Per serving (serves 4): approximately 400-450 calories, 12g protein, 55g carbohydrates, and 15g fat.
This dish packs probiotics from kimchi, which is great for digestion and gut health. The eggs provide quality protein and essential nutrients like choline and vitamin D. Using sesame oil adds heart-healthy fats and antioxidants.
For gluten-free diets, just make sure to use tamari instead of regular soy sauce. The recipe is naturally low in sugar and contains no artificial additives. It’s a balanced meal with carbs, fats, and proteins that satisfies hunger and supports energy levels.
I appreciate this recipe because it feels indulgent but still wholesome—a perfect example of comfort food that doesn’t leave you feeling weighed down.
Conclusion
Crispy kimchi fried rice with spicy fried egg is one of those recipes that feels like a little celebration every time you make it. The combination of crunchy rice, tangy kimchi, and that creamy, spicy egg hits all the right notes for comfort and flavor.
Feel free to make it your own, adjusting the spice or adding your favorite proteins. I love how versatile it is—whether it’s a quick solo meal or something to share with friends.
It’s become one of my kitchen staples, a dish I turn to when I want both ease and excitement in one bowl. I hope you enjoy making it as much as I do—drop a comment if you try it or have your own twists to share!
Here’s to crispy bites and spicy delights that bring a little joy to your table.
Frequently Asked Questions about Crispy Kimchi Fried Rice with Spicy Fried Egg
Can I use fresh rice instead of day-old rice?
Fresh rice is usually too moist and sticky, which makes it hard to get crispy. If you only have fresh rice, spread it out on a tray and chill it for at least an hour to dry it out a bit before frying.
How do I make the fried egg extra spicy?
Sprinkle gochugaru or drizzle a little sriracha on top of the egg right after frying. You can also mix chili flakes into the oil before frying the egg for a subtle spicy flavor.
Is kimchi fried rice gluten-free?
Kimchi itself is generally gluten-free, but soy sauce often contains gluten. Use tamari or a gluten-free soy sauce alternative to keep the dish gluten-free.
Can I prepare this recipe ahead of time?
The rice and kimchi mix can be prepped ahead, but for the best texture, fry the rice and eggs right before serving.
What’s the best way to store leftovers?
Store leftover fried rice in an airtight container in the fridge for up to 2 days. Reheat in a hot skillet to restore crispiness. It’s best to fry fresh eggs when serving leftovers.
Pin This Recipe!

Crispy Kimchi Fried Rice Recipe with Spicy Fried Egg

A quick and easy crispy kimchi fried rice topped with a spicy fried egg, delivering bold flavors and satisfying textures perfect for any occasion.
- Prep Time: 13 minutes
- Cook Time: 20 minutes
- Total Time: 33 minutes
- Yield: 4 servings 1x
- Category: Main Course
- Cuisine: Korean
Ingredients
- 3 cups (about 600g) day-old cooked white rice
- 1 cup (150g) chopped kimchi
- 2 tbsp vegetable oil
- 1 tbsp sesame oil
- 1 tbsp gochujang (Korean chili paste)
- 3 cloves garlic, minced
- 2 stalks green onions, thinly sliced
- 1 tbsp soy sauce
- 4 large eggs
- 1 tsp gochugaru (Korean chili flakes), optional
- Salt and black pepper to taste
Instructions
- Break up your cold, day-old rice with your hands or a fork to separate any clumps. (5 minutes)
- In a mixing bowl, combine the chopped kimchi, gochujang, soy sauce, and minced garlic. Stir well. (3 minutes)
- Add the rice to the bowl and toss thoroughly until every grain is coated with the spicy kimchi paste. (3 minutes)
- Place your skillet or cast-iron pan over medium-high heat and add the vegetable oil. Heat until oil shimmers but does not smoke. (2 minutes)
- Spread the rice mixture evenly in the pan and press it down firmly with your spatula. Let it cook undisturbed for about 4-5 minutes until the bottom is golden and crispy. (5 minutes)
- Carefully flip sections of the rice to crisp the other side, or stir gently and press down again for another 3-4 minutes. (4 minutes)
- Sprinkle sliced green onions over the rice and toss gently to combine. Adjust seasoning with salt or pepper if needed. (2 minutes)
- In a separate small pan, heat a teaspoon of vegetable oil over medium heat. Crack in an egg and cook sunny-side-up until whites are set but yolk is runny, about 2-3 minutes. Sprinkle with gochugaru and a pinch of salt. Repeat for all eggs. (6 minutes)
- Scoop the crispy kimchi fried rice onto plates and top each serving with a spicy fried egg. Serve immediately. (2 minutes)
Notes
Use day-old rice for best crispiness. Press rice firmly into the pan and cook undisturbed to develop crispy edges. Adjust spice levels with gochujang and gochugaru. For vegan version, omit eggs or replace with pan-fried tofu. Reheat leftovers in a hot skillet to restore crispiness; fry fresh eggs when serving leftovers.
Nutrition
- Serving Size: 1 serving (about 1/4
- Calories: 425
- Sugar: 5
- Sodium: 700
- Fat: 15
- Saturated Fat: 3
- Carbohydrates: 55
- Fiber: 3
- Protein: 12
Keywords: kimchi fried rice, crispy fried rice, spicy fried egg, Korean recipe, quick dinner, easy fried rice


