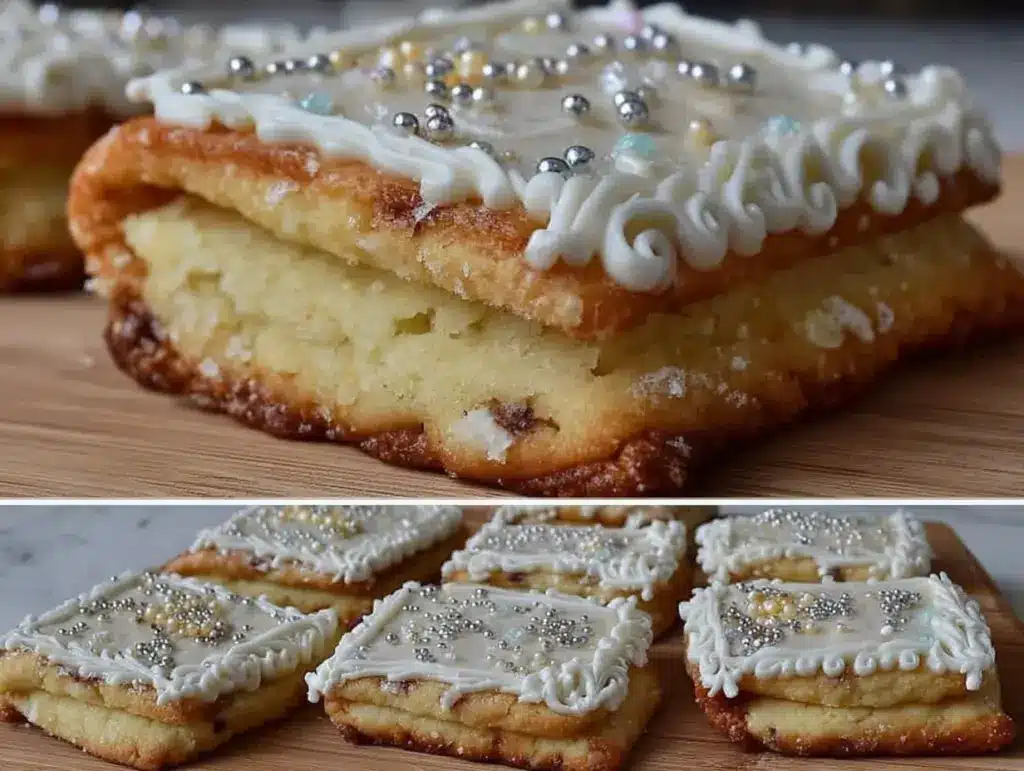
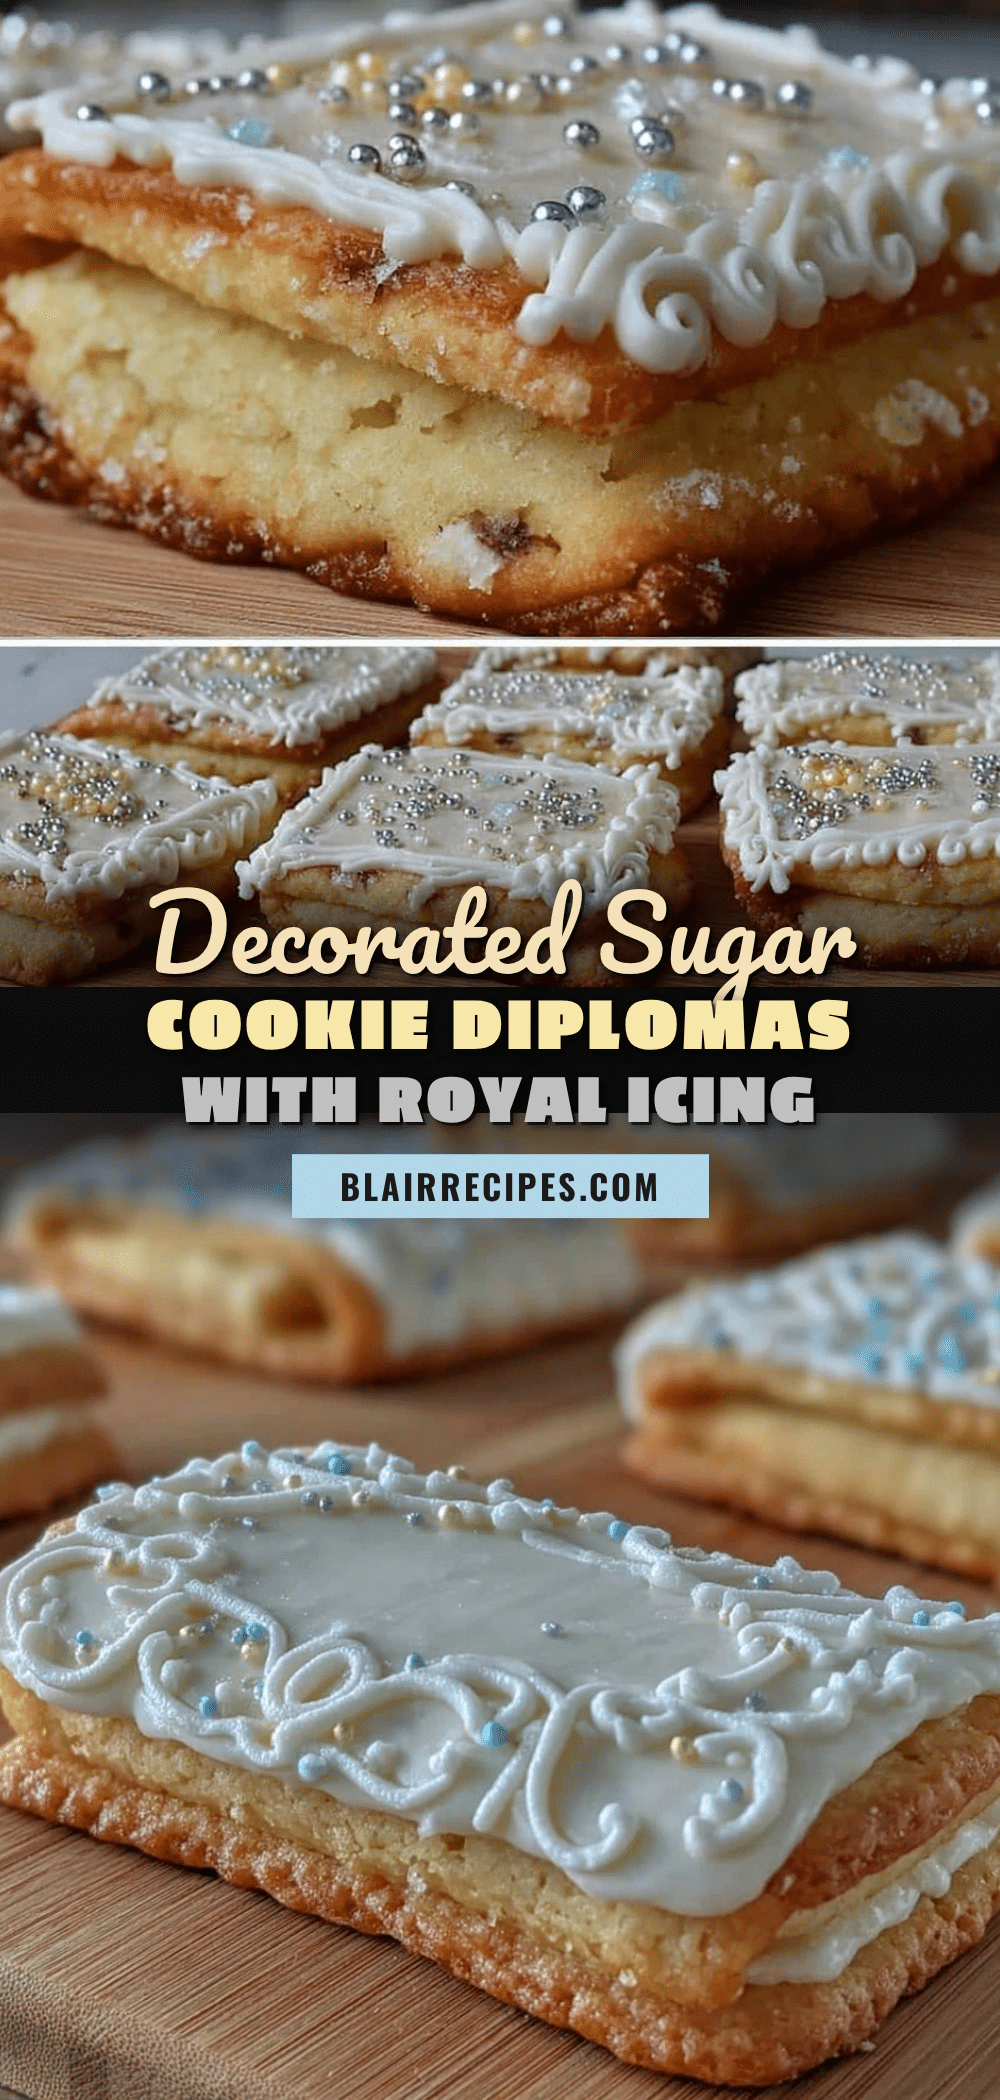
“Hey, do you think you can whip up some diploma cookies for the graduation party tomorrow?” my sister texted me at 9 PM, and honestly, my first thought was, “Oh boy, royal icing again?” But you know how these last-minute requests go—sometimes they lead to unexpectedly fun kitchen marathons. I wasn’t really sure if I could pull off perfectly decorated sugar cookie diplomas with royal icing detail on such short notice, especially since I’m not exactly a pro at intricate cookie decorating.
So, I rolled up my sleeves, dug out my trusty cookie cutters, and started mixing dough. The smell of vanilla and butter filled the kitchen, blending with a quiet hum of my favorite playlist. There was something oddly comforting about the rhythmic action of rolling and cutting, a welcome pause in the chaos of the day. The royal icing turned out smoother than I remembered, and as I piped the tiny rolled diploma scrolls and tied little icing bows, my skepticism melted away. It wasn’t just about making cute cookies; it became a small, quiet celebration of the milestone itself.
Those little diploma cookies didn’t just vanish at the party—they sparked conversations, smiles, even a few “where did you get these?!” moments. I realized that this recipe stuck with me not just because it’s a neat trick for graduation season, but because it’s approachable and satisfying. It’s the kind of recipe that feels personal and doable, even when you’re pressed for time and not a baking wizard. And honestly? That’s why I’m still making these every spring, year after year, with a little more confidence and a lot more icing practice.
Why You’ll Love This Recipe
Having made these sugar cookie diplomas more times than I can count, I can say this recipe really hits the sweet spot for celebrating graduations or any achievement-worthy moment.
- Quick & Easy: The dough comes together in about 15 minutes, and you can bake a batch in 12-15 minutes. Perfect if you’re juggling last-minute party prep.
- Simple Ingredients: Nothing fancy—just pantry staples like flour, butter, sugar, and eggs. You probably have everything on hand already.
- Perfect for Celebrations: Whether it’s a graduation party, a school event, or a congratulatory gift, these cookies fit right in.
- Crowd-Pleaser: Kids love the fun diploma shape, and adults appreciate the classic sugar cookie taste paired with the charming royal icing detail.
- Unbelievably Delicious: The cookies are buttery and tender, with a slight crisp on the edges that pairs perfectly with the smooth, sweet royal icing.
What really sets this recipe apart is the icing technique. I’ve tweaked the royal icing to be just the right consistency for piping delicate scroll edges and tiny bows without frustration. Plus, the balanced sweetness means it’s not overpowering, letting the buttery cookie shine. If you’re someone who’s tried decorated cookies before and felt overwhelmed, this tutorial breaks it down into manageable steps that you can easily fit into your day.
This isn’t just another sugar cookie recipe—it’s a way to add a little handmade charm to a big moment, without stress or mess. And if you love simple homemade treats, you might also appreciate the straightforward goodness in my honey roasted butternut squash with rosemary, which pairs beautifully for an elegant party spread.
What Ingredients You Will Need
This recipe uses simple, wholesome ingredients to deliver buttery cookies with a smooth royal icing finish that holds up beautifully for decorating. No need for specialty items, though you can swap a few things if needed.
- For the Sugar Cookie Dough:
- All-purpose flour (about 3 cups / 360g) – choose a trusted brand like King Arthur for consistent results
- Unsalted butter, softened (1 cup / 227g) – room temperature for easy mixing
- Granulated sugar (1 cup / 200g) – adds sweetness and structure
- Large eggs (2, room temperature) – helps bind and enrich the dough
- Pure vanilla extract (1 tsp) – for warm, classic flavor
- Baking powder (1 tsp) – gives a slight lift and tender crumb
- Salt (¼ tsp) – balances sweetness
- For the Royal Icing:
- Powdered sugar (4 cups / 480g) – sifted for smooth icing
- Pasteurized egg whites or meringue powder (3 tbsp) – stabilizes the icing
- Fresh lemon juice or water (5-6 tbsp) – to adjust consistency
- Food coloring gels (optional) – classic white for diplomas, plus black or brown for writing details
- Decorative Touches:
- Edible gold or silver dust (optional) – for a little shimmer on bows or scroll edges
- Fine-tipped piping bags or disposable plastic bags with corner snipped
If you want to try a gluten-free version, swapping in almond flour or a gluten-free blend works surprisingly well, though the texture will be a bit softer. For a dairy-free take, plant-based butter alternatives can be used, but watch for slight changes in dough firmness. For a smooth royal icing, I personally like using meringue powder from brands like Wilton, which makes the process more straightforward and less risky than raw egg whites.
Equipment Needed
- Mixing bowls – medium and large sizes for dough and icing
- Electric mixer or stand mixer – makes creaming butter and sugar a breeze
- Measuring cups and spoons – precise measurements matter here
- Rolling pin – a non-stick or lightly floured rolling pin helps with even dough thickness
- Cookie cutters – diploma scroll-shaped cutters are ideal, but a rectangular cutter plus a little hand shaping works too
- Baking sheets lined with parchment paper or silicone mats – prevents sticking and promotes even baking
- Piping bags and fine tips – essential for royal icing details; disposable bags with cut corners work well for beginners
- Sifter or fine mesh strainer – for powdered sugar in icing
- Small bowls or cups – to mix and color icing
If you don’t have a stand mixer, a sturdy hand mixer will do just fine. For rolling pins, I’ve found a simple wooden one is easier to control than heavier models, especially when working with delicate dough. And if you’re tight on budget, you can improvise piping bags with zip-top bags by snipping the corner, just remember to keep your icing consistency right so it flows smoothly.
Preparation Method

- Make the Dough: In a large bowl, cream together the softened butter (1 cup / 227g) and sugar (1 cup / 200g) using an electric mixer until light and fluffy, about 3-4 minutes. This step is crucial for tender cookies.
- Add Eggs and Vanilla: Beat in the eggs (2 large, room temp) one at a time, then stir in 1 teaspoon of pure vanilla extract. The mixture may look slightly curdled but that’s okay.
- Combine Dry Ingredients: In a separate bowl, whisk together 3 cups (360g) of all-purpose flour, 1 teaspoon baking powder, and ¼ teaspoon salt.
- Mix Dry into Wet: Gradually add the dry ingredients to the wet mixture, mixing on low speed until just combined. Avoid overmixing to keep cookies tender. The dough will be soft but not sticky. If it feels too sticky, chill for 15 minutes.
- Chill the Dough: Wrap the dough in plastic wrap and refrigerate for at least 1 hour. This step helps prevent spreading during baking and makes rolling easier.
- Roll and Cut: Preheat your oven to 350°F (175°C). On a lightly floured surface, roll out the dough to about ¼ inch (6 mm) thickness. Use your diploma-shaped cookie cutter to cut shapes. If you don’t have one, cut rectangles about 3” x 1.5” (7.5 x 4 cm), and gently pinch one short edge to mimic a scroll. Transfer cookies to parchment-lined baking sheets.
- Bake: Bake for 12-15 minutes, or until the edges just begin to turn golden. Keep a close eye—overbaking dries them out. Remove from oven and let cool completely on wire racks before decorating.
- Prepare Royal Icing: In a medium bowl, beat 4 cups (480g) sifted powdered sugar with 3 tablespoons meringue powder and 5-6 tablespoons lemon juice or water. Start with less liquid and add more until the icing reaches a thick but pipeable consistency. Divide into bowls for coloring if desired.
- Decorate: Fill piping bags with the white royal icing for the base scroll detail. Pipe a smooth outline and flood the center. Let it dry for about 30 minutes. Then use a slightly thicker consistency and a fine tip to pipe “rolled” edges, little bows, and writing details in black or brown icing. For delicate touches like ribbons, steady hands and patience are key. Let the cookies dry overnight for best results.
Pro tip: If your icing feels too runny while decorating, add a little more powdered sugar; if it’s too stiff, add a few drops of lemon juice or water. The drying time is important—don’t rush the step or your details might smudge.
Cooking Tips & Techniques
Piping royal icing can honestly be a bit intimidating at first, but a few tricks have saved me from many disasters. First, always test your icing consistency on parchment paper before decorating the cookies. You want a flow that’s smooth but holds its shape.
One common mistake is rushing to decorate cookies that aren’t fully cooled—warm cookies can cause the icing to melt or slide off. Letting them cool completely is a game changer.
Another tip: outline your cookies with a slightly thicker icing, then flood the inside with a thinner consistency. This “dam and flood” method keeps the icing neat and controlled. It’s the same technique I use when making my famous green bean casserole, where precision matters for presentation.
Practice steady pressure on your piping bag and keep your hand close to the cookie surface for better control. If you mess up, use a damp brush or toothpick to fix small mistakes quickly before the icing dries.
Lastly, patience is key. Let your cookies dry in a dust-free environment overnight. I’ve learned the hard way that trying to stack or package cookies too soon leads to cracked or smudged designs.
Variations & Adaptations
This sugar cookie diploma recipe is pretty flexible, so you can customize it for different occasions or dietary needs.
- Color Variation: Instead of classic white diplomas, try pastel shades for spring graduations or school colors for a personalized touch.
- Flavored Dough: Add a teaspoon of almond extract or lemon zest to your dough for a subtle twist that pairs beautifully with the royal icing.
- Gluten-Free Option: Swap all-purpose flour with a 1:1 gluten-free baking blend. Cookies might be more delicate, so handle gently.
- Vegan Adaptation: Use dairy-free butter and replace eggs with flax eggs (1 tbsp ground flax + 3 tbsp water per egg). Royal icing can be made with aquafaba instead of egg whites.
- Alternative Shapes: If you want to switch things up, try rolling out the dough and cutting into mortarboards or stars. I once made a batch of these diplomas alongside lemon zest sautéed green beans for a graduation brunch—both were hits!
Serving & Storage Suggestions
Serve these decorated sugar cookie diplomas at room temperature to enjoy the perfect balance of tender cookie and crisp royal icing. They look fantastic arranged on a festive platter or packaged individually in cellophane bags tied with ribbon for party favors.
If you’re planning ahead, store the cookies in an airtight container layered with parchment paper to avoid sticking. They keep well for up to a week at room temperature.
For longer storage, freeze undecorated cookies wrapped tightly in plastic wrap, then decorated after thawing. Decorated cookies freeze best if fully dry and stored in a rigid container to protect the icing.
Reheating isn’t really needed, but if you want a fresher-baked feel, pop undecorated cookies in a 300°F (150°C) oven for 3-5 minutes. Avoid heating decorated ones, as the icing may soften or melt.
Fun fact: royal icing flavors tend to mellow and deepen after a day or two, so if you’re not in a rush, make cookies a day ahead. It gives you more time to prepare other dishes like a warm butternut squash soup for your celebration table.
Nutritional Information & Benefits
Each decorated sugar cookie diploma contains roughly 150-180 calories depending on size and icing amount. They’re primarily a treat, rich in carbohydrates and sugars, with moderate fat from butter.
Key ingredients like butter provide vitamin A and contribute to the cookie’s tenderness. Using fresh eggs offers protein and essential nutrients.
If you’re mindful of allergens, note that this recipe contains gluten, dairy, and egg. Gluten-free and vegan adaptations are possible with ingredient swaps mentioned above.
From a wellness perspective, these cookies are best enjoyed in moderation as a celebratory indulgence—perfect for marking milestones without overdoing it. I often pair them with lighter dishes to balance a party menu.
Conclusion
Perfect decorated sugar cookie diplomas with royal icing detail are more than just cute treats—they’re little handmade medals for achievements, crafted with care and a bit of patience. This recipe makes it doable for anyone, even if you’re not a seasoned baker or decorator. You can customize the colors, flavors, and shapes to suit your style and occasion, making every batch uniquely yours.
For me, these cookies hold a warm place in my kitchen memories—reminders of late-night baking sprints and joyful celebrations. If you give this recipe a try, I’d love to hear how your cookies turn out or what special touches you added. Sharing stories and photos truly makes all the difference in a recipe’s journey.
Happy baking, and here’s to many sweet celebrations ahead!
FAQs About Perfect Decorated Sugar Cookie Diplomas
- Can I make the dough ahead of time? Yes! The dough can be refrigerated for up to 3 days or frozen for up to 1 month. Just thaw before rolling.
- What if I don’t have a diploma-shaped cutter? You can cut rectangles and gently pinch one end to mimic a scroll, or use any small rectangular cutter you have on hand.
- How do I store decorated cookies without smudging the icing? Let the royal icing dry completely, preferably overnight, then store in a single layer or with parchment paper between layers in an airtight container.
- Can I use store-bought royal icing? You can, but homemade royal icing tends to have better texture and taste. Plus, you can customize consistency and color easily.
- What’s the best way to fix mistakes on royal icing? Use a damp toothpick or small brush to gently smooth or lift icing before it dries. For dried mistakes, carefully scrape with a knife and re-pipe once dry.
Pin This Recipe!
Perfect Decorated Sugar Cookie Diplomas Easy Royal Icing Tutorial

A quick and easy recipe for buttery sugar cookie diplomas decorated with smooth royal icing, perfect for graduation celebrations and other special occasions.
- Prep Time: 15 minutes
- Cook Time: 12-15 minutes
- Total Time: 1 hour 30 minutes
- Yield: 24 cookies 1x
- Category: Dessert
- Cuisine: American
Ingredients
- 3 cups (360g) all-purpose flour
- 1 cup (227g) unsalted butter, softened
- 1 cup (200g) granulated sugar
- 2 large eggs, room temperature
- 1 teaspoon pure vanilla extract
- 1 teaspoon baking powder
- 1/4 teaspoon salt
- 4 cups (480g) powdered sugar, sifted
- 3 tablespoons pasteurized egg whites or meringue powder
- 5–6 tablespoons fresh lemon juice or water
- Food coloring gels (optional)
- Edible gold or silver dust (optional)
- Fine-tipped piping bags or disposable plastic bags with corner snipped
Instructions
- Make the Dough: In a large bowl, cream together the softened butter and sugar using an electric mixer until light and fluffy, about 3-4 minutes.
- Add Eggs and Vanilla: Beat in the eggs one at a time, then stir in the vanilla extract.
- Combine Dry Ingredients: In a separate bowl, whisk together the flour, baking powder, and salt.
- Mix Dry into Wet: Gradually add the dry ingredients to the wet mixture, mixing on low speed until just combined. Chill dough for 15 minutes if too sticky.
- Chill the Dough: Wrap the dough in plastic wrap and refrigerate for at least 1 hour.
- Roll and Cut: Preheat oven to 350°F (175°C). Roll dough to 1/4 inch thickness and cut with diploma-shaped cookie cutters or rectangles about 3” x 1.5”, pinching one short edge to mimic a scroll. Transfer to parchment-lined baking sheets.
- Bake: Bake for 12-15 minutes until edges begin to turn golden. Cool completely on wire racks.
- Prepare Royal Icing: Beat powdered sugar with meringue powder and lemon juice or water until thick but pipeable. Divide and color if desired.
- Decorate: Pipe white royal icing outline and flood center. Let dry 30 minutes. Use thicker icing and fine tip to pipe scroll edges, bows, and writing details. Let dry overnight.
Notes
If icing is too runny, add more powdered sugar; if too stiff, add lemon juice or water. Let cookies cool completely before decorating. Dry decorated cookies overnight in a dust-free environment to avoid smudging. Dough can be refrigerated up to 3 days or frozen up to 1 month. Gluten-free and vegan adaptations are possible with ingredient swaps.
Nutrition
- Serving Size: 1 cookie
- Calories: 150180
- Sugar: 15
- Sodium: 80
- Fat: 7
- Saturated Fat: 4
- Carbohydrates: 25
- Protein: 2
Keywords: sugar cookies, royal icing, graduation cookies, decorated cookies, easy cookie recipe, party cookies, homemade treats


