Introduction
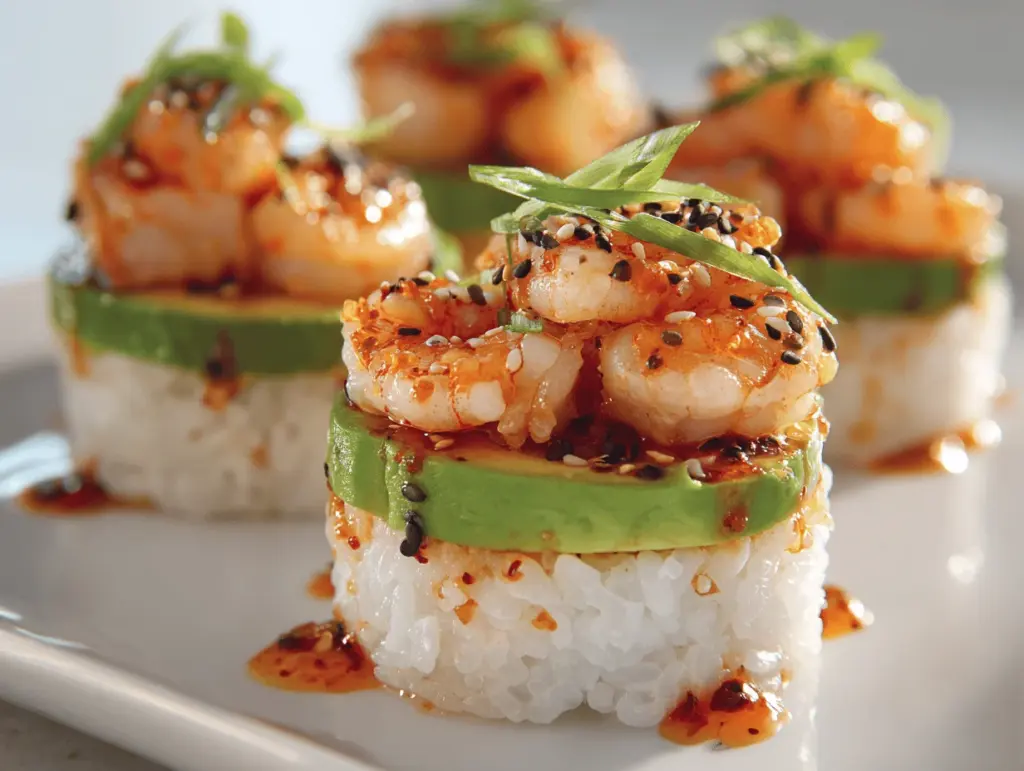
The crunch of cucumber, the sticky-sweet sushi rice, and that fiery kick from the creamy spicy shrimp – every bite of these Spicy Shrimp Sushi Stacks is like a flavor party in your mouth. Honestly, the first time I made these was for a last-minute girls’ night in, and they disappeared before I could even snap a photo! There’s something magical about transforming your favorite sushi bar flavors into a playful, stackable treat. No rolling mats, no fuss, just pure, hands-on fun and impressive layers that look way fancier than the effort required.
I grew up loving sushi, but let’s face it, making perfect rolls at home can be a little intimidating. That’s how these spicy shrimp sushi stacks came to be. I wanted all the flavors of my favorite spicy shrimp roll, but without the pressure of rolling tight, even logs. Stacking everything in layers? Total game-changer. Plus, with a little creativity, these sushi stacks are endlessly customizable for any crowd – picky eaters, spice lovers, or anyone who just wants something different for a sushi party.
Not only do these spicy shrimp sushi stacks look gorgeous on a party platter, but they’re also packed with protein and fresh veggies. They’re perfect for sushi lovers who want a fun, interactive appetizer or even a light dinner. As someone who’s made these more times than I can count (and tweaked the recipe every time), I can promise you – they’re as reliable as they are delicious. Whether you’re a total sushi rookie or a seasoned home chef, you’ll find these stacks ridiculously satisfying and a total crowd-pleaser.
Why You’ll Love This Recipe
There are so many reasons I keep coming back to these spicy shrimp sushi stacks. They combine everything I adore about sushi – bold flavors, fresh textures, and a little bit of heat – but with a playful, stackable twist. Here’s why you’ll be obsessed too:
- Quick & Easy: These come together in about 30 minutes (seriously!), making them perfect for busy weeknights or spontaneous sushi cravings.
- Simple Ingredients: No hard-to-find pantry items here. You probably have most things on hand, and the rest are at your local grocery store.
- Perfect for Parties: Whether it’s a sushi party, a potluck, or a fun family dinner, these sushi stacks are a guaranteed hit. They look beautiful and taste even better.
- Crowd-Pleaser: My friends and family always rave about these stacks. Kids love the layers, and adults love the bold flavors.
- Unbelievably Delicious: The creamy-spicy shrimp, tangy rice, and crisp veggies are pure comfort food with a fresh, mouthwatering twist.
What really sets these spicy shrimp sushi stacks apart? I blend the shrimp with a creamy sriracha-mayo, giving every bite a deep, satisfying heat without being overwhelming. The layers hold together perfectly, and you get that lovely balance of cool cucumber, rich avocado, and savory sushi rice. And unlike regular sushi rolls, there’s no rolling drama – just simple stacking (even my toddler helps with assembly sometimes).
These aren’t just “good.” They’re the kind of appetizer that makes people stop and savor the moment. They taste like your favorite sushi roll but with more texture and a wow-factor presentation. Honestly, I think they’re even better for parties because you can make a bunch ahead of time, and everyone gets their own cute, stackable serving. They’re lighter than deep-fried appetizers, too, so you can enjoy more than one!
What Ingredients You Will Need
This spicy shrimp sushi stacks recipe is all about simple, fresh ingredients coming together for one seriously tasty dish. Here’s what you’ll need – and a few personal notes to help you get the best results every time:
- Sushi Rice (1 cup uncooked, about 200 g): Short-grain Japanese rice is a must for that sticky, chewy texture. I like Nishiki brand, but any sushi rice will do.
- Rice Vinegar (2 tbsp / 30 ml): This adds tang and a touch of sweetness to the rice. Don’t skip it – it’s essential for “sushi” flavor.
- Sugar (1 tbsp / 12 g): Just enough to balance out the vinegar.
- Salt (1/2 tsp / 3 g): For seasoning the rice.
- Cooked Shrimp (8 oz / 225 g, peeled & deveined): I use medium shrimp (31-40 count). You can use larger and chop, or even buy pre-cooked for speed.
- Mayonnaise (3 tbsp / 45 g): Kewpie mayo is my favorite for its richness, but regular mayo works just fine.
- Sriracha (1-2 tbsp / 15-30 ml, to taste): Adjust the heat level to your liking. I like it spicy, but you do you!
- Soy Sauce (1 tbsp / 15 ml): For extra umami in the shrimp layer.
- English Cucumber (1 small, diced): Adds crunch and freshness. Persian cucumbers work too.
- Avocado (1 large, sliced or diced): Creamy and rich – I pick slightly firm avocados so the stacks hold better.
- Nori Sheets (2-3 sheets, cut into small squares): For that classic sushi flavor. I use roasted nori and snip it with kitchen scissors.
- Green Onion (2, thinly sliced): For garnish and mild onion flavor.
- Sesame Seeds (1 tbsp / 10 g, toasted): Black or white – they add a nutty crunch. Toast them in a dry pan for best flavor.
- Optional Add-Ins: Pickled ginger, wasabi, or even diced mango for a sweet flair. (I sometimes add a little mango for a tropical kick – trust me, it works!)
If you need to swap ingredients, go ahead! Use cooked crab instead of shrimp, swap sriracha for another chili sauce, or choose brown rice for a whole-grain spin. For gluten-free, just use tamari instead of soy sauce and double-check your sriracha.
One more tip: If you can’t find sushi rice, arborio (risotto) rice works in a pinch – it’s sticky enough. And if you want to keep things super light, you can use cauliflower rice (just steam and season it a bit).
Equipment Needed

You really don’t need a sushi chef’s toolkit for these spicy shrimp sushi stacks. Here’s what I use (and a few swaps if you’re working with what’s in your kitchen):
- Measuring Cups & Spoons: For accuracy – especially with rice and liquids.
- Small Saucepan: To cook the sushi rice. If you’ve got a rice cooker, that’s even better (push a button and walk away!).
- Mixing Bowls (2-3): For the shrimp mixture, rice seasoning, and prepping veggies.
- Sharp Knife & Cutting Board: For dicing cucumber, slicing avocado, and chopping shrimp if needed.
- Kitchen Scissors: To cut nori sheets into tidy squares. (Optional, but makes life easier.)
- Measuring Jug or Small Bowl: For mixing the vinegar, sugar, and salt for the rice.
- Muffin Tin or Round Food Rings: This is my secret weapon! Use a muffin tin to shape the stacks, or food rings for perfectly round layers. No rings? Use a clean, empty tuna can with both ends removed.
- Plastic Wrap: To help remove the stacks from molds cleanly.
- Small Frying Pan: For toasting sesame seeds (you can do this in the oven too).
If you don’t have food rings, don’t sweat it – the muffin tin trick works like a charm. And for an eco-friendly swap, use silicone muffin cups (they pop right out). Rinse your rice cooker right after use to keep it in good shape – sticky rice can be stubborn.
Preparation Method
-
Cook the Sushi Rice:
Rinse 1 cup (200 g) sushi rice under cold water until the water runs clear (this removes excess starch and keeps things from getting gummy). Add the rinsed rice to a small saucepan with 1¼ cups (300 ml) water. Bring to a boil, then cover, reduce heat to low, and simmer for 18 minutes. Remove from heat, let it sit (covered) for 10 minutes.
Tip: Don’t peek while cooking! Steam is your friend here. -
Season the Rice:
While the rice is resting, combine 2 tbsp (30 ml) rice vinegar, 1 tbsp (12 g) sugar, and ½ tsp (3 g) salt in a small bowl. Microwave for 20 seconds or until the sugar dissolves. Gently fold this mixture into the hot rice with a spatula, being careful not to mash the grains. Let cool to room temp.
Prep Note: If the rice is too hot, it can wilt your veggies, so give it a little time. -
Prepare the Spicy Shrimp:
Chop 8 oz (225 g) cooked shrimp into bite-sized pieces. In a bowl, mix 3 tbsp (45 g) mayo, 1-2 tbsp (15-30 ml) sriracha (to taste), and 1 tbsp (15 ml) soy sauce. Add the shrimp and toss until well coated. Set aside.
Warning: If your shrimp is still warm, cool it before mixing or the mayo can separate. -
Prep the Veggies & Nori:
Dice 1 small English cucumber and 1 large avocado. Cut nori sheets into squares the size of your molds. Thinly slice 2 green onions. Toast 1 tbsp (10 g) sesame seeds in a dry pan over medium heat for 2-3 minutes, stirring often.
Tip: Use a squeeze of lemon on the avocado to keep it green. -
Assemble the Stacks:
Line a muffin tin or food ring with plastic wrap for easy removal. Layer as follows:- Bottom: 1-2 tbsp seasoned sushi rice, gently pressed in.
- Next: A layer of diced cucumber (about 1 tbsp).
- Then: A layer of avocado (about 1 tbsp), gently pressed.
- Top: 2 tbsp spicy shrimp mixture.
- Finish: Place a square of nori on top.
Press gently after each layer for neat stacks. Chill stacks for 5-10 minutes to help them set.
-
Unmold and Garnish:
Carefully lift the stacks from the molds using the plastic wrap. Flip onto a plate so the nori is at the bottom. Sprinkle with toasted sesame seeds and sliced green onion.
Sensory Cue: The stacks should hold together but be tender – not stiff or mushy. -
Serve:
Serve immediately with extra sriracha, soy sauce, or pickled ginger on the side. (I sometimes drizzle a little extra spicy mayo over the top for drama!)
If your stacks fall apart, press the layers a bit more firmly next time, or chill a little longer. If your rice is too sticky, wet your fingers lightly to press it in place.
Cooking Tips & Techniques
Through lots of trial and error (and a few sushi stack disasters), I’ve picked up some helpful tricks for flawless spicy shrimp sushi stacks every time:
- Rice Texture: Sushi rice that’s too wet will make the stacks slide apart. If you’re unsure, let the rice cool a bit uncovered so extra moisture evaporates.
- Mold Matters: Press gently, but don’t squish! Too much pressure makes dense stacks; too little and they’ll fall apart. You want layers to stick but still look distinct.
- Ingredient Prep: Cut everything to a similar size for even layers. It makes the stacks more stable and prettier too.
- Keep It Cold: If your kitchen is warm, chill the shrimp mixture before assembling. This helps the mayo stay creamy and not runny.
- Don’t Over-Sauce: It’s tempting to add more spicy mayo, but too much makes the shrimp slide. A thin, even coating is perfect.
- Toasting Sesame Seeds: Always toast them fresh for best flavor. Watch closely – they burn fast!
- Batch Assembly: Set up an assembly line and do all the rice layers at once, then the cucumbers, and so on. It makes things much faster (and less messy).
- Serving Time: Sushi stacks are best eaten within a couple hours. If you want to prep ahead, make all components, then assemble just before serving.
Once, I tried to rush the process and didn’t let my rice cool enough – the avocado turned brown, and everything looked a bit sad. Lesson learned! Take those extra few minutes for chilling. And don’t be afraid to get creative with garnishes – a sprinkle of shichimi togarashi or a drizzle of eel sauce can really wow your guests.
Variations & Adaptations
One of the best things about spicy shrimp sushi stacks is how easy they are to customize. Here are some fun ways to change things up:
- Low-Carb/Keto: Use steamed cauliflower rice instead of sushi rice. It’s lighter but still gives you that layered vibe. Just season it a bit more aggressively since it’s blander than rice.
- Vegetarian: Swap the shrimp for diced marinated tofu or cooked tempeh. Or try a spicy egg salad for a different protein punch.
- Extra Crunch: Add a layer of crispy fried onions or tempura flakes (tenkasu) between the avocado and shrimp for a little crunch.
- Allergen-Friendly: For gluten-free, use tamari instead of soy sauce and double-check your sriracha. For egg-free, use vegan mayo.
- Seasonal Flavor: In summer, I sometimes add diced mango or pineapple for a sweet, tangy contrast to the spicy shrimp.
- Different Cooking Methods: Try grilling the shrimp with a light brush of soy sauce for a smoky flavor before chopping and mixing. It adds another layer of depth.
Once, I swapped the shrimp for leftover grilled salmon and it was just as tasty (maybe even better). Don’t be afraid to riff on the basics and make these stacks your own!
Serving & Storage Suggestions
Serve your spicy shrimp sushi stacks chilled or at cool room temperature – they’re freshest that way. I love arranging them on a big platter with a sprinkle of extra sesame seeds and a little pile of pickled ginger in the center for color.
These stacks pair perfectly with a crisp green salad or some miso soup for a complete sushi party spread. For drinks, chilled sake, sparkling water with lime, or a light lager all work beautifully.
To store, cover leftover stacks tightly with plastic wrap and refrigerate for up to 24 hours. The avocado might brown a bit, but a squeeze of lemon helps. Rice will harden in the fridge, so for best texture, let stacks sit at room temp for 15 minutes before serving. I don’t recommend freezing these – the texture just isn’t the same after thawing.
If you’re reheating leftovers (though honestly, they’re best cold), do so very gently in the microwave – 10 seconds at a time just to take the chill off. The flavors meld overnight, so don’t be surprised if they taste even more savory the next day.
Nutritional Information & Benefits
Each spicy shrimp sushi stack (based on 8 stacks per batch) contains approximately:
- Calories: 180
- Protein: 10g
- Fat: 7g
- Carbohydrates: 18g
- Fiber: 2g
Shrimp is a low-calorie, high-protein seafood packed with selenium and vitamin B12. Avocado brings heart-healthy fats and fiber, while cucumber and nori add vitamins and minerals. These stacks are naturally gluten-free if you use tamari, and can be dairy-free with the right mayo.
If you’re watching sodium, use low-sodium soy sauce and go easy on the added salt. Personally, I love these stacks as a lighter sushi option – they’re filling, energizing, and don’t leave me sluggish like fried appetizers sometimes do.
Conclusion
If you’re looking for a showstopping, delicious, and surprisingly easy sushi party appetizer, these spicy shrimp sushi stacks are your answer. They’re playful, fresh, and just spicy enough to keep things interesting.
Don’t be afraid to mix up the layers based on what you love or what’s in the fridge – honestly, that’s half the fun. Whether you make them for a special occasion or just a Tuesday night treat, I hope you fall in love with these as much as I have.
If you give this spicy shrimp sushi stacks recipe a try, let me know in the comments how it went! Share your own twists, tag your sushi stack creations, or send this recipe to a friend who needs a little sushi joy. Here’s to more fun, flavor-packed, and stress-free sushi nights!
FAQs About Spicy Shrimp Sushi Stacks
Can I make spicy shrimp sushi stacks ahead of time?
Yes! Prep all the ingredients ahead and assemble up to 2 hours before serving. Keep them covered and chilled for best freshness.
What can I use instead of shrimp?
You can use cooked crab, grilled salmon, marinated tofu, or even cooked chicken for a different protein. Just chop and season as you would the shrimp.
Are these sushi stacks gluten-free?
They can be! Use tamari in place of soy sauce and double-check your other ingredients (like sriracha and mayo) for hidden gluten.
How spicy are these stacks?
The spice level is up to you! Add less sriracha for a milder stack, or more for extra heat. You can always serve extra hot sauce on the side.
Can I use brown rice instead of sushi rice?
Yes, but cook it until sticky and season well. The texture will be a bit different, but it’s a great whole-grain option for these spicy shrimp sushi stacks.
PrintSpicy Shrimp Sushi Stacks
These Spicy Shrimp Sushi Stacks are a playful, no-roll sushi appetizer featuring layers of creamy spicy shrimp, seasoned sushi rice, crisp cucumber, and avocado. Perfect for parties or a fun dinner, they deliver all your favorite sushi bar flavors in an easy, stackable form.
- Prep Time: 20 minutes
- Cook Time: 18 minutes
- Total Time: 38 minutes
- Yield: 8 stacks 1x
- Category: Appetizer
- Cuisine: Japanese
Ingredients
- 1 cup uncooked sushi rice (about 200 g)
- 1 1/4 cups water
- 2 tablespoons rice vinegar
- 1 tablespoon sugar
- 1/2 teaspoon salt
- 8 ounces cooked shrimp, peeled and deveined
- 3 tablespoons mayonnaise (preferably Kewpie or regular)
- 1–2 tablespoons sriracha, to taste
- 1 tablespoon soy sauce (or tamari for gluten-free)
- 1 small English cucumber, diced
- 1 large avocado, sliced or diced
- 2–3 nori sheets, cut into small squares
- 2 green onions, thinly sliced
- 1 tablespoon toasted sesame seeds (black or white)
- Optional: pickled ginger, wasabi, diced mango
Instructions
- Rinse the sushi rice under cold water until the water runs clear. Add to a small saucepan with 1 1/4 cups water. Bring to a boil, cover, reduce heat to low, and simmer for 18 minutes. Remove from heat and let sit, covered, for 10 minutes.
- While rice rests, combine rice vinegar, sugar, and salt in a small bowl. Microwave for 20 seconds or until sugar dissolves. Gently fold into the hot rice. Let rice cool to room temperature.
- Chop cooked shrimp into bite-sized pieces. In a bowl, mix mayonnaise, sriracha, and soy sauce. Add shrimp and toss to coat. Set aside.
- Dice cucumber and avocado. Cut nori sheets into squares sized to your molds. Thinly slice green onions. Toast sesame seeds in a dry pan over medium heat for 2-3 minutes, stirring often.
- Line a muffin tin or food ring with plastic wrap. Layer 1-2 tablespoons seasoned sushi rice, then 1 tablespoon diced cucumber, 1 tablespoon avocado, and 2 tablespoons spicy shrimp mixture. Place a square of nori on top. Press gently after each layer. Chill stacks for 5-10 minutes.
- Carefully lift stacks from molds using plastic wrap. Flip onto a plate so nori is at the bottom. Sprinkle with toasted sesame seeds and sliced green onion.
- Serve immediately with extra sriracha, soy sauce, or pickled ginger on the side. Optionally, drizzle extra spicy mayo over the top.
Notes
For best results, let rice cool before assembling to avoid wilting veggies. Press layers gently but firmly for neat stacks. Use tamari for gluten-free. Stacks are best eaten within a couple hours; chill before serving for best texture. Customize with mango, pickled ginger, or swap proteins as desired.
Nutrition
- Serving Size: 1 stack
- Calories: 180
- Sugar: 2
- Sodium: 400
- Fat: 7
- Saturated Fat: 1
- Carbohydrates: 18
- Fiber: 2
- Protein: 10
Keywords: spicy shrimp sushi stacks, sushi appetizer, easy sushi, party appetizer, shrimp sushi, Japanese, sushi stack recipe, gluten-free sushi, no-roll sushi


