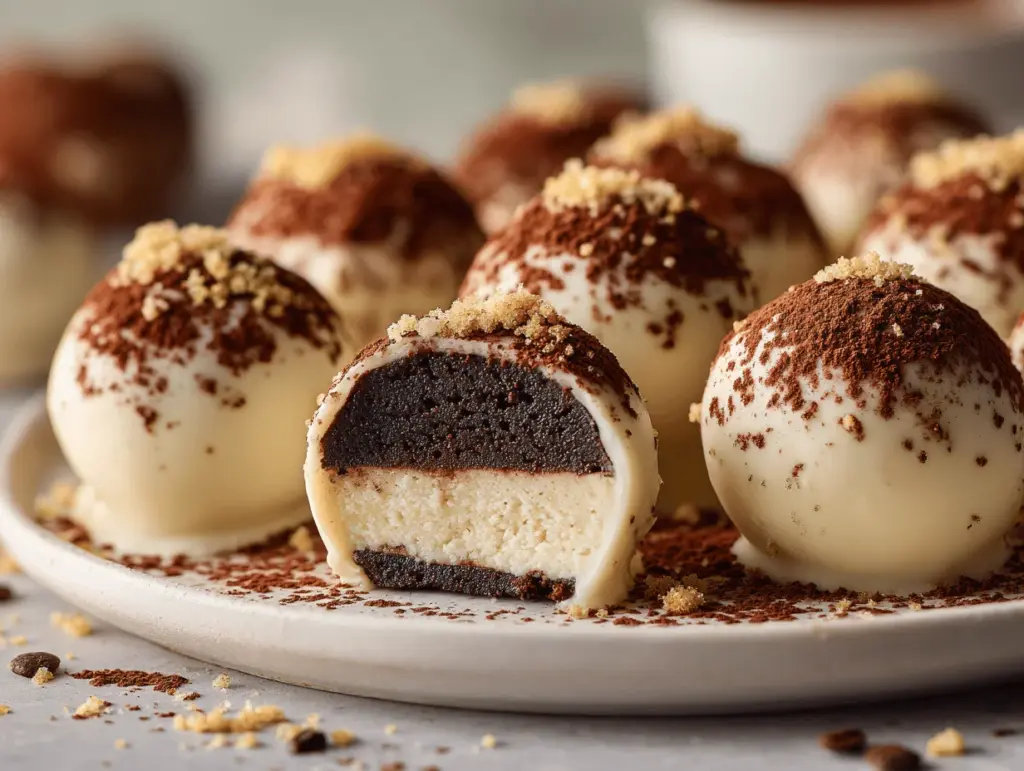
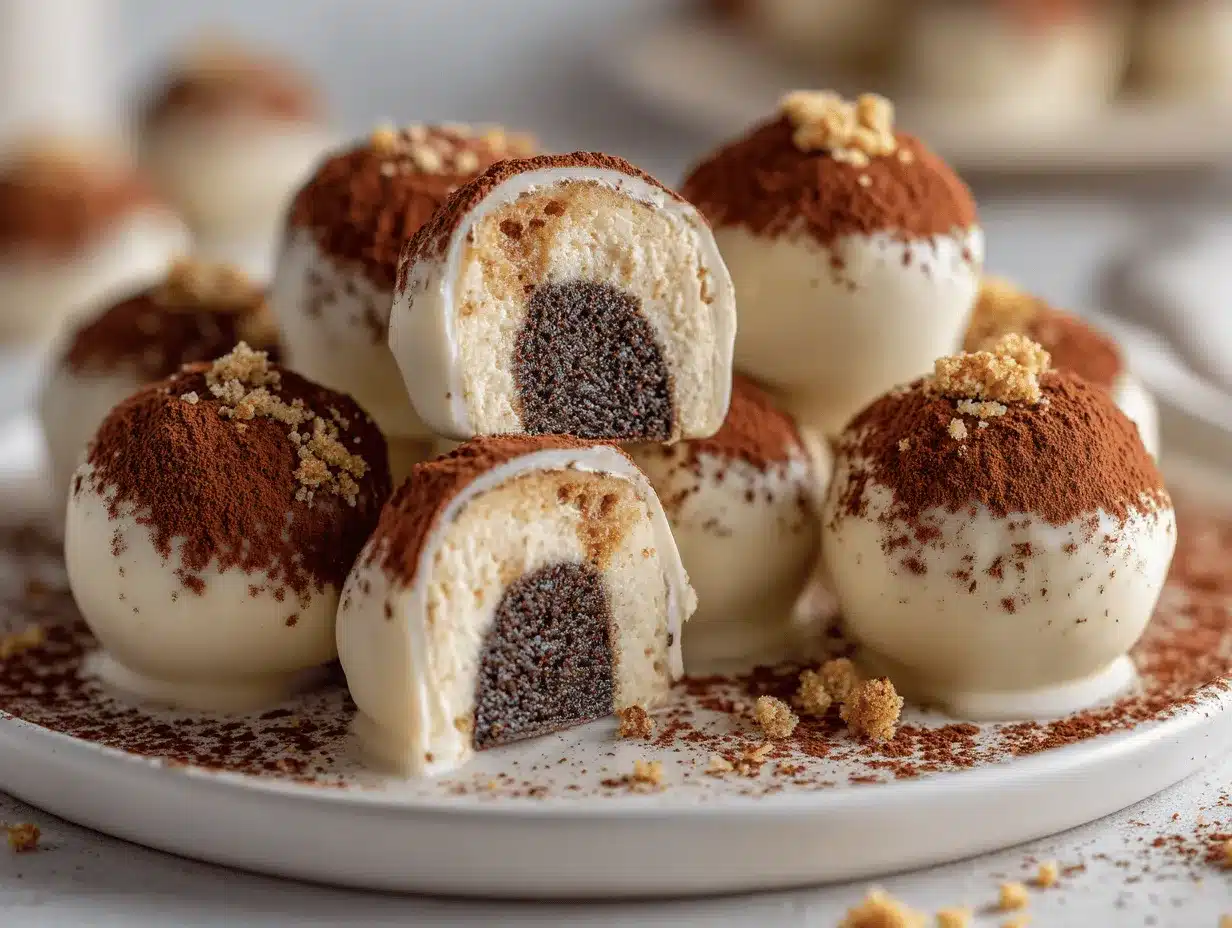
The first time I made tiramisu cheesecake truffles, the aroma of espresso wafted through my kitchen and, honestly, I felt like I’d been whisked away to a cozy Italian café. There’s something magical about the way cocoa powder dusts your fingers as you roll each truffle—messy, but so worth it! I’d been craving a dessert that packed all the creamy, boozy, coffee-kissed flavor of tiramisu, but in a bite-sized form. Let’s face it, sometimes you just want a treat you can pop in your mouth—no forks, no fuss.
This recipe for tiramisu cheesecake truffles started as an experiment during a holiday baking marathon. My cheesecake obsession collided with my love for classic tiramisu, and after a few tweaks (and a couple of sticky hands), these little wonders were born. They’re so easy to make, but always feel fancy—perfect for gifting, parties, or a late-night snack attack. I’ve brought these to potlucks and watched them disappear in minutes. Everyone wants the recipe, and I’m always happy to share my secrets.
If you’re a fan of Italian desserts, cheesecake, or just love anything dunked in chocolate and rolled in cocoa, you’re going to adore these tiramisu cheesecake truffles. They’re rich, creamy, and have a sneaky hint of espresso that makes them totally irresistible. Plus, they’re no-bake! I’ve tested this recipe more times than I can count (with plenty of taste tests along the way), and I’m excited for you to give it a try. Whether you’re making them for a crowd or just for yourself, these truffles deliver everything you love about tiramisu—minus the baking and the wait.
Why You’ll Love This Recipe
- Quick & Easy: You can whip up these tiramisu cheesecake truffles in under 30 minutes (plus chilling). Perfect for spontaneous sweet cravings or last-minute guests.
- Simple Ingredients: No need to hunt for specialty items—most ingredients are probably sitting in your fridge or pantry right now.
- Perfect for Entertaining: These truffles look elegant and taste luxurious, making them a hit at parties, baby showers, or even holiday gatherings.
- Crowd-Pleaser: The combination of creamy cheesecake and classic tiramisu flavors wins everyone over—kids and adults alike.
- Unbelievably Delicious: The texture is smooth and rich, with a melt-in-your-mouth center and a subtle crunch from the cocoa dusting.
What sets my tiramisu cheesecake truffles apart is the technique—blending softened cream cheese with mascarpone and infusing it with espresso and a splash of coffee liqueur. Trust me, using real mascarpone and a touch of Kahlúa makes all the difference. The filling is ultra-smooth, and the chocolate shell gives you a satisfying snap with every bite.
After testing the recipe with different ratios, I landed on a balance that’s not too sweet and not too heavy—just pure Italian-inspired indulgence. It’s the kind of dessert that’ll have you closing your eyes after the first taste. I’ve made these for both fancy occasions and casual movie nights; they always steal the show. They’re also perfect for gifting because they travel well and look impressive packed into a little box. If you’re looking for a treat that combines flavor and simplicity, these tiramisu cheesecake truffles are it!
What Ingredients You Will Need
This recipe uses simple, wholesome ingredients to deliver bold flavor and a creamy, satisfying texture—no oven required. Most items are pantry staples, and you can easily swap a few things based on what you have.
- Cream Cheese, softened (8 oz / 225g): The base for creamy texture. I like using full-fat for best flavor.
- Mascarpone Cheese (4 oz / 115g): Adds authentic tiramisu flavor. (If you can’t find it, double the cream cheese.)
- Powdered Sugar (1 cup / 120g): Sweetens and softens the filling.
- Espresso or Strong Coffee, cooled (2 tbsp / 30ml): Gives that classic tiramisu kick. (Instant espresso works in a pinch.)
- Kahlúa or Coffee Liqueur (1 tbsp / 15ml): Optional, but highly recommended for deeper flavor.
- Vanilla Extract (1 tsp / 5ml): Rounds out the flavors.
- Ladyfinger Cookies (about 8, crushed, 1 cup / 60g): Adds texture and echoes tiramisu’s signature layers. (Substitute with graham crackers if needed.)
- Dark Chocolate (8 oz / 225g): For dipping. I prefer 60-70% cacao for rich flavor.
- Coconut Oil (2 tsp / 10ml): Helps smooth out the melted chocolate and gives a glossy finish.
- Unsweetened Cocoa Powder (for dusting): That classic tiramisu touch. Dutch-processed is great for color.
Ingredient Tips:
- If you’re gluten-free, swap the ladyfingers for gluten-free vanilla wafers.
- Use dairy-free cream cheese and coconut cream for a vegan version. (Skip mascarpone or use a plant-based alternative.)
- For a nutty twist, add 2 tbsp (15g) finely chopped toasted hazelnuts.
- I always grab Philadelphia cream cheese and BelGioioso mascarpone for the best results, but store brands work too.
- Can’t find Kahlúa? A splash of rum or amaretto will work wonders.
All in all, this tiramisu cheesecake truffles recipe lets you mix and match with what’s in your pantry—just don’t skip the espresso!
Equipment Needed
- Mixing Bowls: At least two—one for the filling, one for the chocolate.
- Hand Mixer or Stand Mixer: For whipping the cheeses and sugar. (I’ve used a sturdy whisk in a pinch—just takes more muscle!)
- Spatula: For scraping down the sides and folding in ladyfingers.
- Baking Sheet: Lined with parchment paper for setting the truffles.
- Small Cookie Scoop or Spoon: Helps portion the filling evenly. (I use a mini ice cream scoop for perfect rounds.)
- Microwave-Safe Bowl: For melting chocolate. (If you have a double boiler, use that for extra control.)
- Forks or Dipping Tools: For dipping truffles in melted chocolate.
- Fine Mesh Sieve: To dust cocoa powder lightly and evenly.
If you don’t have a hand mixer, a whisk and some elbow grease will do. For dipping, two forks work just fine if you don’t own a fancy truffle tool. I’ve tried both, and honestly, messier tools make for more rustic-looking treats (which I love). When using nonstick baking sheets, cleanup is a breeze. If you’re on a budget, stick with the basics—no need for anything fancy here.
Preparation Method
- Make the Cheesecake Filling: In a large mixing bowl, add 8 oz (225g) cream cheese and 4 oz (115g) mascarpone. Beat on medium speed for about 2 minutes, until very smooth and creamy. Scrape down the sides as needed. The mixture should be lump-free and fluffy.
- Add Sweeteners and Flavor: Sift in 1 cup (120g) powdered sugar, then add 2 tbsp (30ml) cooled espresso, 1 tbsp (15ml) Kahlúa (or coffee liqueur), and 1 tsp (5ml) vanilla extract. Beat again for 1-2 minutes until fully combined. The filling will be soft but thick enough to hold its shape. If it feels runny, chill for 10 minutes before the next step.
- Fold in Ladyfingers: Crush about 8 ladyfinger cookies (about 1 cup / 60g) into fine crumbs. Gently fold them into the cheese mixture with a spatula. The crumbs should blend evenly so the mixture firms up and isn’t too sticky.
- Chill the Mixture: Cover the bowl and refrigerate for at least 30 minutes (or up to 2 hours). The filling must be cold and slightly firm before rolling. If you rush this step, the truffles may lose their shape when dipped in chocolate.
- Shape the Truffles: Using a small cookie scoop or spoon, portion the chilled mixture into 1-inch (2.5cm) balls. Roll gently between your palms to smooth out. You should get about 20-24 truffles. Place each ball on a parchment-lined baking sheet.
- Freeze Before Dipping: Freeze the truffles for at least 20 minutes. This helps them hold their shape while dipping and prevents melting.
- Melt the Chocolate: Place 8 oz (225g) dark chocolate and 2 tsp (10ml) coconut oil in a microwave-safe bowl. Microwave in 30-second bursts, stirring after each, until smooth and glossy. (Or use a double boiler for gentler melting.) If the chocolate thickens, add a touch more coconut oil.
- Dip the Truffles: Using a fork, dip each frozen truffle into the melted chocolate, letting excess drip off. Place back on the parchment sheet. If chocolate pools at the bottom, don’t panic—it makes a nice “foot.”
- Dust with Cocoa: While the chocolate is still slightly tacky (not fully set), sift unsweetened cocoa powder over each truffle using a fine mesh sieve. This gives that signature tiramisu look and a hint of bitterness.
- Final Chill: Refrigerate the dipped truffles for another 30 minutes, or until the chocolate is firm. They’re ready to serve!
Preparation Notes: If your filling feels too soft to roll, chill it longer. For sticky hands, dust your palms lightly with powdered sugar. If your chocolate seizes, add a little coconut oil to loosen it up. The smell of the coffee and chocolate is your cue that you’re on the right track!
Efficiency tip: I like to shape all the truffles first, freeze, then set up my dipping station for smooth assembly. It makes the process more fun and less stressful!
Cooking Tips & Techniques
- Use Room Temperature Cheeses: Softened cream cheese and mascarpone blend much better, preventing lumps. Cold cheese can make mixing a hassle.
- Don’t Skip the Chill: Chilling the mixture is crucial for shaping. If you skip it, you’ll end up with sticky blobs instead of neat truffles (been there, done that).
- Chocolate Dipping Tips: Always melt chocolate slowly—microwave in short bursts or use a double boiler. If your chocolate seizes, try adding coconut oil or butter.
- Multitasking Trick: Shape all your truffles while the chocolate melts. That way, you’re not waiting around for one thing to finish before starting another.
- Consistency is Key: Use a cookie scoop for uniform truffles. It not only looks pro, but they’ll chill and dip evenly.
I’ve made the mistake of rushing the chilling process, thinking I could save time—spoiler, it just makes things messier! The cocoa dusting is best done while the chocolate is slightly sticky; otherwise, it won’t adhere as well. If you want extra crunch, roll the finished truffles in crushed nuts or sprinkle with espresso powder for a flavor punch. For an ultra-smooth chocolate shell, make sure your truffles are frozen before dipping.
These tiramisu cheesecake truffles are forgiving, though. If your chocolate coating isn’t perfect, a dusting of cocoa hides a multitude of sins! The trickiest part is not eating them all before sharing. Once you get the hang of the process, you’ll be making these on repeat for every occasion.
Variations & Adaptations
- Gluten-Free: Swap out the ladyfingers for gluten-free vanilla wafers or almond flour cookies. The texture stays lovely, and no one will know the difference.
- Vegan: Use dairy-free cream cheese and coconut cream instead of mascarpone. Skip the liqueur or use a vegan-friendly alternative.
- Seasonal Flavors: Add orange zest for a citrusy twist, or stir in 2 tbsp (15g) finely chopped dark chocolate for extra richness. In summer, try rolling in toasted coconut instead of cocoa powder.
- Alcohol-Free: Replace Kahlúa with extra espresso or a splash of vanilla syrup for a family-friendly treat.
- Nutty Crunch: Roll finished truffles in chopped pistachios or hazelnuts for texture and flavor.
I’ve tried swapping the ladyfingers with chocolate wafer cookies when I was out of the classic kind—honestly, it turned out amazing! You can play with the filling, too—add a pinch of cinnamon or cardamom for warmth. For a deeper coffee kick, sprinkle the finished truffles with instant espresso powder. There’s plenty of room to make these your own, so don’t be afraid to experiment!
Serving & Storage Suggestions
Serve tiramisu cheesecake truffles chilled, right out of the fridge. They’re perfect on a pretty platter with a dusting of extra cocoa powder. For a party, arrange them in mini cupcake liners—they look adorable and stay neat. Pair with strong espresso or a glass of dessert wine for a real treat.
Store leftovers in an airtight container in the refrigerator for up to 5 days. The flavors actually deepen overnight, making them even more delicious the second day. If you want to freeze them, place in a single layer on a baking sheet until firm, then transfer to a zip-top bag. Freeze for up to 2 months. Thaw in the fridge before serving—don’t microwave, or the chocolate will sweat!
To reheat (if you must): let sit at room temperature for 10-15 minutes. These truffles are best cold, but if you prefer them a bit softer, just let them warm up for a few minutes. They’re great for lunchbox treats or as a sweet surprise in a care package.
Nutritional Information & Benefits
| Per Truffle (approx.) | Amount |
|---|---|
| Calories | 110 |
| Protein | 2g |
| Fat | 7g |
| Carbohydrates | 10g |
| Sugar | 7g |
These tiramisu cheesecake truffles are a little indulgent, but not over-the-top. Cream cheese and mascarpone supply calcium and some protein, while dark chocolate offers antioxidants. If you use gluten-free or vegan subs, they fit most dietary needs (just check labels for allergens). The biggest potential allergens here are dairy and gluten, so adjust as needed.
Honestly, I love that a couple of these satisfy my sweet tooth without making me feel stuffed. They’re a smart way to enjoy dessert in moderation and bring a bit of Italian café flair to your day!
Conclusion
These tiramisu cheesecake truffles are proof that you don’t need fancy equipment or hours in the kitchen to make an unforgettable dessert. With creamy, coffee-infused filling and a snappy chocolate shell, every bite is like a mini celebration. They’re perfect for impressing friends, spoiling yourself, or bringing a touch of Italy to any occasion.
Feel free to tweak the recipe—use orange zest, swap the liqueur, or roll in nuts. The best desserts are the ones you make your own! Personally, I love these because they remind me of family gatherings and café visits. There’s something comforting about a treat you can eat with your fingers, no plate required.
If you try these tiramisu cheesecake truffles, leave a comment, share your twist, or pin this recipe for later. I promise your kitchen will smell amazing, and your taste buds will thank you. Happy truffle-making!
FAQs
Can I make tiramisu cheesecake truffles without ladyfingers?
Absolutely! Substitute with graham crackers, vanilla wafers, or even shortbread cookies. The texture will be a bit different, but still delicious.
Do I have to use Kahlúa or coffee liqueur?
Nope! You can skip it or use extra espresso for a non-alcoholic version. A splash of vanilla syrup works too.
Can I freeze tiramisu cheesecake truffles?
Yes! Freeze them after dipping in chocolate, then store in a sealed bag for up to 2 months. Thaw in the fridge before serving.
How do I prevent my truffles from being too sticky to roll?
Make sure to chill the filling thoroughly before shaping. If it’s still sticky, dust your hands with powdered sugar or chill longer.
What chocolate is best for coating truffles?
I recommend dark chocolate (60-70% cacao) for a rich, balanced flavor. Milk chocolate works if you prefer something sweeter!
Pin This Recipe!

Tiramisu Cheesecake Truffles

These easy tiramisu cheesecake truffles combine creamy cheesecake, authentic tiramisu flavors, and a hint of espresso in a bite-sized, no-bake treat. Perfect for parties, gifting, or a late-night snack, they deliver all the indulgence of classic Italian dessert with minimal fuss.
- Prep Time: 20 minutes
- Cook Time: 0 minutes
- Total Time: 1 hour 30 minutes
- Yield: 20-24 truffles 1x
- Category: Dessert
- Cuisine: Italian
Ingredients
- 8 oz cream cheese, softened
- 4 oz mascarpone cheese
- 1 cup powdered sugar
- 2 tbsp espresso or strong coffee, cooled
- 1 tbsp Kahlúa or coffee liqueur (optional)
- 1 tsp vanilla extract
- 8 ladyfinger cookies (about 1 cup), crushed
- 8 oz dark chocolate (60-70% cacao)
- 2 tsp coconut oil
- Unsweetened cocoa powder, for dusting
Instructions
- In a large mixing bowl, beat cream cheese and mascarpone on medium speed for about 2 minutes until smooth and creamy.
- Sift in powdered sugar, then add cooled espresso, Kahlúa (if using), and vanilla extract. Beat for 1-2 minutes until fully combined.
- Crush ladyfinger cookies into fine crumbs and gently fold into the cheese mixture with a spatula.
- Cover the bowl and refrigerate for at least 30 minutes (or up to 2 hours) until the filling is cold and slightly firm.
- Using a small cookie scoop or spoon, portion the chilled mixture into 1-inch balls. Roll gently between your palms to smooth out. Place each ball on a parchment-lined baking sheet.
- Freeze the truffles for at least 20 minutes to help them hold their shape while dipping.
- Melt dark chocolate and coconut oil in a microwave-safe bowl in 30-second bursts, stirring after each, until smooth and glossy. (Or use a double boiler.)
- Using a fork, dip each frozen truffle into the melted chocolate, letting excess drip off. Place back on the parchment sheet.
- While the chocolate is still slightly tacky, sift unsweetened cocoa powder over each truffle using a fine mesh sieve.
- Refrigerate the dipped truffles for another 30 minutes, or until the chocolate is firm. Serve chilled.
Notes
For gluten-free, substitute ladyfingers with gluten-free vanilla wafers. For vegan, use dairy-free cream cheese and coconut cream instead of mascarpone. Chill the filling thoroughly for easy rolling. Dust hands with powdered sugar if mixture is sticky. Use a cookie scoop for uniform truffles. Truffles can be frozen for up to 2 months.
Nutrition
- Serving Size: 1 truffle
- Calories: 110
- Sugar: 7
- Fat: 7
- Carbohydrates: 10
- Protein: 2
Keywords: tiramisu, cheesecake truffles, Italian dessert, no-bake, chocolate, espresso, party treats, easy dessert, bite-sized, holiday baking


