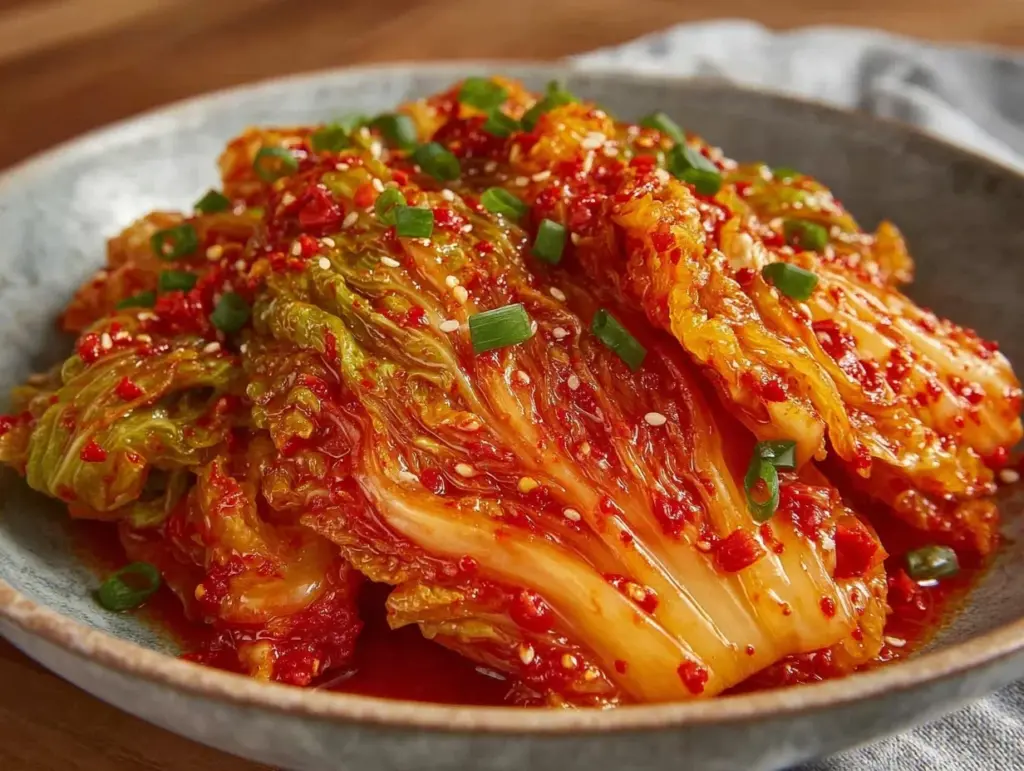
The sharp, spicy tang of homemade kimchi is something that sticks with you—honestly, it’s like a punch of vibrant flavor that wakes up your taste buds. I still remember the first time I made this irresistible homemade kimchi; it was during a chilly weekend when I craved something bold and alive, something that could warm me from the inside out. You know that feeling when a dish not only tastes great but also carries a bit of history in every bite? That’s exactly what this easy authentic spicy kimchi brings to the table.
Kimchi isn’t just any side dish—it’s a staple in Korean cuisine that’s been around for centuries. What I love most about this homemade kimchi recipe is how you can tailor it just right, balancing spice and fermentation to your liking. Plus, it’s packed with probiotics and nutrients, which is a big win if you’re looking to add something healthy and flavorful to your diet. I’ve tested this recipe multiple times, adjusting the spice levels and fermentation times until I found that perfect blend of sour, spicy, and umami.
Whether you’re a kimchi newbie or a seasoned fermenter, this homemade kimchi recipe is straightforward enough to fit into your kitchen routine yet authentic enough to impress anyone familiar with Korean food. It’s a game-changer for busy families, adventurous eaters, or anyone wanting to add a little spice and culture to their meals. Ready to dive into making your own easy authentic spicy kimchi that you’ll absolutely love? Let’s get started.
Why You’ll Love This Recipe
After making kimchi the traditional way more times than I can count, this version stands out for so many reasons. Here’s why you’ll fall for this homemade kimchi recipe:
- Quick & Easy: While fermentation takes time, the prep itself comes together in under 45 minutes—no specialized equipment needed.
- Simple Ingredients: You won’t need to hunt down rare items; everything is pretty common, especially if you frequent an Asian market or have a well-stocked pantry.
- Perfect for Any Occasion: Whether it’s a casual weeknight dinner, a festive gathering, or a healthy snack, kimchi adds that spicy kick and gut-friendly goodness.
- Crowd-Pleaser: This recipe earns rave reviews from my family and friends—kids and adults alike love the bold flavors.
- Unbelievably Delicious: The balance of heat, sourness, and umami is spot on, making it incredibly addictive (seriously, you’ll find yourself sneaking bites).
What makes this kimchi different? I blend the chili flakes just right to get that authentic spicy depth without overpowering the cabbage’s natural crunch. Plus, I’ve included tips to ferment it perfectly every time, so you get that satisfying tang and fizz without fuss. This homemade kimchi is comfort food with a fiery twist—healthy, flavorful, and deeply satisfying.
What Ingredients You Will Need
This easy authentic spicy kimchi recipe uses straightforward ingredients that come together in harmony to create bold flavors and satisfying crunch. Here’s what you’ll need:
- Napa cabbage: 1 large head (about 2-3 lbs / 900-1350 g), the star of the show. Choose firm leaves with vibrant color.
- Coarse sea salt: 1/2 cup (120 g) for salting the cabbage, which helps draw out moisture and kickstarts fermentation.
- Water: 4 cups (950 ml), to make a brine for soaking the cabbage.
- Garlic cloves: 6 large, minced (adds a sharp, pungent flavor).
- Fresh ginger: 2 tablespoons, grated (for that warm, spicy undertone).
- Korean red pepper flakes (gochugaru): 1/4 cup (30 g) – this is key for authentic heat and color. I recommend the Jongga brand if you can find it.
- Fish sauce: 3 tablespoons, for umami depth (substitute with soy sauce for a vegetarian option).
- Green onions: 4 stalks, chopped into 1-inch pieces (for fresh, sharp notes).
- Carrot: 1 medium, julienned (adds sweetness and texture).
- Daikon radish: 1/2 cup, julienned (optional, but adds crunch).
- Sugar: 1 teaspoon (balances the flavors and helps fermentation).
Most of these ingredients are pantry staples or easy to find at an Asian grocery store. The key is fresh produce and good-quality Korean chili flakes. If you want to experiment, you can swap daikon with turnip or add a bit of apple for sweetness. Remember, the salt type matters; coarse sea salt works best because it dissolves slowly and helps with crispiness.
Equipment Needed
Making homemade kimchi is surprisingly simple equipment-wise. Here’s what I use:
- Large mixing bowl: For salting and soaking the cabbage. Glass or stainless steel works best to avoid any reaction with the salt.
- Colander: To drain the cabbage after salting.
- Sharp knife: For chopping the vegetables precisely.
- Cutting board: Your prep base.
- Gloves: Optional but highly recommended when mixing the spicy kimchi paste – protects your hands from chili burn.
- Glass jar or fermentation container: Around 1-quart (1-liter) size with a tight lid. I prefer mason jars because they’re easy to clean and don’t react with acid.
- Small bowl: For mixing the kimchi paste ingredients.
If you don’t have a fermentation-specific jar, a regular glass jar with a loosely fitting lid works fine since kimchi produces gases during fermentation. Just remember to “burp” it daily to release pressure. I once tried fermenting kimchi in a plastic container and noticed a slight off-flavor, so I stick with glass now for the cleanest taste.
Detailed Preparation Method

- Prepare the cabbage: Cut the Napa cabbage lengthwise into quarters, then chop each quarter into 2-inch (5 cm) pieces. Place the cabbage in a large bowl.
- Salt the cabbage: Sprinkle the 1/2 cup (120 g) coarse sea salt evenly over the cabbage. Toss thoroughly to coat all pieces. Add 4 cups (950 ml) cold water to cover the cabbage and let it soak for 1.5 to 2 hours. Toss every 30 minutes to ensure even salting. This step draws out water and softens the leaves—essential for good fermentation.
- Rinse and drain: After soaking, rinse the cabbage 3 times under cold running water to remove excess salt. Drain well in a colander for about 20 minutes—excess water can dilute the kimchi flavor.
- Make the kimchi paste: In a small bowl, combine minced garlic, grated ginger, Korean red pepper flakes (gochugaru), fish sauce, and sugar. Stir well until it forms a thick paste. Adjust the chili flakes if you want it milder or hotter. The paste should be vibrant red and smell pungent and spicy.
- Prepare the vegetables: Julienne the carrot and daikon radish, and chop the green onions into 1-inch (2.5 cm) pieces.
- Mix everything: Wearing gloves, add the drained cabbage, prepared vegetables, and kimchi paste into a large bowl. Use your hands to massage the paste evenly into the cabbage and veggies, making sure every piece is coated. This can take about 5-7 minutes. The mixture should be sticky and spicy, with a deep red color.
- Pack into jar: Transfer the kimchi mixture tightly into a clean 1-quart (1-liter) glass jar. Press down firmly to remove air pockets and leave about 1 inch (2.5 cm) of space at the top for fermentation gases. Seal the jar with a lid.
- Ferment: Leave the jar at room temperature (around 68-72°F / 20-22°C) for 1-2 days, depending on how tangy you like your kimchi. You might want to “burp” it once a day to release gas. After the initial fermentation, move it to the refrigerator; flavors will continue to develop slowly over the next 1-2 weeks.
Pro tip: If you’re new to fermenting, start tasting the kimchi after 24 hours, then daily after that. You’ll notice the flavors shift from fresh and crisp to sour and funky—that’s the magic of fermentation!
Cooking Tips & Techniques
Making authentic homemade kimchi can seem intimidating, but these tips make it easier. Trust me, I’ve learned the hard way!
- Don’t skip the salting: It’s crucial for drawing out moisture and ensuring that crisp texture. If you rush this, your kimchi could turn out soggy.
- Use gloves: Mixing the chili paste by hand is the best method, but the chili flakes can burn your skin. Gloves save you from that fiery aftermath.
- Adjust spice levels carefully: Korean red pepper flakes vary in heat. Start with less if you’re unsure and add more next time.
- Press firmly when packing the jar: Removing air pockets helps create an anaerobic environment needed for fermentation and prevents mold.
- Temperature matters: Warmer temps speed fermentation, cooler temps slow it down. Keep your kimchi in a stable spot away from direct sunlight.
- Burp the jar daily: Fermentation creates gas buildup. Releasing it prevents jar explosions and keeps your kimchi safe.
- Patience pays off: Fermentation is a slow dance, not a race. Flavor deepens the longer you wait.
I once tried skipping rinsing after salting, and my kimchi was way too salty and overwhelmed the flavors. Lesson learned: rinse well but don’t overdo it. Also, if you notice any white film on top, it’s usually harmless yeast—just skim it off.
Variations & Adaptations
This homemade kimchi recipe is flexible and welcomes tweaks based on your taste or dietary needs.
- Vegetarian/Vegan option: Swap fish sauce for soy sauce or tamari, and omit shrimp paste if you decide to add it.
- Less spicy: Reduce gochugaru or replace half with sweet paprika for milder heat but good color.
- Extra crunchy: Add more daikon or shredded cabbage for texture lovers.
- Fermentation speed: For faster fermentation, keep the jar at warmer room temperature (just be careful not to go above 75°F / 24°C).
- Seasonal twist: In summer, toss in sliced cucumbers or fresh herbs like perilla leaves for a refreshing variation.
Personally, I once added a little grated pear to the paste—it brought a subtle sweetness that balanced the heat beautifully. Experimenting is part of the fun, and you’ll discover your own favorite spin on this classic.
Serving & Storage Suggestions
Kimchi is best enjoyed cold or at room temperature—straight from the fridge is perfect. Serve it as a side dish with rice, noodles, or grilled meats. It’s also fantastic stirred into fried rice, soups, or even on tacos for a spicy Korean twist.
Store your homemade kimchi in the refrigerator after the initial fermentation phase. Properly stored, it can last up to 3 months, though the flavor will continue to evolve and become more sour over time. I like to eat mine within the first month for that fresh, spicy kick.
When reheating kimchi dishes, add kimchi at the last minute to keep its crunch and vibrant flavor. If you want to enjoy it warm, try kimchi jjigae (kimchi stew) for a comforting meal.
Flavors deepen and meld the longer it sits, so don’t rush—it’s a slow process but totally worth it. Also, always use a clean utensil to scoop kimchi to avoid contamination.
Nutritional Information & Benefits
Homemade kimchi is not just tasty; it’s a powerhouse of nutrition. A typical serving (about 100 g / 3.5 oz) contains roughly 15-20 calories, minimal fat, and is rich in fiber, vitamins A, B, and C, plus minerals like calcium and iron.
The key benefit? Probiotics. Thanks to fermentation, kimchi is loaded with beneficial bacteria that support gut health and digestion. Plus, ingredients like garlic and ginger have natural anti-inflammatory and immune-boosting properties.
This recipe is naturally gluten-free and low-carb, making it a great addition for various diets. Just watch out for fish sauce if you have seafood allergies, and opt for substitutions as needed.
From my experience as someone who loves fermented foods, adding homemade kimchi to my meals has noticeably improved my digestion and added a burst of flavor that’s hard to beat.
Conclusion
Making your own irresistible homemade kimchi is easier than you think, and this easy authentic spicy recipe is a great place to start. It’s packed with bold flavors, gut-friendly benefits, and a satisfying crunch that keeps me coming back for more. Whether you’re new to fermenting or a kimchi fanatic, this recipe offers plenty of room to customize and make it your own.
I hope you give this recipe a try and enjoy the process as much as the results. Don’t be shy—experiment with spice levels and additions to find your perfect batch. When you do, come back and share your story or variations with me!
Happy fermenting, and here’s to adding a little fire and tradition to your kitchen!
FAQs About Homemade Kimchi
How long does it take to ferment kimchi?
Fermentation usually starts after 1-2 days at room temperature, but full flavor develops over 1-2 weeks in the fridge. You can taste it daily to find your preferred tanginess.
Can I use regular cabbage instead of Napa cabbage?
You can, but Napa cabbage is traditional and provides the right texture and flavor. Regular green cabbage works but will be crunchier and less tender.
Do I need special kimchi chili flakes?
Korean red pepper flakes (gochugaru) are best for authentic flavor and color. Other chili powders won’t give the same balance of heat and sweetness.
Is kimchi vegan-friendly?
Traditional kimchi uses fish sauce or shrimp paste, but you can make a vegan version by substituting with soy sauce or tamari and skipping seafood ingredients.
How should I store homemade kimchi?
Store kimchi in an airtight glass jar in the refrigerator after fermentation. It lasts up to 3 months and tastes better as it ages.
Pin This Recipe!

Homemade Kimchi Recipe Easy Authentic Spicy Kimchi You’ll Love

This easy authentic spicy kimchi recipe delivers a perfect balance of heat, sourness, and umami with a satisfying crunch. Packed with probiotics and nutrients, it’s a flavorful staple of Korean cuisine that you can easily make at home.
- Prep Time: 30 minutes
- Cook Time: 0 minutes
- Total Time: 1.5 to 2 hours prep plus 1-2 days fermentation
- Yield: About 4 cups kimchi (approximately 8 servings) 1x
- Category: Side Dish
- Cuisine: Korean
Ingredients
- 1 large head Napa cabbage (about 2–3 lbs / 900–1350 g)
- 1/2 cup coarse sea salt (120 g)
- 4 cups water (950 ml)
- 6 large garlic cloves, minced
- 2 tablespoons fresh ginger, grated
- 1/4 cup Korean red pepper flakes (gochugaru) (30 g)
- 3 tablespoons fish sauce (substitute soy sauce for vegetarian option)
- 4 green onions, chopped into 1-inch pieces
- 1 medium carrot, julienned
- 1/2 cup daikon radish, julienned (optional)
- 1 teaspoon sugar
Instructions
- Cut the Napa cabbage lengthwise into quarters, then chop each quarter into 2-inch pieces. Place the cabbage in a large bowl.
- Sprinkle 1/2 cup coarse sea salt evenly over the cabbage. Toss thoroughly to coat all pieces. Add 4 cups cold water to cover the cabbage and let it soak for 1.5 to 2 hours, tossing every 30 minutes.
- Rinse the cabbage 3 times under cold running water to remove excess salt. Drain well in a colander for about 20 minutes.
- In a small bowl, combine minced garlic, grated ginger, Korean red pepper flakes, fish sauce, and sugar. Stir well until it forms a thick paste.
- Julienne the carrot and daikon radish, and chop the green onions into 1-inch pieces.
- Wearing gloves, add the drained cabbage, prepared vegetables, and kimchi paste into a large bowl. Massage the paste evenly into the cabbage and veggies for 5-7 minutes until sticky and deep red.
- Transfer the kimchi mixture tightly into a clean 1-quart glass jar. Press down firmly to remove air pockets and leave about 1 inch of space at the top. Seal the jar with a lid.
- Leave the jar at room temperature (68-72°F) for 1-2 days to ferment, burping once a day to release gas. After initial fermentation, move to the refrigerator and let flavors develop over 1-2 weeks.
Notes
[‘Use coarse sea salt for best results as it dissolves slowly and helps with crispiness.’, ‘Wear gloves when mixing the chili paste to protect your hands from chili burn.’, ‘Burp the jar daily during fermentation to release gas and prevent explosions.’, ‘Rinse the cabbage well after salting to avoid overly salty kimchi.’, ‘Fermentation time can be adjusted based on desired tanginess; taste after 24 hours and daily thereafter.’, ‘If white film appears on top, it is usually harmless yeast; skim it off.’, ‘For vegetarian or vegan kimchi, substitute fish sauce with soy sauce or tamari.’, ‘Keep kimchi in a stable, cool place away from direct sunlight during fermentation.’]
Nutrition
- Serving Size: About 1/2 cup (100 g
- Calories: 1520
- Sugar: 1
- Sodium: 600
- Fat: 0.2
- Carbohydrates: 3
- Fiber: 2
- Protein: 1
Keywords: kimchi, homemade kimchi, spicy kimchi, fermented food, Korean recipe, easy kimchi, authentic kimchi, probiotic food


