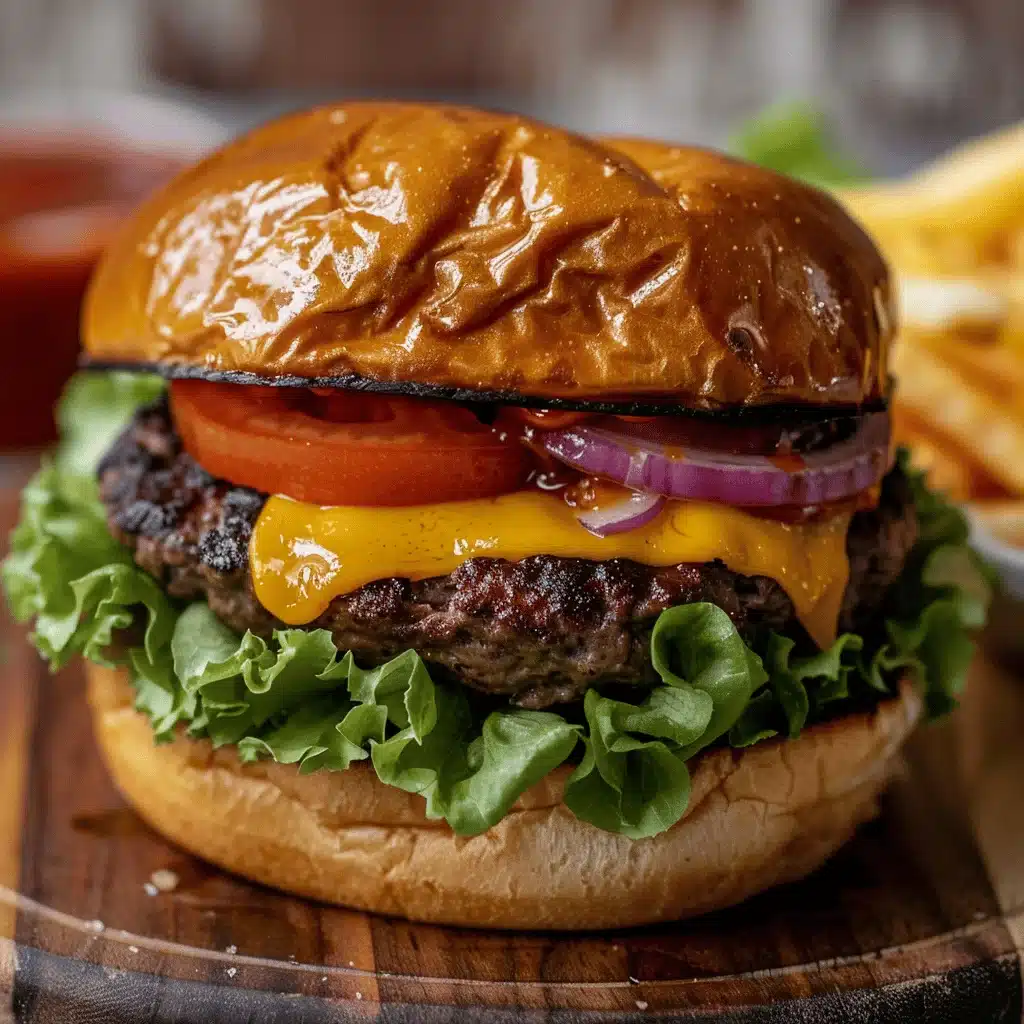
The sizzle of beef hitting a hot grill, the aroma of melted cheese, and the crunch of fresh toppings—there’s nothing quite like biting into the perfect cheeseburger. This classic cheeseburger recipe is my go-to for backyard barbecues, weeknight dinners, and whenever I’m craving juicy, loaded perfection. It’s simple, foolproof, and packed with flavor that’ll make you forget about takeout burgers forever.
I’ve been perfecting this recipe for years, tweaking the seasoning, experimenting with toppings, and mastering the balance between a tender patty and a toasted bun. Trust me when I say this burger is everything you want—juicy, flavorful, and customizable to fit your cravings. Whether you’re hosting friends or treating yourself to something indulgent, this cheeseburger is sure to hit the spot every single time.
Why You’ll Love This Recipe
- Juicy and Flavorful: These patties are seasoned to perfection and cooked to retain their juiciness. No dry burgers here!
- Easy to Make: This recipe uses simple techniques and ingredients you probably already have in your kitchen.
- Customizable: Load it up with your favorite toppings or keep it classic—this burger is your blank canvas.
- Perfect for Any Occasion: From casual weeknight dinners to summer BBQs, this cheeseburger shines every time.
- Kid-Friendly: Even picky eaters can’t resist a cheeseburger with their favorite toppings.
What makes this recipe stand out is its simplicity without sacrificing flavor. The patties are seasoned just enough to enhance the beef without overpowering it, and the toasted buns provide the perfect contrast to the tender, juicy burger. Every bite feels like a homemade masterpiece. Plus, you can personalize it to fit your preferences—whether you’re a bacon lover, an avocado enthusiast, or a purist who sticks to cheese and ketchup.
What Ingredients You Will Need
This recipe uses everyday ingredients that come together to create a mouthwatering burger. Here’s what you’ll need:
- Ground Beef (80/20): This ratio ensures the patties are juicy with just the right amount of fat for flavor.
- Salt and Pepper: The classic seasoning that lets the beef shine.
- Cheddar Cheese: Sharp or mild, the choice is yours. (Feel free to use your favorite cheese!)
- Burger Buns: Soft, slightly toasted buns are key for holding everything together.
- Butter: To toast the buns and add a subtle richness.
- Lettuce: Crisp iceberg or romaine for freshness.
- Tomato Slices: Juicy and thick for added texture.
- Pickles: Optional, but they add a tangy crunch.
- Onion: Raw, grilled, or caramelized—your choice!
- Ketchup, Mustard, and Mayo: Classic condiments to complement the burger.
Optional add-ons like bacon, avocado, or jalapeños can take your burger to the next level. And if you’re gluten-free, try using a lettuce wrap or gluten-free buns instead.
Equipment Needed
Making the perfect cheeseburger doesn’t require fancy tools, but a few essentials will help:
- Grill or Grill Pan: For that irresistible charred flavor.
- Spatula: A sturdy spatula makes flipping the patties easier.
- Mixing Bowl: To combine and shape the ground beef.
- Knife: Sharp enough to slice toppings neatly.
- Cutting Board: For prepping ingredients.
- Toaster or Pan: To toast the burger buns.
If you don’t have a grill, a cast-iron skillet works beautifully. And for the toasted buns, you can use a toaster or lightly butter them and toast in a pan.
Preparation Method

- Prepare the Patties: In a mixing bowl, gently combine 1 lb (450 g) of ground beef with 1 tsp salt and 1/2 tsp black pepper. Avoid over-mixing to keep the patties tender.
- Shape the Patties: Divide the beef into four equal portions and shape into 1/2-inch (1.3 cm) thick patties. Make a slight indentation in the center to prevent them from puffing up during cooking.
- Preheat the Grill: Heat your grill or skillet to medium-high. Lightly oil the grates or pan to prevent sticking.
- Cook the Patties: Place the patties on the grill and cook for 3–4 minutes per side for medium doneness. Add a slice of cheddar cheese to each patty during the last minute of cooking.
- Toast the Buns: Spread a thin layer of butter on the cut sides of the buns and toast them on the grill or in a pan until golden and slightly crisp.
- Assemble the Burger: Layer the bottom bun with lettuce, tomato, and onion. Add the patty with melted cheese, followed by pickles if desired. Spread condiments on the top bun and place it over the patty.
Serve immediately while the cheese is gooey and the bun is warm. Enjoy the masterpiece you’ve just created!
Cooking Tips & Techniques
- Don’t Over-Mix: Handle the ground beef gently to avoid tough patties.
- Indent the Patties: Pressing a dimple in the center ensures the patties cook evenly without bulging.
- Use Fresh Ingredients: Crisp lettuce, ripe tomatoes, and high-quality cheese make all the difference.
- Temperature Control: Medium-high heat prevents overcooking while creating a nice sear.
- Rest the Patties: Let the patties rest for a minute after cooking to retain juices.
Cooking cheeseburgers is part science, part art, and these tips will have you flipping burgers like a pro in no time.
Variations & Adaptations
- Low-Carb Option: Swap the bun for a lettuce wrap or keto-friendly bread.
- Spicy Kick: Add sliced jalapeños or drizzle hot sauce for extra heat.
- Vegetarian Adaptation: Replace the beef patty with a plant-based burger or portobello mushroom cap.
- Seasonal Twist: Experiment with seasonal toppings like grilled peaches or cranberry chutney.
One of my favorite tweaks is adding crispy bacon and a dollop of guacamole for a California-style burger—absolute heaven!
Serving & Storage Suggestions
Serving: Serve the cheeseburgers hot off the grill with a side of fries, onion rings, or a crisp green salad. Pair with a cold drink, like lemonade or a craft beer, for the ultimate meal experience.
Storage: Leftover patties can be stored in an airtight container in the refrigerator for up to 3 days. Reheat in a skillet over low heat or microwave in short bursts to avoid drying them out.
If freezing, wrap patties individually and store for up to 3 months. Thaw overnight in the fridge before reheating.
Nutritional Information & Benefits
Each cheeseburger (with toppings and bun) contains approximately:
- Calories: 450–500
- Protein: 25–30 g
- Carbohydrates: 30–35 g
- Fat: 20–25 g
Ground beef is an excellent source of protein and iron, while fresh veggies like lettuce and tomato provide vitamins and fiber. For a lighter option, use lean ground beef and whole-grain buns.
Conclusion
There’s something magical about a perfectly crafted cheeseburger—it’s comforting, satisfying, and endlessly customizable. This recipe delivers juicy patties, melty cheese, and fresh toppings that rival any restaurant burger. Once you make these at home, you’ll never want to settle for fast food again.
I hope this recipe becomes your new favorite for family dinners, BBQs, or any time you’re craving cheeseburger perfection. Let me know in the comments how you personalized your burger, and don’t forget to share this recipe with your friends. Happy cooking!
FAQs
Can I use lean ground beef?
Yes, but keep in mind that leaner beef may result in less juicy patties. You can add a tablespoon of olive oil or butter to compensate.
How do I keep the patties from falling apart?
Don’t over-mix the beef, and make sure the grill or pan is properly preheated to create a good sear.
Can I make this recipe gluten-free?
Absolutely! Use gluten-free buns or wrap the patty in lettuce leaves for a bun-free option.
What’s the best cheese for cheeseburgers?
Cheddar is a classic choice, but Swiss, American, or pepper jack work beautifully too.
Can I cook these patties in the oven?
Yes! Bake at 375°F (190°C) for about 20 minutes, flipping halfway through, until cooked to your desired doneness.
Pin This Recipe!