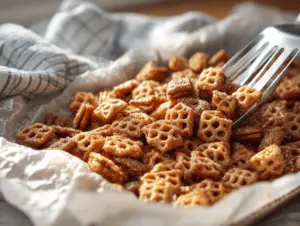
This is the kind of recipe that stops you in your tracks—the moment you walk into the kitchen and get hit with that unmistakable aroma of warm, cheesy goodness. Honestly, cheese puffs have always had a special place in my snack-loving heart. I remember the first time I tried making homemade cheese puffs: my hands were covered in flour, the oven timer was ticking, and the anticipation was real! When I pulled out that first batch, I couldn’t believe how golden, crisp, and pillowy they were. These cheese puffs are the answer to every party snack dilemma, late-night craving, or “just-because” baking moment. If you’ve ever wanted a snack that walks the line between comfort and crowd-pleaser, this cheese puffs recipe is it.
As someone who’s baked for family gatherings, kids’ birthday parties, and even impromptu movie nights, I can tell you this recipe gets requested on repeat. There’s something about the light, airy texture and that rich, cheesy flavor that makes these puffs disappear fast—so don’t be surprised if you’re left wishing you’d made a double batch. Cheese puffs aren’t just about the cheese (though, let’s be real, that’s most of the magic). It’s the way the dough comes together, the crackle of the crust, and the way every bite feels like a tiny celebration. Whether you’re a seasoned home baker or just dipping your toes into savory snacks, this cheese puffs recipe is simple, reliable, and totally addictive.
If you’re after a homemade snack that looks gorgeous on a Pinterest board and tastes even better than it looks, cheese puffs are your answer. I’ve tweaked and perfected this recipe over countless batches, and I’m excited to share all my tips, tricks, and cheesy secrets so you’ll get perfect puffs every time. Let’s get baking!
Why You’ll Love This Cheese Puffs Recipe
Let’s face it—snack time is sacred, and these cheese puffs are a snack you’ll find yourself craving again and again. After baking dozens of batches (sometimes with kids “helping” and sometimes in a rush), I can confidently say this recipe nails that perfect balance between ease and flavor. Here’s exactly why you’ll fall for these cheese puffs:
- Quick & Easy: Ready in under 45 minutes, no fancy techniques required. Perfect for busy weeknights, surprise guests, or those “I need a snack now!” moments.
- Simple Ingredients: Just pantry basics—flour, eggs, butter, and cheese. No weird or hard-to-find stuff. You’ve probably got everything on hand already!
- Party Appetizer Perfection: These cheese puffs shine at gatherings. I’ve seen them vanish at brunches, holiday parties, and even potlucks. They’re bite-sized, elegant, and always get compliments.
- Crowd-Pleaser: Both kids and adults can’t keep their hands off them. They’re not too spicy, not too bland—just the right amount of cheesy comfort.
- Unbelievably Delicious: Crisp outside, soft and airy inside, with layers of cheesy flavor in every puff. One bite and you get why homemade beats store-bought every time.
What sets my cheese puffs recipe apart? I use a little trick: mixing two types of cheese for depth (sharp cheddar plus Parmesan, anyone?) and cooking the dough (choux style) for that signature hollow, light texture. No dense or gummy puffs here! Whether you serve them solo, with dips, or jazzed up with spices, these cheese puffs are comfort food at its best—easy to make, hard to stop eating. Trust me, these are the cheese puffs you’ll want for every occasion, even if the “occasion” is just you and a cup of tea.
So, if you want a snack that’s reliable, flexible, and always delicious, this cheese puffs recipe is the one to bookmark—and share. Your snack game is about to get an upgrade (and your kitchen will smell amazing)!
What Ingredients You Will Need
This cheese puffs recipe is built on simple, honest ingredients that work together to create the fluffiest, cheesiest bites. No mystery ingredients here—just the good stuff. If you’re missing something, I’ve got you covered with easy swaps and tips. Here’s what you’ll need for the classic cheese puffs:
- For the Dough:
- 1 cup (240 ml) water
- 1/2 cup (115 g) unsalted butter (cubed for easier melting)
- 1/2 teaspoon salt (I like fine sea salt for even seasoning)
- 1 cup (125 g) all-purpose flour (sifted for lighter puffs)
- 4 large eggs (room temperature is best)
- For the Cheese:
- 1 cup (100 g) sharp cheddar cheese, grated (for bold flavor)
- 1/4 cup (25 g) grated Parmesan cheese (adds tangy, salty depth)
- Extra Flavor (Optional):
- 1/4 teaspoon cayenne pepper (for a subtle kick)
- 1/2 teaspoon garlic powder (if you want a savory twist)
- Fresh chives or parsley, finely chopped, for garnish
Ingredient Tips: For cheese, I always reach for block cheddar and hand-grate it—pre-shredded can be tempting but doesn’t melt as smoothly. Parmesan adds that irresistible savory note, but you can swap in Asiago or Gruyère if you want a different vibe. If you need these to be gluten-free, try a 1:1 gluten-free flour blend (I’ve had good results with Bob’s Red Mill).
If you’re dairy-free, there are some solid cheese alternatives out there—just make sure they melt well. For a little extra zing, add a pinch of smoked paprika or dried thyme. These ingredients are all about giving you flexibility and flavor, so don’t be afraid to experiment a bit. The base is classic, but the seasoning and cheese can be tailored to your taste (or whatever’s in your fridge right now!).
Equipment Needed
Making cheese puffs doesn’t require a fancy kitchen setup, honestly. Here’s what I use every time I whip up a batch:
- Medium saucepan: For melting butter and heating water—any sturdy pan will do.
- Wooden spoon or silicone spatula: You’ll want something sturdy for stirring the dough; wooden spoons work best for me.
- Mixing bowl: For beating in the eggs and mixing in cheese.
- Baking sheet: Line with parchment paper for easy cleanup (I use a rimmed sheet to prevent runaway puffs).
- Parchment paper or silicone baking mat: Keeps the puffs from sticking and gives a crisp bottom.
- Pastry bag (optional): For piping neat rounds, but honestly, a spoon works just fine if you’re not after perfection.
- Measuring cups and spoons: For accuracy (especially with flour and cheese).
- Wire cooling rack: Helps the puffs cool evenly without getting soggy.
I’ve made these with nothing more than a spoon and a bowl, but if you have a stand mixer with a paddle attachment, it can speed things up. For cleaning, I always soak the saucepan right after making the dough—choux dough can stick like glue if you wait too long. If you’re on a budget, skip the pastry bag and use a zip-top bag with the corner snipped off. Cheese puffs are forgiving, and the tools don’t need to be high-end!
Preparation Method

Ready for the step-by-step? Making cheese puffs might sound intimidating, but it’s honestly just a matter of following the process. Here’s my tried-and-true method:
- Preheat oven: Set your oven to 400°F (200°C). Line a baking sheet with parchment paper or a silicone mat.
- Make the dough base: In a medium saucepan, combine 1 cup (240 ml) water, 1/2 cup (115 g) unsalted butter, and 1/2 teaspoon salt. Bring to a boil over medium heat. When the butter has melted and the mixture is bubbling, add the flour all at once.
- Cook the dough: Stir vigorously with a wooden spoon until the mixture forms a ball and pulls away from the sides (about 1-2 minutes). It should look smooth and a bit shiny. Don’t worry if there’s a thin film at the bottom of the pan—totally normal!
- Cool slightly: Remove from heat and let the dough cool for 3-5 minutes. This prevents the eggs from scrambling when you add them. (The dough should be warm, not hot.)
- Add eggs: Add the eggs one at a time, mixing well after each addition. The dough will look separated and slippery at first—keep mixing until it’s smooth and glossy. You can add the eggs by hand, or use a mixer on low speed.
- Mix in cheese and seasonings: Stir in 1 cup (100 g) grated cheddar, 1/4 cup (25 g) Parmesan, and any optional seasonings (cayenne, garlic powder). The dough should be thick but pipeable.
- Shape the puffs: Transfer the dough to a pastry bag fitted with a large round tip, or just use a spoon. Pipe or dollop tablespoon-sized mounds onto the baking sheet, spacing about 1 inch (2.5 cm) apart. I get about 18-20 puffs per batch.
- Add garnish (optional): Sprinkle a little extra cheese or chopped herbs on top for color and flavor.
- Bake: Place in the oven and bake for 22-25 minutes, or until golden brown and puffed. Don’t open the oven door early—this can cause collapse!
- Check doneness: The puffs should feel light and hollow, with a crisp shell. If they look pale, give them a few more minutes. (I tap the bottom of one to check for a hollow sound.)
- Cool: Transfer to a wire rack and let cool for a few minutes. They’re best served warm, but room temperature works too.
Troubleshooting: If your cheese puffs don’t rise, double-check your oven temperature (use an external thermometer if possible). If the dough is too runny, add a tablespoon of flour and mix thoroughly. Dry, dense puffs usually mean overbaked or too much flour. For extra efficiency, measure everything before you start—the process moves fast. The dough should be sticky but hold its shape when piped or spooned.
Cooking Tips & Techniques
Here are a few tricks I’ve picked up after baking more cheese puffs than I care to admit:
- Don’t rush the dough: Cooking the flour in the butter-water mixture is key. Stir until you get a thick ball, not just a paste.
- Eggs matter: Room temperature eggs incorporate more smoothly. If you forget, just set them in warm water for 5 minutes.
- Cheese selection: Use block cheese and grate it yourself. Pre-shredded cheese often contains anti-caking agents and doesn’t melt as nicely.
- Watch oven temp: A too-cool oven means flat puffs. I always use an oven thermometer to double-check because built-in dials can be off.
- No peeking: Opening the oven door before the puffs set can make them deflate. Fight the urge!
- Multitasking tip: While the dough cools, grate your cheese and prep your eggs—you’ll save a minute or two.
- Consistency: The finished dough should be thick, glossy, and pipeable. Too thin? Add a little flour. Too thick? Beat in a tablespoon of water.
- Failures happen: My first batch ever collapsed—rookie mistake, I peeked too soon. If yours do, don’t toss them; they’re still tasty, just less pretty!
- Batch baking: If you’re making a double batch, bake one sheet at a time for best rise and color.
With these tips, you’ll get cheese puffs that are consistently light, golden, and bursting with cheesy flavor. Practice makes perfect—every batch teaches you something new!
Variations & Adaptations
Cheese puffs are the ultimate blank canvas for savory snacking. Here are some fun ways to switch things up:
- Gluten-Free Cheese Puffs: Swap all-purpose flour for a 1:1 gluten-free blend. I’ve had success with King Arthur and Bob’s Red Mill. The texture stays airy and delicious.
- Spicy Jalapeño Cheese Puffs: Add 1/4 cup finely diced jalapeño to the dough along with the cheese. For even more zing, toss in a pinch of smoked paprika.
- Herb & Garlic Cheese Puffs: Stir 1 tablespoon fresh chopped herbs (parsley, thyme, or chives) and 1/2 teaspoon garlic powder into the dough. The flavor is garden-fresh and perfect for springtime snacks.
If you want to use a different cheese, try Gruyère, Emmental, or even blue cheese for a bold variation. For a lower-carb option, use almond flour—just add an extra egg to help with structure. If you’re dairy-free, use your favorite melting vegan cheese and plant-based butter.
One variation I love is adding a sprinkle of everything bagel seasoning on top before baking—so good with soup! You can also pipe the dough into longer shapes for “cheese sticks.” Honestly, the possibilities are endless, so get creative and make this cheese puffs recipe your own.
Serving & Storage Suggestions
Cheese puffs are best served fresh out of the oven, when they’re warm and the cheese aroma fills the kitchen. I like to arrange them on a platter with fresh herbs for a pop of color. For parties, serve alongside dips like sour cream, salsa, or a spicy aioli. They pair beautifully with soups (think tomato or broccoli cheddar) and even cocktails—try them with sparkling wine for a fun twist!
To store, let the puffs cool completely and place them in an airtight container. They’ll stay fresh at room temperature for up to 2 days. For longer storage, freeze them in a single layer until solid, then transfer to a freezer bag. Reheat in a 350°F (175°C) oven for 5-8 minutes—this brings back their crispiness. Avoid microwaving, as it can make them tough.
As they sit, the flavors deepen and the texture becomes a little chewier (still tasty, just different). If you want to refresh day-old puffs, a quick oven blast does the trick. Leftovers rarely last in my house, but when they do, it’s nice to know they’re just as snackable the next day!
Nutritional Information & Benefits
Each cheese puff (based on a batch of 20) has roughly:
- Calories: 65
- Protein: 2.5 g
- Fat: 4.5 g
- Carbs: 4.2 g
- Sugar: 0.2 g
What makes this cheese puffs recipe a smart snack? The combo of protein from eggs and cheese gives satisfying energy, while the moderate fat keeps you full. If you use quality cheese, you get a hit of calcium and B vitamins. For gluten-free or low-carb diets, swapping the flour works well—just keep an eye on texture. Allergens to note: eggs, dairy, and wheat (unless you use substitutions). Personally, I love these as a post-workout treat or a party snack that won’t leave me sluggish. Balanced, tasty, and a little indulgent—just how snacks should be!
Conclusion
There’s something downright magical about homemade cheese puffs—the way they puff up in the oven, the golden crust, and that cheesy, savory aroma. This cheese puffs recipe is one I come back to again and again, whether I’m feeding a crowd or just treating myself. It’s easy, flexible, and always delivers big flavor with minimal fuss.
If you’re craving a snack that feels special but is simple enough for any day, give these a whirl. Feel free to tweak the cheeses, add your favorite seasonings, or experiment with shapes—there’s no wrong way to enjoy them. I love seeing how you make recipes your own, so don’t be shy: leave a comment, share your twists, or tag me with your cheese puff creations!
Thanks for baking along with me—here’s to snacks that make life a little more delicious, one cheesy bite at a time!
FAQs About Cheese Puffs Recipe
Can I make cheese puffs ahead of time?
Yes! Bake them, cool, and store in an airtight container. Reheat in the oven for a few minutes to refresh their crispiness before serving.
What’s the best cheese to use for cheese puffs?
Sharp cheddar and Parmesan are my favorites, but Gruyère, Emmental, or even a spicy pepper jack work well. Choose cheese that melts smoothly for best results.
Can I freeze cheese puffs?
Absolutely! Freeze baked puffs on a tray, then store in a freezer bag. Reheat straight from frozen in a 350°F (175°C) oven for 5-8 minutes.
Why did my cheese puffs deflate?
This usually happens if you open the oven door too early or underbake them. Make sure the oven is hot and bake until golden and firm.
How can I make these gluten-free?
Swap the flour for a gluten-free 1:1 baking blend. The texture is still light and puffy—just check for a slightly different dough consistency.
Pin This Recipe!

Cheese Puffs Recipe: Easy Homemade Snack for Perfect Party Appetizers

These homemade cheese puffs are light, airy, and packed with cheesy flavor—perfect for parties, snacks, or any occasion. With simple ingredients and a foolproof method, you’ll have golden, crisp, and pillowy puffs in under 45 minutes.
- Prep Time: 15 minutes
- Cook Time: 25 minutes
- Total Time: 40 minutes
- Yield: 18-20 cheese puffs 1x
- Category: Appetizer
- Cuisine: French
Ingredients
- 1 cup (240 ml) water
- 1/2 cup (115 g) unsalted butter, cubed
- 1/2 teaspoon salt
- 1 cup (125 g) all-purpose flour, sifted
- 4 large eggs, room temperature
- 1 cup (100 g) sharp cheddar cheese, grated
- 1/4 cup (25 g) Parmesan cheese, grated
- 1/4 teaspoon cayenne pepper (optional)
- 1/2 teaspoon garlic powder (optional)
- Fresh chives or parsley, finely chopped, for garnish (optional)
Instructions
- Preheat oven to 400°F (200°C). Line a baking sheet with parchment paper or a silicone mat.
- In a medium saucepan, combine water, butter, and salt. Bring to a boil over medium heat.
- Once the butter has melted and the mixture is bubbling, add the flour all at once.
- Stir vigorously with a wooden spoon until the mixture forms a ball and pulls away from the sides (about 1-2 minutes).
- Remove from heat and let the dough cool for 3-5 minutes until warm but not hot.
- Add eggs one at a time, mixing well after each addition until the dough is smooth and glossy.
- Stir in grated cheddar, Parmesan, and any optional seasonings (cayenne, garlic powder).
- Transfer dough to a pastry bag fitted with a large round tip, or use a spoon. Pipe or dollop tablespoon-sized mounds onto the baking sheet, spacing about 1 inch apart (makes 18-20 puffs).
- Sprinkle extra cheese or chopped herbs on top if desired.
- Bake for 22-25 minutes, or until golden brown and puffed. Do not open the oven door early.
- Puffs should feel light and hollow with a crisp shell. If pale, bake a few minutes longer.
- Transfer to a wire rack and let cool for a few minutes. Serve warm or at room temperature.
Notes
For best results, use block cheese and grate it yourself. Don’t open the oven door while baking to prevent collapse. Cheese puffs are best served fresh but can be reheated in the oven. For gluten-free, use a 1:1 gluten-free flour blend. You can freeze baked puffs and reheat straight from frozen.
Nutrition
- Serving Size: 1 cheese puff
- Calories: 65
- Sugar: 0.2
- Sodium: 110
- Fat: 4.5
- Saturated Fat: 2.5
- Carbohydrates: 4.2
- Fiber: 0.2
- Protein: 2.5
Keywords: cheese puffs, gougères, party appetizer, snack, easy cheese puffs, homemade cheese puffs, savory pastry, choux pastry, cheddar, parmesan, finger food