
It all started on a lazy Sunday afternoon when a last-minute text popped up from my neighbor: “Got a surprise potluck tonight—can you bring something snacky?” Honestly, my brain was already halfway to a nap, and the usual deviled eggs seemed too, well, ordinary. But I remembered this little twist I’d stumbled upon during a kitchen experiment gone sideways—turns out, frying deviled eggs until they’re crispy on the outside is a game changer. And bacon? Fresh chives? They just sealed the deal.
I was skeptical at first—fried deviled eggs? Sounds odd, right? But giving these a try felt like the perfect way to impress without hours of work. I whipped up a batch, frying them until golden and crispy, topping each with crunchy bacon bits and a sprinkle of fresh chives. The first bite was a surprise: creamy and tangy inside, with that addictive crunch outside, plus the smoky bacon flavor tying it all together. Everyone at the potluck kept asking where I got the recipe, and honestly, I had to laugh. Sometimes the best dishes come from a little kitchen chaos and a pinch of boldness.
So here’s the thing—this recipe stuck with me not because it’s fancy or complicated, but because it’s that approachable kind of snack that feels special whenever you make it. It’s perfect for those moments when you want to bring something homemade but not overthink it, and it always lands well, whether you’re hosting or just craving a little comfort food with a crispy twist.
Why You’ll Love This Recipe
- Quick & Easy: Comes together in under 30 minutes, perfect for those unexpected gatherings or a quick snack fix.
- Simple Ingredients: Uses pantry staples plus fresh ingredients you probably already have, so no last-minute store runs.
- Perfect for Parties: These crispy deviled eggs with bacon and fresh chives are sure to be a hit at potlucks, holiday gatherings, or casual get-togethers.
- Crowd-Pleaser: The combination of creamy filling, crispy coating, and smoky bacon is irresistible for both kids and adults.
- Unbelievably Delicious: The crispy outside contrasts beautifully with the smooth, tangy inside—this is deviled eggs, but reimagined with a satisfying crunch.
This isn’t your run-of-the-mill deviled eggs recipe. The magic lies in frying the eggs after stuffing, giving each bite a golden, crispy shell that holds a luscious, seasoned filling inside. The bacon adds a smoky saltiness that pairs perfectly with the fresh brightness of chopped chives. Honestly, it’s the kind of snack that makes you pause, close your eyes, and savor the unexpected texture combo.
Whether you’re looking to impress guests without stress or just want a new spin on an old favorite, this recipe offers comfort food vibes with an exciting twist. It’s not just good—it’s the kind of snack that’ll have you reaching for seconds and jotting down the recipe for your next party.
What Ingredients You Will Need
This recipe uses simple, wholesome ingredients to deliver bold flavor and satisfying texture without the fuss. Most are pantry staples, with a few fresh touches that bring everything together beautifully.
- Large eggs (6-8, hard-boiled and peeled) – The star of the show, firm whites with creamy yolk centers.
- Mayonnaise (¼ cup) – Adds creaminess and tang to the filling; I prefer Hellmann’s for its smooth texture.
- Dijon mustard (1 tsp) – Gives a subtle kick and depth to balance the richness.
- Apple cider vinegar (1 tsp) – Brightens the filling with a touch of acidity.
- Salt and freshly ground black pepper (to taste) – Essential for seasoning both filling and coating.
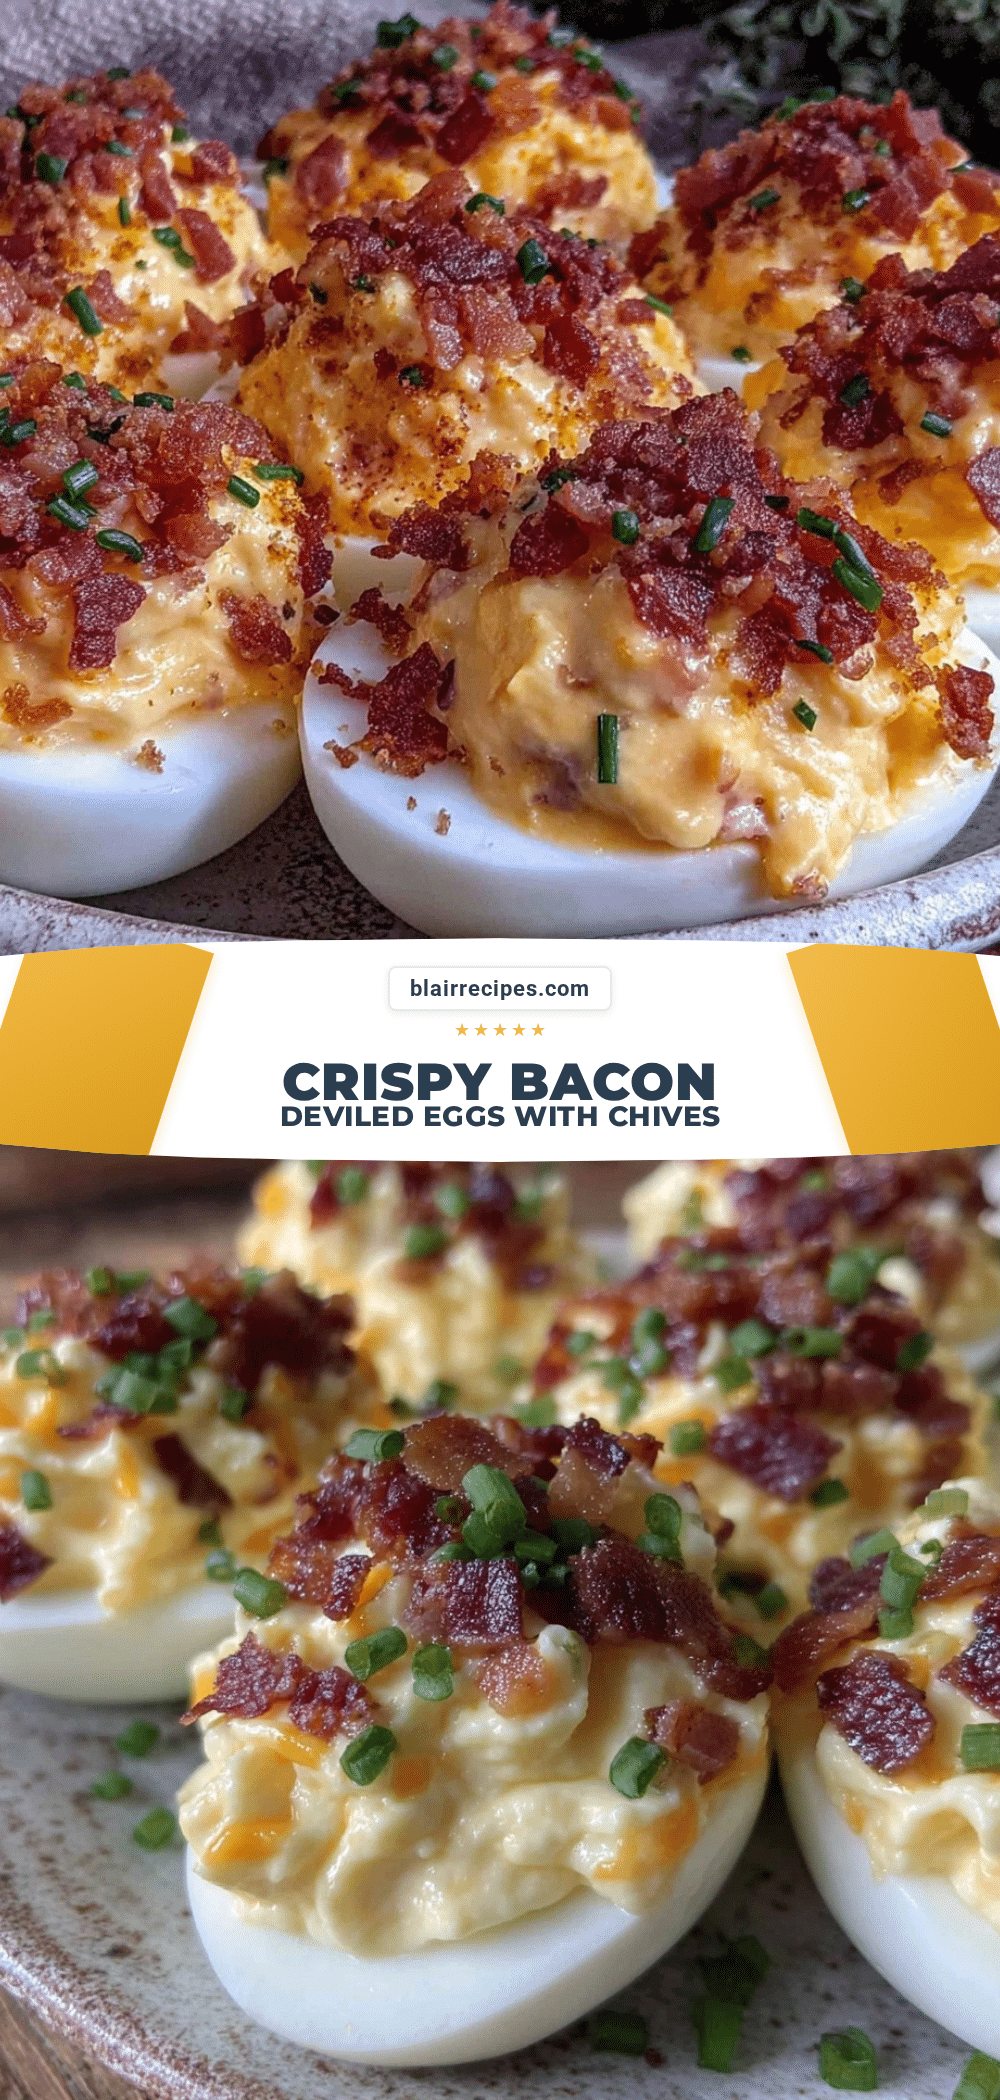
- Bacon (4 slices, cooked crisp and crumbled) – Provides smoky, crunchy bits that top each egg.
- Fresh chives (2 tbsp, finely chopped) – Adds a mild oniony freshness and color pop.
- All-purpose flour (½ cup) – For dredging the stuffed eggs before frying; creates that crisp shell.
- Vegetable oil (for frying, about 1 cup) – Neutral flavor and high smoke point make it perfect for crisping.
- Paprika (optional, for garnish) – Adds a smoky hint and vibrant color on top.
Ingredient Tips: Choose eggs that are at least a week old for easier peeling. If you want a gluten-free version, swap all-purpose flour with almond flour or a gluten-free blend. For a dairy-free mayo, you can find great options like Just Mayo or make a quick homemade version.
Equipment Needed
- Medium saucepan – For boiling the eggs perfectly.
- Mixing bowls – To combine the filling ingredients smoothly.
- Small skillet or frying pan – For frying the stuffed eggs to a golden crisp.
- Slotted spoon or tongs – To safely remove eggs from hot oil without breaking them.
- Paper towels – To drain excess oil after frying and keep the eggs crisp.
- Sharp knife and cutting board – For slicing eggs in half and chopping chives.
- Measuring cups and spoons – To get precise amounts for consistent results.
If you don’t have a deep fryer, a heavy-bottomed skillet works great for shallow frying. Just keep an eye on the oil temperature to avoid greasy eggs. I’ve found a cast iron skillet holds heat evenly, which helps get that perfect golden crust without burning. For budget-friendly options, a simple non-stick pan will do, but be gentle when turning the eggs to keep that crispy coating intact.
Preparation Method

- Hard-boil the eggs: Place 6-8 large eggs in a medium saucepan and cover with cold water by about 1 inch. Bring to a boil over medium-high heat, then cover, turn off the heat, and let sit for 12 minutes. Transfer eggs to an ice bath immediately to stop cooking and make peeling easier. (Prep time: 15 minutes)
- Peel and halve the eggs: Gently crack the shells and peel under running water if needed. Slice each egg in half lengthwise and carefully remove yolks, placing them in a bowl. Arrange the whites on a serving plate or tray. (Prep time: 5 minutes)
- Make the filling: Mash the yolks with a fork until crumbly. Add ¼ cup mayonnaise, 1 tsp Dijon mustard, 1 tsp apple cider vinegar, and salt and pepper to taste. Mix until smooth and creamy. Adjust seasoning as you go—you want a nice balance of tang and richness. (Prep time: 5 minutes)
- Stuff the egg whites: Using a spoon or piping bag, fill each egg white half generously with the yolk mixture. Be careful not to overfill to avoid spilling during frying. (Prep time: 5 minutes)
- Prepare for frying: Pour ½ cup all-purpose flour into a shallow bowl. Lightly dredge each stuffed egg half in the flour, shaking off any excess. This thin coating will crisp up as they fry. (Prep time: 5 minutes)
- Heat the oil: In a skillet, pour in about 1 cup vegetable oil and warm over medium heat until it reaches 350°F (175°C). To test, drop a small pinch of flour in—the oil should sizzle immediately. (Prep time: 5 minutes)
- Fry the eggs: Carefully place the stuffed eggs in the hot oil, cooking in batches if needed to avoid overcrowding. Fry for about 2-3 minutes per side or until golden and crispy. Use a slotted spoon or tongs to gently turn them. (Cook time: 6-8 minutes)
- Drain and garnish: Transfer fried eggs to paper towels to absorb excess oil. Sprinkle crumbled cooked bacon and fresh chopped chives over the top. Add a dusting of paprika if desired for color and subtle smoky flavor. (Prep time: 5 minutes)
- Serve warm or at room temperature: These crispy deviled eggs are best enjoyed fresh but can be reheated gently if needed. (Serving suggestion below)
Pro Tip: Keep your oil temperature steady. Too hot, and the coating burns before heating through; too cool, and the eggs soak up oil and get greasy. I like to keep a thermometer handy or watch for that lively sizzle around the eggs.
Cooking Tips & Techniques
Getting that perfect crispy coating on deviled eggs wasn’t something I nailed on the first try. The key is a delicate balance—too thick a flour layer, and it feels doughy; too thin, and it won’t crisp properly. Lightly dredging and shaking off excess flour is something I learned after a few sticky batches.
Also, frying temperature is crucial. I’ve seen cooks go straight to high heat, only to get burnt outsides and cold middles. Medium heat keeps the eggs cooking gently, creating a golden crust without sacrificing that creamy filling inside. You can tell the oil is ready when a pinch of flour sizzles immediately but doesn’t burn.
Another tip: don’t overcrowd the pan. Crowding causes the temperature to drop, leading to soggy eggs. Fry in small batches and let the oil come back up to temperature between batches. It’s a little extra time, but totally worth it.
For bacon, using thick-cut and cooking until crisp makes a huge difference. I crumble it finely so every bite has just a hint of smoky crunch without overwhelming the egg’s flavor. Fresh chives add a mild onion flavor and a pop of color—don’t skip them!
Variations & Adaptations
- Spicy Kick: Add a dash of cayenne pepper or hot sauce to the yolk filling for smoky heat that wakes up your taste buds.
- Cheesy Twist: Mix in a tablespoon of finely grated sharp cheddar or Parmesan into the yolk mixture for added richness.
- Herbal Freshness: Swap chives with fresh dill or parsley to change the herbal notes and brighten up the flavor.
- Gluten-Free Option: Use almond flour or gluten-free flour blend for dredging instead of regular flour to keep it crispy and safe for gluten sensitivities.
- Air-Fryer Version: For a less oily alternative, place the floured stuffed eggs in a preheated air fryer at 350°F (175°C) for 6-8 minutes, flipping halfway through, until crispy and golden.
Personally, I once tried adding finely chopped sun-dried tomatoes into the filling for a tangy twist. It was a hit, but I’d keep the bacon topping to balance the flavors. Feel free to experiment—these deviled eggs handle flavor tweaks well!
Serving & Storage Suggestions
Serve these crispy deviled eggs warm or at room temperature for best texture. They make a fantastic appetizer arranged on a platter with extra bacon bits and a sprinkle of chives for a colorful presentation. Pair them with a light salad or crisp pickles to cut through the richness.
If you have leftovers (and you might!), store them in an airtight container in the refrigerator for up to 2 days. Reheat gently in a skillet or air fryer to bring back some crispiness—microwaving tends to make them soggy, so avoid if you can.
Flavors develop subtly over time, but the crispy texture is definitely best enjoyed fresh. For parties, I often prepare the filling and egg whites ahead of time, then dredge and fry just before serving to keep that golden crunch.
Nutritional Information & Benefits
Per serving (2 deviled egg halves), you can expect approximately:
| Calories | 150-180 kcal |
|---|---|
| Protein | 10g |
| Fat | 12g |
| Carbohydrates | 2g |
| Fiber | 0.5g |
Eggs are packed with high-quality protein and important nutrients like choline, which supports brain health. Bacon adds flavor and fat, so moderation is key if you’re watching intake. Using fresh chives contributes antioxidants and vitamins while adding freshness without calories.
This recipe is naturally gluten-free when using almond flour or gluten-free flour for dredging and free from added sugars. It fits well into low-carb or keto-inspired diets, making it a satisfying snack that won’t spike blood sugar.
Conclusion
Crispy deviled eggs with bacon and fresh chives offer a delicious twist on a classic snack that’s easy to make and always well-received. The crispy exterior paired with creamy, flavorful filling and smoky bacon creates a texture and flavor combo that’s genuinely satisfying and a little unexpected.
Feel free to tweak the fillings, add your favorite herbs, or switch up the cooking method to suit your kitchen style. This recipe has become a go-to for me when I want something impressive but quick, and I’m confident it’ll find a place in your rotation too.
Give it a try, experiment with your favorite flavors, and don’t be shy about sharing how it turns out. There’s just something about these crispy deviled eggs that makes every gathering a bit more memorable—and that’s a tasty promise you can trust.
FAQs
Can I make these crispy deviled eggs ahead of time?
You can prepare the filling and hard-boil the eggs a day ahead, but for best crispiness, fry them just before serving.
What’s the best way to peel hard-boiled eggs easily?
Use eggs that are at least a week old, cool them quickly in an ice bath after boiling, and peel under running water to help remove the shells smoothly.
Can I bake these instead of frying?
Baking is possible but won’t produce the same crispy texture. For a healthier alternative, try using an air fryer at 350°F (175°C) for 6-8 minutes, turning halfway through.
Is there a substitute for bacon in this recipe?
Yes! You can use smoked turkey bacon, crispy pancetta, or omit it altogether and add extra herbs or a sprinkle of smoked paprika for that smoky flavor.
How do I keep the filling from spilling during frying?
Don’t overfill the egg whites, and make sure to dredge gently in flour to create a thin but secure coating. Handling the eggs carefully when turning in the oil also helps keep everything intact.
Pin This Recipe!
Crispy Deviled Eggs with Bacon and Fresh Chives

A delicious twist on classic deviled eggs, fried until crispy on the outside and topped with smoky bacon and fresh chives. Perfect for parties and quick snacks.
- Prep Time: 30 minutes
- Cook Time: 6-8 minutes
- Total Time: 36-38 minutes
- Yield: 12-16 deviled egg halves (6-8 eggs) 1x
- Category: Appetizer
- Cuisine: American
Ingredients
- 6–8 large eggs, hard-boiled and peeled
- 1/4 cup mayonnaise
- 1 tsp Dijon mustard
- 1 tsp apple cider vinegar
- Salt and freshly ground black pepper, to taste
- 4 slices bacon, cooked crisp and crumbled
- 2 tbsp fresh chives, finely chopped
- 1/2 cup all-purpose flour (or almond flour/gluten-free blend for gluten-free option)
- About 1 cup vegetable oil, for frying
- Paprika (optional, for garnish)
Instructions
- Place 6-8 large eggs in a medium saucepan and cover with cold water by about 1 inch. Bring to a boil over medium-high heat, then cover, turn off the heat, and let sit for 12 minutes. Transfer eggs to an ice bath immediately to stop cooking and make peeling easier.
- Gently crack the shells and peel under running water if needed. Slice each egg in half lengthwise and carefully remove yolks, placing them in a bowl. Arrange the whites on a serving plate or tray.
- Mash the yolks with a fork until crumbly. Add 1/4 cup mayonnaise, 1 tsp Dijon mustard, 1 tsp apple cider vinegar, and salt and pepper to taste. Mix until smooth and creamy.
- Using a spoon or piping bag, fill each egg white half generously with the yolk mixture. Be careful not to overfill to avoid spilling during frying.
- Pour 1/2 cup all-purpose flour into a shallow bowl. Lightly dredge each stuffed egg half in the flour, shaking off any excess.
- In a skillet, pour in about 1 cup vegetable oil and warm over medium heat until it reaches 350°F (175°C). To test, drop a small pinch of flour in—the oil should sizzle immediately.
- Carefully place the stuffed eggs in the hot oil, cooking in batches if needed to avoid overcrowding. Fry for about 2-3 minutes per side or until golden and crispy. Use a slotted spoon or tongs to gently turn them.
- Transfer fried eggs to paper towels to absorb excess oil. Sprinkle crumbled cooked bacon and fresh chopped chives over the top. Add a dusting of paprika if desired.
- Serve warm or at room temperature.
Notes
Keep oil temperature steady at 350°F to avoid burning or greasy eggs. Do not overcrowd the pan when frying. Use eggs at least a week old for easier peeling. For gluten-free, substitute all-purpose flour with almond or gluten-free flour. Air fryer can be used as a healthier alternative.
Nutrition
- Serving Size: 2 deviled egg halves
- Calories: 150180
- Fat: 12
- Carbohydrates: 2
- Fiber: 0.5
- Protein: 10
Keywords: deviled eggs, crispy deviled eggs, bacon deviled eggs, party snacks, appetizer, fried eggs, chives, easy recipe


