One bite of this chocolate peanut butter pie and, honestly, it’s game over—creamy, dreamy, and the perfect balance of sweet and salty. I still remember the first time I made this dessert; it was the middle of summer, and I needed something easy but impressive for a backyard potluck. I only had a few hours and, trust me, the idea of turning on the oven in that heat wasn’t happening. That’s when I discovered how quick and satisfying this chocolate peanut butter pie could be. The very first slice disappeared before I could blink, and every single person asked for the recipe. That’s when I knew I had a keeper.
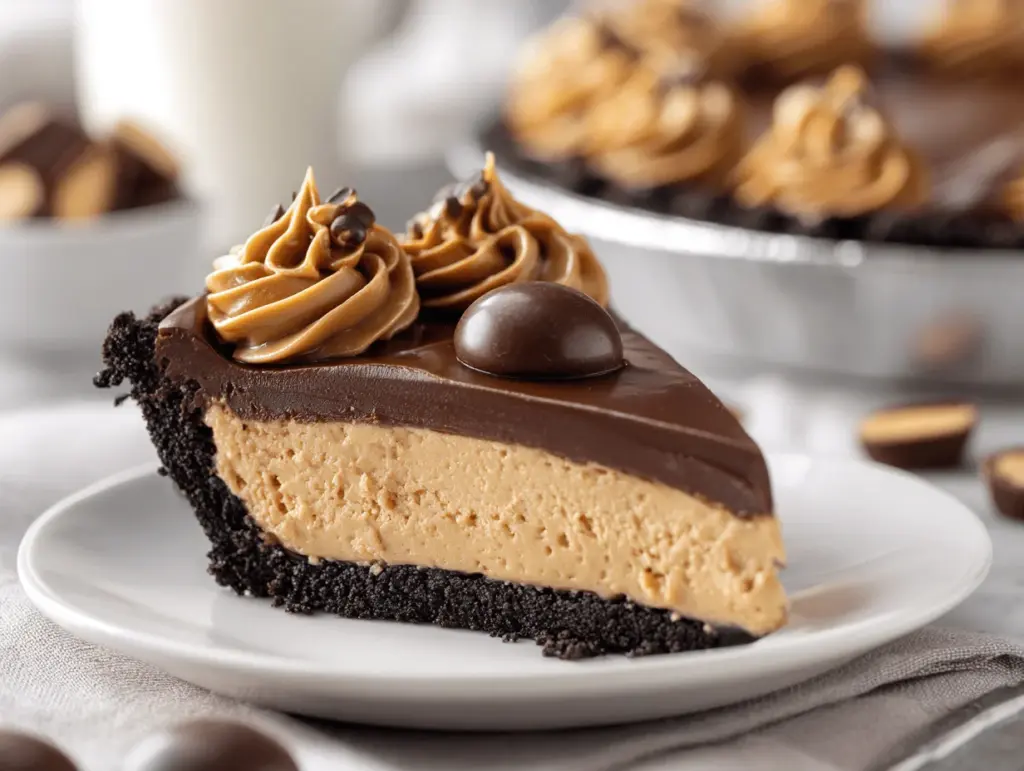
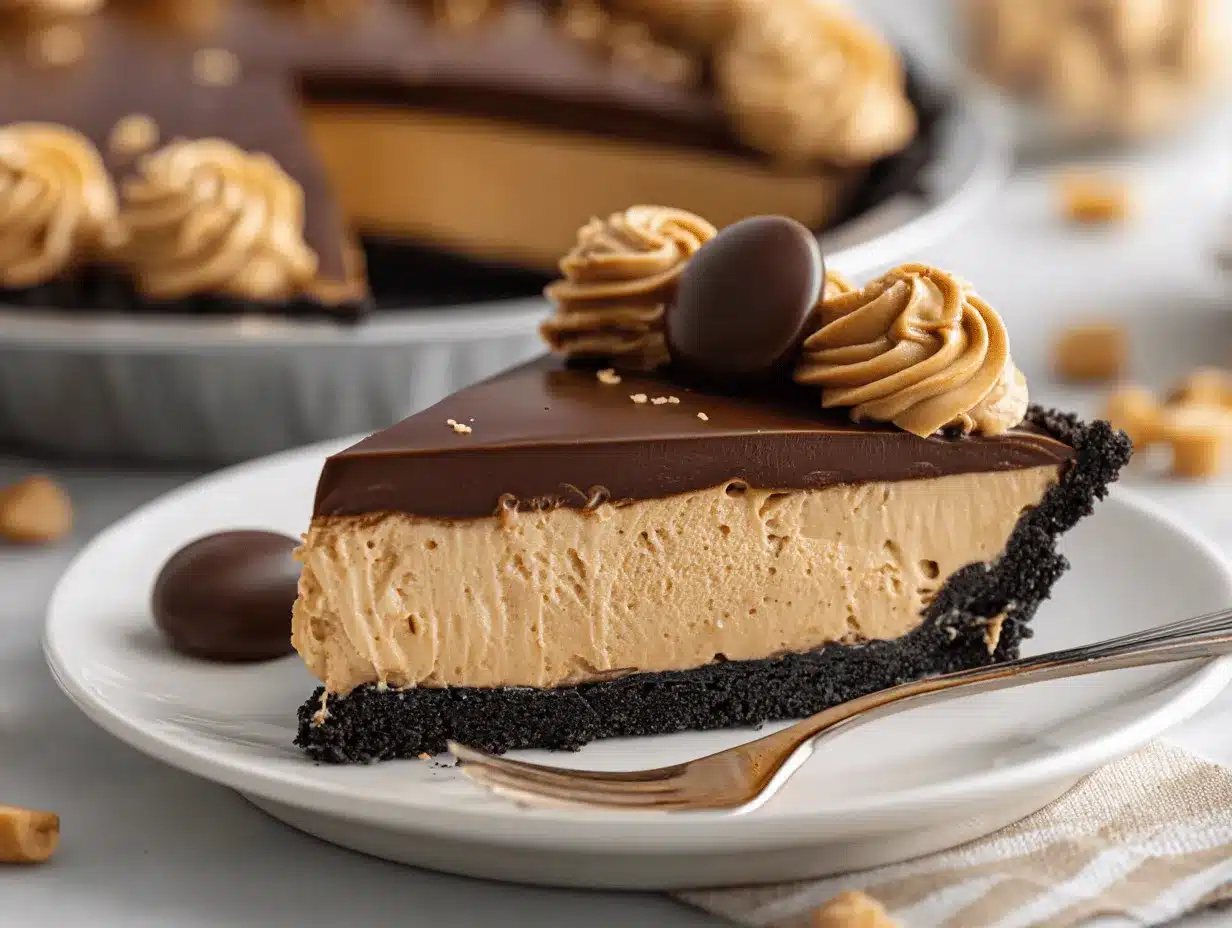
This chocolate peanut butter pie recipe brings together two of my all-time favorite flavors in a way that’s absolutely irresistible. The texture is out of this world: a chocolate cookie crust with a creamy, rich peanut butter filling, all topped with a silky chocolate ganache. It’s the kind of dessert that looks like you spent all afternoon in the kitchen, but (shhh!) you’ll know it took less than 30 minutes of hands-on time. Plus, it chills beautifully, so you can make it ahead for parties, family gatherings, or when you’re just in need of some classic comfort food.
If you’re a fan of classic chocolate peanut butter cups, this pie will be right up your alley. I’ve tested and tweaked this recipe more times than I can count—sometimes swapping the crust, sometimes playing with the filling—and every time, it’s a winner. Whether you’re baking for a birthday, a holiday, or just a Wednesday night, this chocolate peanut butter pie recipe hits all the right notes. Perfect for busy families, last-minute get-togethers, or honestly, just for yourself (no judgment!).
Why You’ll Love This Recipe
Let me tell you—after years of searching for the ultimate chocolate peanut butter pie recipe, this one ticks all the boxes. It’s a go-to in my kitchen for so many reasons, and I’m excited to share exactly what makes it special. Here’s why you’ll be reaching for this recipe again and again:
- Quick & Easy: You can whip this up in under 30 minutes (seriously!), making it perfect for those days when you want maximum wow-factor with minimum effort.
- Simple Ingredients: No need to hunt down specialty items. Everything you need is probably already in your pantry or fridge.
- Perfect for Parties: This is the ultimate crowd-pleaser. Bring it to a potluck, serve it at a birthday, or make it for a holiday dessert table—everyone will be asking for seconds (and the recipe!).
- Kid & Adult Approved: I’ve seen both picky eaters and die-hard dessert lovers light up after their first bite. It’s sweet, a little salty, and oh-so-creamy.
- Unbelievably Delicious: The texture is next-level—the creamy peanut butter filling, crisp chocolate crust, and luscious ganache are a match made in dessert heaven.
What sets this chocolate peanut butter pie apart is the way the filling comes together: a blend of cream cheese and peanut butter whipped until fluffy, then folded with whipped topping for a light but decadent finish. No gritty texture, no heavy aftertaste—just pure, smooth, peanut buttery bliss. The chocolate cookie crust adds a subtle crunch and brings just the right amount of bittersweet chocolate flavor to keep things balanced. And the ganache? It’s the crowning glory, melting on your tongue with every forkful.
This recipe is the definition of comfort food done right. It’s not just easy—it’s reliable, forgiving, and always gets rave reviews. Whether you’re making it for a special event or just because you’re craving something sweet, you’ll love how it turns an ordinary day into something to celebrate. Trust me, once you try it, this chocolate peanut butter pie will be a permanent fixture in your dessert rotation.
What Ingredients You Will Need
This chocolate peanut butter pie recipe is all about using simple, approachable ingredients to create a knockout dessert. You don’t need anything fancy—just some pantry staples and a little bit of fridge magic. Here’s what you’ll need:
- For the Crust:
- Chocolate sandwich cookies (such as Oreos), finely crushed (24 cookies / about 240g) – adds that classic, crunchy base
- Unsalted butter, melted (1/4 cup / 60g) – binds the crust and gives richness
- For the Filling:
- Cream cheese, softened (8 oz / 225g) – makes the filling smooth and tangy
- Creamy peanut butter (3/4 cup / 180g) – main flavor star; I love using Skippy or Jif for the classic taste
- Powdered sugar (1 cup / 120g) – sweetens and keeps the filling fluffy
- Vanilla extract (1 tsp / 5ml) – adds warmth and depth
- Whipped topping (like Cool Whip), thawed (8 oz / 225g) – gives the filling that light, mousse-like texture (you can sub with stabilized whipped cream if you prefer, see tips below)
- For the Ganache Topping:
- Semi-sweet chocolate chips (3/4 cup / 130g) – for a rich, glossy finish
- Heavy cream (1/2 cup / 120ml) – makes the ganache silky smooth
- Optional Garnishes:
- Chopped roasted peanuts – for crunch and a pretty finish
- Mini peanut butter cups or chocolate curls – for extra pizazz
- Sea salt flakes – a pinch on top really brings out the chocolate and peanut butter flavors
Ingredient notes & swaps: For a gluten-free version, use gluten-free chocolate sandwich cookies. If you’re dairy-free, swap the cream cheese and whipped topping for plant-based versions (I’ve tried Kite Hill cream cheese and So Delicious CocoWhip—they work great!). Feel free to use crunchy peanut butter if you want some extra texture, but smooth gives the classic creamy bite. And if you prefer a homemade whipped cream, whip 1 cup (240ml) heavy cream with 2 tbsp (15g) powdered sugar until stiff peaks form, then fold it in where the recipe calls for whipped topping.
Honestly, you can’t go wrong with these ingredients—just make sure your cream cheese is softened and your peanut butter isn’t the natural, oily kind (it can make the filling too loose). I’ve made this with off-brand cookies and even chocolate graham crackers in a pinch—still delicious every time!
Equipment Needed
You don’t need a fancy kitchen setup to make this chocolate peanut butter pie, which is part of its charm. Here’s what you’ll want to have on hand:
- 9-inch (23cm) pie plate – glass or metal both work; I’ve even used a tart pan in a pinch
- Food processor or zip-top bag and rolling pin – for crushing the cookies
- Mixing bowls – at least two: one large for the filling, one small for the ganache
- Hand mixer or stand mixer – makes whipping the filling a breeze, but you can do it by hand with some elbow grease
- Measuring cups and spoons – accuracy matters for that perfect creamy texture
- Rubber spatula – for scraping every last bit of filling and ganache
- Small saucepan or microwave-safe bowl – to heat the cream for the ganache
- Offset spatula or the back of a spoon – for spreading the filling and ganache smoothly
Don’t worry if you don’t have a food processor; a sturdy zip-top bag and a rolling pin (or even a heavy can!) work just fine for crushing cookies. If your hand mixer is on the fritz, you can use a whisk and a strong arm. I once made this pie at a friend’s cabin with nothing but a wooden spoon—it took a bit longer, but the results were still fantastic. For easy cleanup, I recommend using a silicone spatula. And if you’re on a tight budget, you can find pie plates at thrift stores or dollar shops that work just as well as pricier versions.
Preparation Method
- Prepare the crust:
- Finely crush 24 chocolate sandwich cookies (about 240g) in a food processor or by sealing them in a zip-top bag and crushing with a rolling pin.
- Pour in 1/4 cup (60g) melted unsalted butter and pulse or mix until the crumbs look like wet sand.
- Press the mixture firmly into the bottom and up the sides of a 9-inch (23cm) pie plate. Use the bottom of a measuring cup to pack it down—this helps the crust hold together.
- Chill in the freezer for at least 15 minutes while you prepare the filling.
- Make the peanut butter filling:
- In a large mixing bowl, beat 8 oz (225g) softened cream cheese and 3/4 cup (180g) creamy peanut butter on medium speed until smooth and fluffy—about 2-3 minutes.
- Add 1 cup (120g) powdered sugar and 1 tsp (5ml) vanilla extract. Beat until fully combined and creamy.
- Gently fold in 8 oz (225g) whipped topping (or whipped cream) with a spatula, being careful not to deflate the mixture. The filling should be airy and spreadable.
- Spread the filling evenly into the chilled crust. Smooth the top with an offset spatula or the back of a spoon. Chill in the fridge while you prepare the ganache.
- Prepare the chocolate ganache:
- Place 3/4 cup (130g) semi-sweet chocolate chips in a small heatproof bowl.
- Heat 1/2 cup (120ml) heavy cream just until steaming (not boiling) in a small saucepan or microwave (about 45 seconds).
- Pour the hot cream over the chocolate chips. Let sit for 1-2 minutes, then stir gently until the chocolate is melted and the mixture is glossy and smooth.
- Let the ganache cool for 5-10 minutes so it thickens slightly but is still pourable.
- Pour the ganache over the chilled peanut butter layer. Tilt the pie gently to spread it evenly or use a spatula to smooth.
- Chill and decorate:
- Refrigerate the pie for at least 3 hours (preferably overnight) to set fully. The longer it chills, the easier it is to slice.
- Just before serving, top with chopped peanuts, mini peanut butter cups, chocolate curls, or a sprinkle of sea salt, if desired.
- Slice and serve:
- For clean slices, dip a sharp knife in hot water and wipe between cuts.
- Serve chilled for the best texture.
Troubleshooting tips: If your crust is too crumbly, add a tablespoon more melted butter. If your filling seems runny, double-check that your cream cheese and peanut butter are not too warm—pop the filling in the fridge for 15 minutes before spreading. If the ganache splits, stir in a little extra cream to bring it back together. I’ve learned these tricks after a few too many “oops” moments!
Cooking Tips & Techniques
After making this chocolate peanut butter pie more times than I can count, I’ve picked up a few tricks that guarantee delicious, picture-perfect results every time:
- Room Temperature Ingredients: Make sure your cream cheese is softened and your peanut butter isn’t straight from the fridge. Cold ingredients can lead to lumps in the filling—nobody wants that!
- Don’t Overbeat: When mixing the filling, stop once everything is just combined. Overbeating can deflate the whipped topping and make the filling dense instead of airy.
- Pack the Crust Firmly: Use the bottom of a measuring cup to press the crust mixture into the pie plate. This helps the crust set up and prevents it from crumbling when sliced.
- Chill Time Matters: The pie needs at least 3 hours in the fridge (overnight is best) for the layers to firm up. If you’re in a rush, a quick 30-minute stint in the freezer can help, but watch it so it doesn’t freeze solid.
- Ganache Perfection: Let the ganache cool slightly before pouring it over the filling—if it’s too hot, it can melt the peanut butter layer.
- Sharp Knife, Clean Slices: For tidy pieces, run your knife under hot water and wipe it clean between each cut. It’s a little extra effort, but your slices will look bakery-worthy.
One time, I tried to rush the chilling step, and my slices were a goopy mess—lesson learned! Now, I always make this pie the night before an event. If you’re multitasking, make the crust and filling a day ahead, then add the ganache before serving for the freshest look. And don’t be afraid to get creative with the toppings—sometimes I swirl in a little caramel or scatter extra chocolate chips for a fun twist. This pie is super forgiving, so don’t stress if things aren’t perfect. The taste will win everyone over, guaranteed.
Variations & Adaptations
One of my favorite things about this chocolate peanut butter pie recipe is how flexible it is. Here are a few ways you can switch things up based on your needs or cravings:
- Gluten-Free: Swap the regular chocolate sandwich cookies for a gluten-free version. Most grocery stores carry them now, and you won’t even notice the difference in the crust!
- No-Bake Pretzel Crust: For a salty-sweet twist, use crushed pretzels (about 2 cups / 180g) and 1/4 cup (60g) melted butter instead of cookies. It adds an extra crunch and a little saltiness that’s so addictive.
- Dairy-Free: Use plant-based cream cheese and a dairy-free whipped topping. For the ganache, swap the heavy cream for canned coconut cream. I’ve made a vegan version for a friend, and it was a hit!
- Nut-Free: Use sunflower seed butter in place of peanut butter, and skip the peanut garnishes. (Always check cookie and topping labels for hidden allergens.)
- Chocolate Lovers’ Dream: Mix mini chocolate chips into the filling or swirl a little melted dark chocolate through before chilling. You can also use a double chocolate cookie crust for extra intensity.
- Seasonal Additions: Top with fresh berries in the summer, or add a sprinkle of cinnamon or pumpkin spice to the filling in the fall for a cozy twist.
My personal favorite adaptation is the pretzel crust—I love that salty crunch against the sweet, creamy filling. No matter how you tweak it, this chocolate peanut butter pie is endlessly customizable to suit your taste, dietary needs, or just whatever you have on hand. Don’t be afraid to experiment!
Serving & Storage Suggestions
This chocolate peanut butter pie is best served chilled, straight from the fridge. The filling is creamy and firm, and the ganache stays glossy and luscious. For a special touch, I like to garnish each slice with a dollop of whipped cream and a sprinkle of chopped peanuts or mini peanut butter cups.
If you’re serving for a party, slice the pie ahead of time and place each piece on a cupcake liner for easy grabbing. It pairs perfectly with a glass of cold milk, hot coffee, or even a mug of rich hot chocolate if you’re feeling extra indulgent. For a festive twist, drizzle a little caramel or extra chocolate sauce over each slice.
To store leftovers, cover the pie tightly with plastic wrap or aluminum foil and keep it in the refrigerator for up to 5 days. If you want to make it ahead, you can freeze the whole pie (without garnishes) for up to 2 months—just thaw overnight in the fridge before serving. To refresh the texture after freezing, let it sit at room temperature for about 20 minutes before slicing. The flavors actually deepen after a day or two in the fridge, so it’s great for making ahead!
Nutritional Information & Benefits
Each slice of this chocolate peanut butter pie is, let’s be honest, an indulgent treat! On average, one slice (1/10th of the pie) contains approximately:
- Calories: 430
- Fat: 29g
- Carbohydrates: 38g
- Sugar: 24g
- Protein: 7g
The good news? Peanut butter brings in healthy fats and a bit of protein, which helps keep you satisfied. If you use a lower-sugar whipped topping or swap in a sugar substitute, you can shave off some of the sweetness. This recipe is easy to make gluten-free or dairy-free, so it can fit a variety of dietary needs. Peanut butter is also a source of magnesium, vitamin E, and B vitamins. Just be sure to check for allergies—this pie contains peanuts, dairy, and gluten (unless adapted). I find that enjoying a small, satisfying slice is all you need to feel like you’re treating yourself!
Conclusion
If you’re searching for a dessert that’s easy, crowd-pleasing, and totally crave-worthy, this chocolate peanut butter pie recipe is the answer. It’s the kind of treat that feels nostalgic and new at the same time: classic flavors, creamy texture, and a touch of chocolatey decadence. Whether you’re making it for a party, a family dinner, or a solo movie night (been there!), it’s destined to become a fast favorite.
I love this recipe because it’s so adaptable and forgiving—you can swap ingredients, play with the toppings, or even make it ahead. It’s proof that you don’t have to spend hours in the kitchen to create something memorable. If you try this chocolate peanut butter pie, I’d love to hear your thoughts! Leave a comment below, share your own twists, or tag me on social media with your creations. Happy baking, and don’t forget to treat yourself to that second slice—you’ve earned it!
Frequently Asked Questions
How far in advance can I make chocolate peanut butter pie?
You can make this pie up to 2 days ahead and keep it covered in the refrigerator. The flavors actually get even better as it chills!
Can I use homemade whipped cream instead of whipped topping?
Absolutely! Simply whip 1 cup (240ml) heavy cream with 2 tbsp (15g) powdered sugar until stiff peaks form, then fold it in just like you would with whipped topping.
What can I use instead of chocolate sandwich cookies for the crust?
If you don’t have chocolate cookies, try using chocolate graham crackers or even pretzels for a salty-sweet variation. Just crush them and add melted butter as directed.
Is this recipe gluten-free?
The pie can be made gluten-free by using gluten-free chocolate sandwich cookies for the crust and double-checking all other ingredients for hidden gluten.
Can I freeze chocolate peanut butter pie?
Yes! Wrap the pie well (without toppings) and freeze for up to 2 months. Thaw overnight in the fridge before serving for best texture.
PrintChocolate Peanut Butter Pie

This easy, no-bake chocolate peanut butter pie features a crunchy chocolate cookie crust, a creamy peanut butter filling, and a silky chocolate ganache topping. It’s the perfect make-ahead dessert for parties, potlucks, or any time you crave a sweet and salty treat.
- Prep Time: 25 minutes
- Cook Time: 0 minutes
- Total Time: 3 hours 25 minutes (includes chilling)
- Yield: 10 servings 1x
- Category: Dessert
- Cuisine: American
Ingredients
- 24 chocolate sandwich cookies (such as Oreos), finely crushed (about 240g)
- 1/4 cup (60g) unsalted butter, melted
- 8 oz (225g) cream cheese, softened
- 3/4 cup (180g) creamy peanut butter
- 1 cup (120g) powdered sugar
- 1 tsp (5ml) vanilla extract
- 8 oz (225g) whipped topping (like Cool Whip), thawed (or 1 cup heavy cream whipped with 2 tbsp powdered sugar)
- 3/4 cup (130g) semi-sweet chocolate chips
- 1/2 cup (120ml) heavy cream
- Optional: chopped roasted peanuts
- Optional: mini peanut butter cups or chocolate curls
- Optional: sea salt flakes
Instructions
- Finely crush the chocolate sandwich cookies in a food processor or by sealing them in a zip-top bag and crushing with a rolling pin.
- Mix the crushed cookies with melted butter until the mixture resembles wet sand.
- Press the mixture firmly into the bottom and up the sides of a 9-inch pie plate. Chill in the freezer for at least 15 minutes.
- In a large mixing bowl, beat softened cream cheese and peanut butter on medium speed until smooth and fluffy (about 2-3 minutes).
- Add powdered sugar and vanilla extract. Beat until fully combined and creamy.
- Gently fold in the whipped topping (or whipped cream) with a spatula until the filling is airy and spreadable.
- Spread the filling evenly into the chilled crust. Smooth the top and chill in the fridge while preparing the ganache.
- Place chocolate chips in a small heatproof bowl. Heat heavy cream until steaming (not boiling) and pour over the chocolate chips.
- Let sit for 1-2 minutes, then stir until the chocolate is melted and the ganache is glossy and smooth. Let cool for 5-10 minutes.
- Pour the ganache over the chilled peanut butter layer. Tilt the pie or use a spatula to spread evenly.
- Refrigerate the pie for at least 3 hours (preferably overnight) to set.
- Before serving, garnish with chopped peanuts, mini peanut butter cups, chocolate curls, or sea salt if desired.
- For clean slices, dip a sharp knife in hot water and wipe between cuts. Serve chilled.
Notes
For a gluten-free version, use gluten-free chocolate sandwich cookies. For dairy-free, use plant-based cream cheese, whipped topping, and coconut cream for the ganache. Chill the pie thoroughly for clean slices. Customize with different crusts or toppings as desired. The pie can be made ahead and even frozen (without garnishes).
Nutrition
- Serving Size: 1 slice (1/10th of pie)
- Calories: 430
- Sugar: 24
- Sodium: 270
- Fat: 29
- Saturated Fat: 13
- Carbohydrates: 38
- Fiber: 2
- Protein: 7
Keywords: chocolate peanut butter pie, no bake dessert, easy pie recipe, party dessert, creamy peanut butter pie, chocolate ganache, potluck dessert, make ahead dessert


