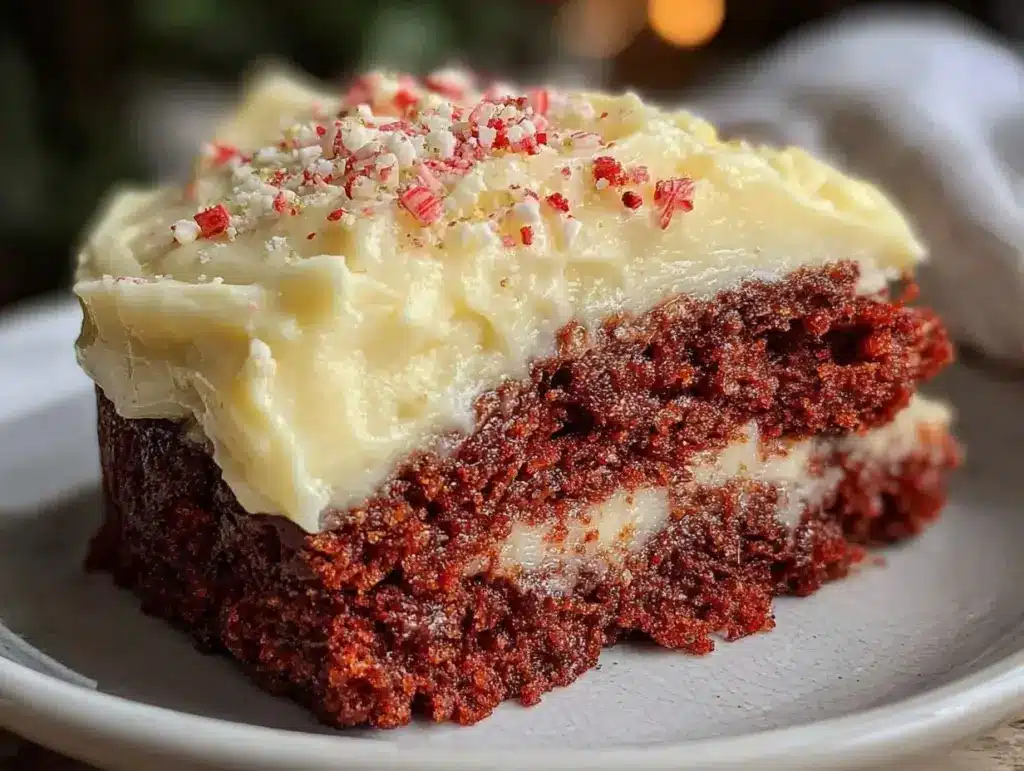
“You really have to try this red velvet cake,” my coworker said, sliding a slice across the office table with a mischievous grin. Honestly, I was skeptical—red velvet always felt like a fancy dessert reserved for special occasions or bakery shelves. But that day, after a long, chaotic morning juggling deadlines and endless meetings, biting into that vibrant, tender cake felt like a quiet victory. The cream cheese frosting was silky but not too sweet, hugging each crumb perfectly.
That small moment stuck with me. I found myself craving that balance of smooth frosting and moist crumb, so I started experimenting with my own classic red velvet cake recipe with moist cream cheese frosting. It wasn’t just about replicating a bakery treat; it was about crafting a dessert that felt approachable yet special enough to share at family dinners or casual weekend gatherings.
What’s funny is that this recipe came from a few tweaks—adjusting the cocoa just right, swapping out vinegars to get the tang spot-on, and perfecting the frosting texture so it’s creamy without being heavy. It’s not a rushed recipe; it’s the one I come back to when I want a dessert that’s reliable and downright delightful. It’s the kind of cake that makes you pause, savor, and maybe even close your eyes after that first bite.
So, if you’re like me and thought red velvet was just for show, this recipe will gently change your mind. It’s a little bit nostalgic, a little bit indulgent, and honestly, just plain good. No fuss, no frills—just classic comfort wrapped up in a stunning red package.
Why You’ll Love This Classic Red Velvet Cake Recipe
After testing this recipe many times (yes, more than I care to admit in a single week), I can confidently say it’s a keeper. The balance of flavors and textures is something I’ve honed to hit the sweet spot every time. Here’s why this classic red velvet cake with moist cream cheese frosting stands out:
- Quick & Easy: The whole process takes about 1 hour and 30 minutes from start to finish—perfect for busy home cooks who want a baked treat without the fuss.
- Simple Ingredients: You probably have everything in your pantry already—no need to hunt down anything exotic or fancy.
- Perfect for Celebrations: Whether it’s a birthday, holiday, or just a cozy Sunday, this cake fits right in.
- Crowd-Pleaser: I’ve brought this to potlucks and family dinners, and it always disappears fast.
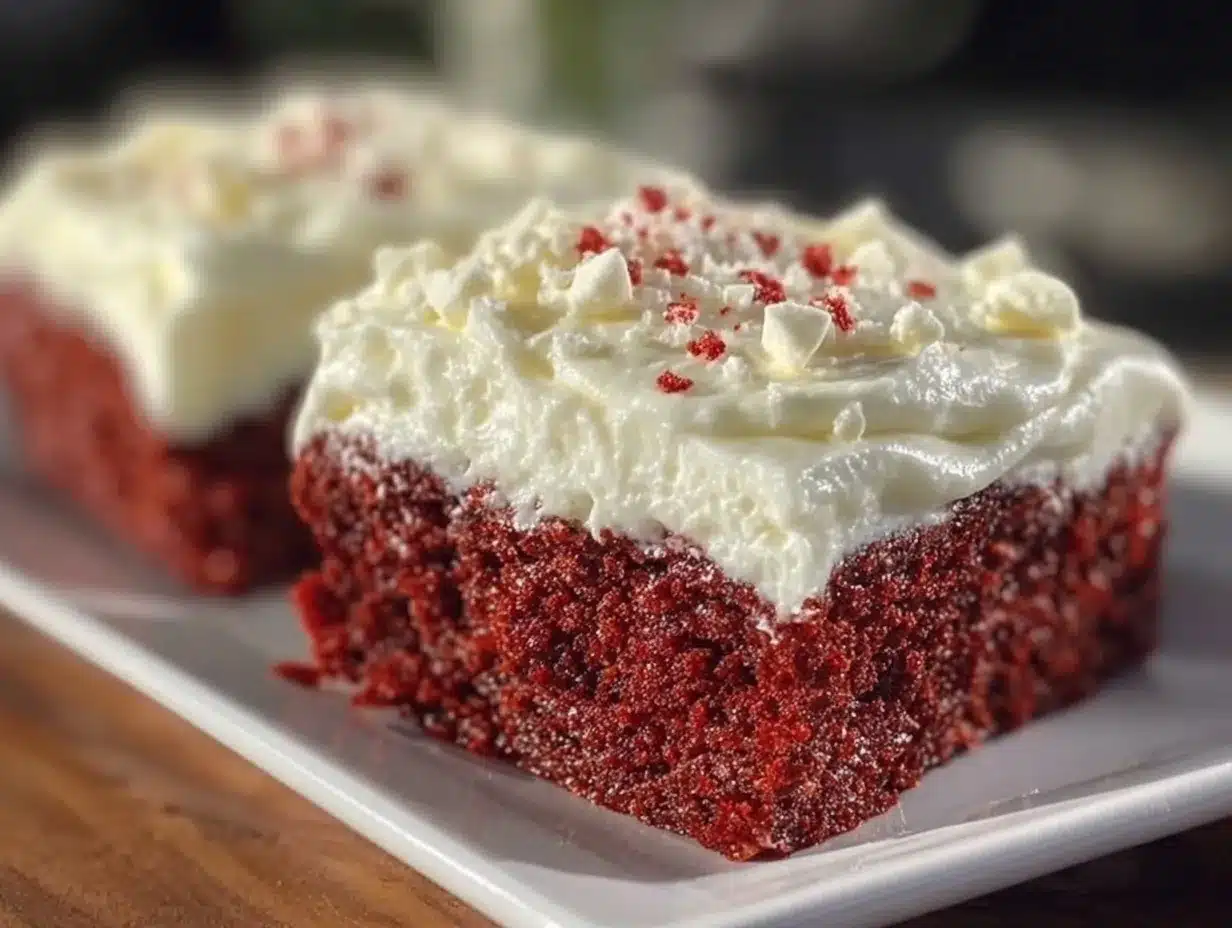
- Unbelievably Delicious: The texture is so moist and tender, thanks to the buttermilk and just the right amount of cocoa. Plus, the cream cheese frosting is smooth, tangy, and not too sweet—exactly what you want to balance the cake.
What makes this recipe different? It’s the small details that matter: using a blend of cocoa and red food coloring for that iconic hue, a touch of vinegar to react with baking soda for a light crumb, and whipping the cream cheese frosting just right so it’s luscious but not runny. It’s a recipe I trust to deliver consistent results, even when I’m juggling other dishes like a honey-roasted butternut squash with rosemary or a vibrant sautéed green beans side.
This isn’t just a dessert; it’s a little celebration on a plate. Every slice invites you to slow down and enjoy something sweet but grounded—a reminder that comfort food doesn’t have to be complicated.
What Ingredients You Will Need
This recipe calls for straightforward, pantry-friendly ingredients that come together to create a cake with rich flavor and that classic red velvet charm. You can find most of these staples in any grocery store, and substitutions are easy if needed.
- For the Cake Batter:
- All-purpose flour (2 ½ cups / 320 grams) – provides structure
- Cocoa powder (1 ½ tablespoons) – use unsweetened, natural cocoa for authentic flavor
- Baking soda (1 teaspoon) – helps the cake rise and gives it lightness
- Salt (½ teaspoon) – balances sweetness
- Unsalted butter (1 cup / 227 grams), softened – adds richness and moisture
- Sugar (1 ¾ cups / 350 grams) – for sweetness
- Large eggs (2), room temperature – provides structure and moisture
- Buttermilk (1 cup / 240 ml), room temperature – key to tender crumb and tangy flavor (can use milk + 1 tbsp vinegar if needed)
- White vinegar (1 tablespoon) – reacts with baking soda to create light crumb
- Vanilla extract (1 teaspoon) – adds warmth and depth
- Red food coloring (2 tablespoons) – use gel or liquid for vibrant color
- For the Cream Cheese Frosting:
- Cream cheese (8 ounces / 227 grams), softened – look for full-fat for the best texture
- Unsalted butter (½ cup / 113 grams), softened – adds creaminess
- Powdered sugar (4 cups / 480 grams), sifted – sweetness and smooth texture
- Vanilla extract (1 teaspoon) – flavor enhancer
- Pinch of salt – balances sweetness
For best results, I recommend using a quality unsweetened cocoa powder like Hershey’s or Ghirardelli. When it comes to cream cheese, Philadelphia brand tends to give that smooth, reliable texture I prefer. If you want a dairy-free version, substitute the cream cheese and butter with their plant-based counterparts and use almond milk in place of buttermilk (adding a teaspoon of lemon juice for acidity).
Equipment Needed
- Mixing Bowls: A couple of medium-sized bowls, preferably glass or stainless steel, for mixing wet and dry ingredients separately.
- Electric Mixer: A handheld or stand mixer makes creaming the butter and sugar and whipping the frosting much easier. I’ve tried both, but the stand mixer saves a ton of time.
- Measuring Cups and Spoons: Accurate measurements are crucial, especially for baking powder and vinegar.
- 9-inch Round Cake Pans: Two pans work best for layered cakes. Non-stick or well-greased with parchment paper helps with easy release.
- Cooling Rack: Essential for letting the cake cool evenly and avoiding soggy bottoms.
- Offset Spatula or Butter Knife: Useful for smooth, even frosting application.
If you don’t have a stand mixer, no worries—a sturdy whisk and a bit of elbow grease can get the job done, though it might take a little longer. I also keep a silicone spatula handy for scraping down the sides of the bowl during mixing, which helps prevent clumps. For budget-friendly cake pans, lightweight aluminum pans work well and heat evenly, but avoid using old, scratched pans that might affect the cake’s rise.
Preparation Method
- Preheat and Prep: Set your oven to 350°F (175°C). Grease two 9-inch round cake pans with butter and line the bottoms with parchment paper. This ensures the cakes come out cleanly after baking (about 10 minutes prep).
- Mix Dry Ingredients: In a medium bowl, sift together 2 ½ cups (320 g) of all-purpose flour, 1 ½ tablespoons cocoa powder, 1 teaspoon baking soda, and ½ teaspoon salt. Whisk to combine evenly and set aside (5 minutes).
- Cream Butter and Sugar: In a large bowl, use an electric mixer to beat 1 cup (227 g) softened unsalted butter with 1 ¾ cups (350 g) sugar until light and fluffy, about 3-4 minutes. This step is key for a tender crumb.
- Add Eggs: Beat in 2 large eggs, one at a time, mixing well after each addition. The batter might look slightly curdled here; that’s normal (2 minutes).
- Combine Wet Ingredients: In a small bowl, mix 1 cup (240 ml) room temperature buttermilk, 1 tablespoon white vinegar, 1 teaspoon vanilla extract, and 2 tablespoons red food coloring. Stir gently to combine (2 minutes).
- Alternate Adding Dry and Wet Ingredients: Add the dry flour mixture in three additions alternating with the wet buttermilk mixture, starting and ending with the dry ingredients. Mix on low speed until just combined after each addition—avoid overmixing to keep the cake light (5 minutes).
- Divide and Bake: Evenly pour the batter into the prepared cake pans. Smooth the tops with a spatula. Bake in the preheated oven for 30-35 minutes, or until a toothpick inserted in the center comes out clean. The cakes should spring back lightly when pressed (do not open the oven door before 25 minutes to avoid sinking) (30-35 minutes).
- Cool Down: Let the cakes cool in the pans for 10 minutes, then turn them out onto a wire rack to cool completely before frosting (1 hour). This step is crucial to prevent frosting from melting.
- Make the Cream Cheese Frosting: Beat together 8 ounces (227 g) softened cream cheese and ½ cup (113 g) unsalted butter until smooth and creamy, about 2-3 minutes. Gradually add 4 cups (480 g) powdered sugar and 1 teaspoon vanilla extract, then beat until fluffy (3-4 minutes). Add a pinch of salt to balance sweetness.
- Assemble the Cake: Place one cake layer on your serving plate. Spread a generous layer of frosting over the top. Add the second layer and cover the entire cake with the remaining frosting. For a clean finish, chill the cake for 15-20 minutes before slicing.
Pro tip: If the frosting feels too soft, chill it for 10 minutes and then whip again—this helps with spreading and prevents it from sliding off. The batter’s texture should be smooth and thick but pourable; if it’s too stiff, a splash more buttermilk can help.
Cooking Tips & Techniques
Baking red velvet cake can be a bit tricky, but a few insider tips make all the difference. First off, don’t skimp on the buttermilk—its acidity tenderizes the crumb and works with the baking soda to give that subtle lift.
When incorporating the red food coloring, gel colors work best for a vibrant hue without altering the batter’s consistency. I learned the hard way that too much liquid food coloring can make the batter runny, affecting the texture.
Creaming the butter and sugar properly is vital. You want it light and fluffy because this traps air, creating a tender cake. If you try to rush this step, the cake can turn dense.
Also, watch your oven temperature closely. Every oven runs a little differently—too hot and the cake edges can dry out before the center cooks through. Using an oven thermometer is a simple way to avoid this problem.
For the cream cheese frosting, patience is key. The cream cheese and butter should be at room temperature so they blend smoothly. I once tried frosting straight from the fridge and ended up with lumpy, streaky icing—lesson learned!
Finally, let the cake layers cool completely before frosting. I know it’s tempting to dive in right away, but warm cake will melt the frosting and make a mess.
Multitasking tip: While the cakes bake, start prepping your sides or other dishes, like a vibrant sautéed green beans with lemon zest, so you’re not overwhelmed when the cake comes out of the oven.
Variations & Adaptations
This classic red velvet cake recipe is a wonderful base that welcomes creative tweaks. Here are a few variations I’ve tried and loved:
- Gluten-Free Version: Swap out all-purpose flour for a 1:1 gluten-free baking flour blend. Just keep an eye on the batter’s consistency—it may need a touch more buttermilk.
- Vegan Adaptation: Use plant-based cream cheese and vegan butter for frosting. Replace eggs with flax eggs (1 tablespoon ground flaxseed + 3 tablespoons water per egg) and use almond or oat milk with vinegar in place of buttermilk.
- Chocolate Intensity: Add an extra tablespoon of cocoa powder for a deeper chocolate flavor without overpowering the classic red velvet taste.
- Fruit Twist: Fold in fresh raspberries or blackberries to the batter before baking for a fruity surprise that complements the tangy cream cheese frosting beautifully.
- Spiced Red Velvet: Add a pinch of cinnamon and nutmeg to the dry ingredients for a subtle warm spice that feels just right for fall or winter gatherings.
One of my favorite personal twists was adding a thin layer of homemade raspberry jam between the cake layers before frosting—something that paired surprisingly well and made the cake even more memorable. For a lighter take, the frosting can be thinned slightly with milk and whipped into a fluffier texture, perfect for those who find cream cheese frosting too rich.
Serving & Storage Suggestions
This classic red velvet cake is best served at room temperature. That way, the cream cheese frosting is soft and creamy, and the cake is tender and moist. I like to slice it into generous wedges and serve it with a cup of strong coffee or a cold glass of milk.
If you’re planning a full meal, pair the cake with lighter, fresh sides—something like the vibrant green bean and tomato salad with feta offers a bright contrast to the rich sweetness of the cake. For holiday spreads, a scoop of vanilla ice cream alongside this cake can be a simple yet indulgent finish.
To store, tightly cover the cake with plastic wrap or keep it in an airtight container. It stays fresh in the refrigerator for up to 4 days. Before serving leftovers, let it sit at room temperature for about 20 minutes to soften the frosting and improve flavor.
For longer storage, this cake freezes well. Wrap individual slices in plastic wrap and place in a freezer-safe container for up to 3 months. Thaw in the fridge overnight and bring to room temperature before serving.
Over time, the flavors meld wonderfully, making it even better the next day—if it lasts that long, that is!
Nutritional Information & Benefits
Per serving (1 slice, approx. 1/12 of the cake), this classic red velvet cake with moist cream cheese frosting contains roughly 350-400 calories depending on portion size and frosting amount. It has moderate amounts of fat and sugar, typical for a celebratory dessert.
The buttermilk adds calcium and protein, while the cream cheese provides some beneficial fats. Cocoa powder contributes antioxidants, and the vinegar helps with the cake’s light texture without adding calories.
This recipe can fit into a balanced diet when enjoyed in moderation. For gluten-free or vegan adaptations, the usual allergens can be avoided without sacrificing flavor.
From a wellness perspective, I appreciate that this cake is homemade with real ingredients—no strange preservatives or artificial flavors—so it feels like a treat that doesn’t compromise on taste or quality.
Conclusion
This classic red velvet cake with moist cream cheese frosting has earned a permanent spot in my recipe box. It’s reliable, delicious, and strikes a perfect balance between indulgent and approachable. Whether you’re baking for a special occasion or just craving a slice of something sweet and comforting, this recipe won’t let you down.
Feel free to tweak the frosting sweetness or add your favorite fillings—baking should be fun and flexible! I love how adaptable this cake is, fitting into different tastes and dietary needs.
If you give it a try, I’d love to hear what variations you come up with or how it turned out for your family. Sharing these little kitchen wins makes the whole process even sweeter.
Happy baking—and may your kitchen always smell like freshly baked cake!
Frequently Asked Questions about Classic Red Velvet Cake
Why does red velvet cake need vinegar?
The vinegar reacts with baking soda to create carbon dioxide bubbles, which help the cake rise and give it a tender crumb. It also enhances the tangy flavor that pairs beautifully with the cream cheese frosting.
Can I make this cake without food coloring?
Yes, but the vibrant red color is a classic part of red velvet. Without food coloring, the cake will look more like a chocolate cake with a reddish tint.
How do I store leftover red velvet cake?
Keep it covered in the refrigerator for up to 4 days. Bring it to room temperature before serving for best texture and flavor.
Can I use a different frosting instead of cream cheese?
While cream cheese frosting is traditional and complements the cake’s flavor, you can use a simple buttercream or whipped cream frosting if preferred.
Is red velvet cake gluten-free?
This recipe uses all-purpose flour, but you can substitute with a gluten-free flour blend to make it gluten-free. Just watch the texture and adjust liquids if needed.
Pin This Recipe!
Classic Red Velvet Cake Recipe Easy Moist Cream Cheese Frosting Guide

A reliable and delicious classic red velvet cake with moist crumb and smooth cream cheese frosting, perfect for celebrations or casual gatherings.
- Prep Time: 20 minutes
- Cook Time: 30-35 minutes
- Total Time: 1 hour 30 minutes
- Yield: 12 servings 1x
- Category: Dessert
- Cuisine: American
Ingredients
- 2 ½ cups (320 grams) all-purpose flour
- 1 ½ tablespoons unsweetened natural cocoa powder
- 1 teaspoon baking soda
- ½ teaspoon salt
- 1 cup (227 grams) unsalted butter, softened
- 1 ¾ cups (350 grams) sugar
- 2 large eggs, room temperature
- 1 cup (240 ml) buttermilk, room temperature (or milk + 1 tbsp vinegar)
- 1 tablespoon white vinegar
- 1 teaspoon vanilla extract
- 2 tablespoons red food coloring (gel or liquid)
- 8 ounces (227 grams) cream cheese, softened
- ½ cup (113 grams) unsalted butter, softened
- 4 cups (480 grams) powdered sugar, sifted
- 1 teaspoon vanilla extract
- Pinch of salt
Instructions
- Preheat oven to 350°F (175°C). Grease two 9-inch round cake pans with butter and line bottoms with parchment paper.
- In a medium bowl, sift together flour, cocoa powder, baking soda, and salt. Whisk to combine and set aside.
- In a large bowl, beat softened butter and sugar with an electric mixer until light and fluffy, about 3-4 minutes.
- Beat in eggs one at a time, mixing well after each addition. Batter may look curdled; this is normal.
- In a small bowl, mix buttermilk, white vinegar, vanilla extract, and red food coloring gently to combine.
- Add dry flour mixture in three additions alternating with wet buttermilk mixture, starting and ending with dry ingredients. Mix on low speed until just combined after each addition; avoid overmixing.
- Divide batter evenly between prepared pans and smooth tops with a spatula.
- Bake for 30-35 minutes or until a toothpick inserted in the center comes out clean. Avoid opening oven door before 25 minutes.
- Cool cakes in pans for 10 minutes, then turn out onto wire racks to cool completely before frosting.
- For frosting, beat cream cheese and butter until smooth and creamy, about 2-3 minutes.
- Gradually add powdered sugar and vanilla extract, then beat until fluffy, about 3-4 minutes. Add a pinch of salt to balance sweetness.
- Place one cake layer on serving plate and spread a generous layer of frosting on top.
- Add second cake layer and cover entire cake with remaining frosting.
- Chill cake for 15-20 minutes before slicing for a clean finish.
Notes
Use gel food coloring for vibrant color without thinning batter. Cream butter and sugar until light and fluffy for tender crumb. Let cake layers cool completely before frosting to prevent melting. If frosting is too soft, chill and whip again before spreading.
Nutrition
- Serving Size: 1 slice (1/12 of cak
- Calories: 375
- Sugar: 38
- Sodium: 320
- Fat: 18
- Saturated Fat: 10
- Carbohydrates: 52
- Fiber: 1
- Protein: 4
Keywords: red velvet cake, cream cheese frosting, classic cake, moist cake, easy cake recipe, celebration dessert


