
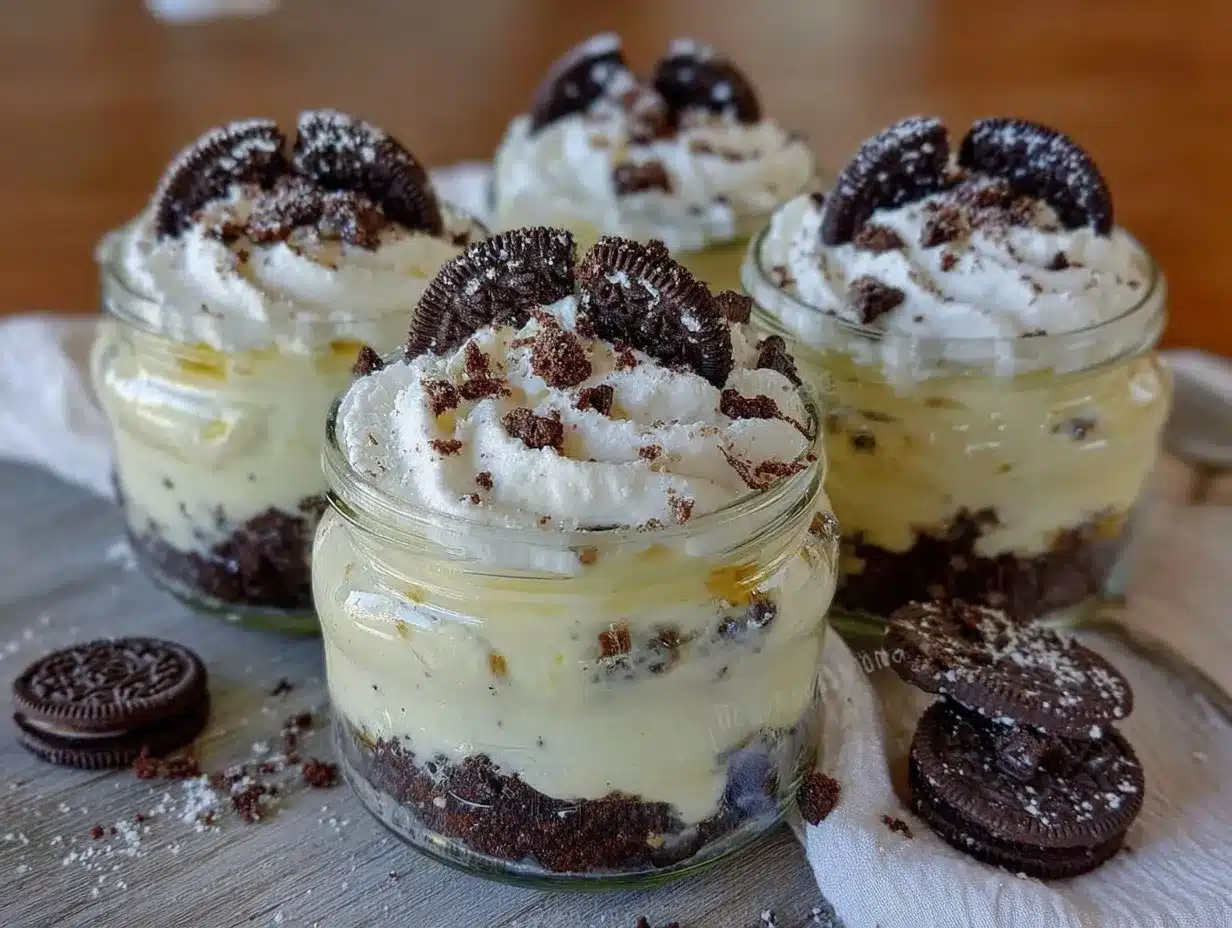
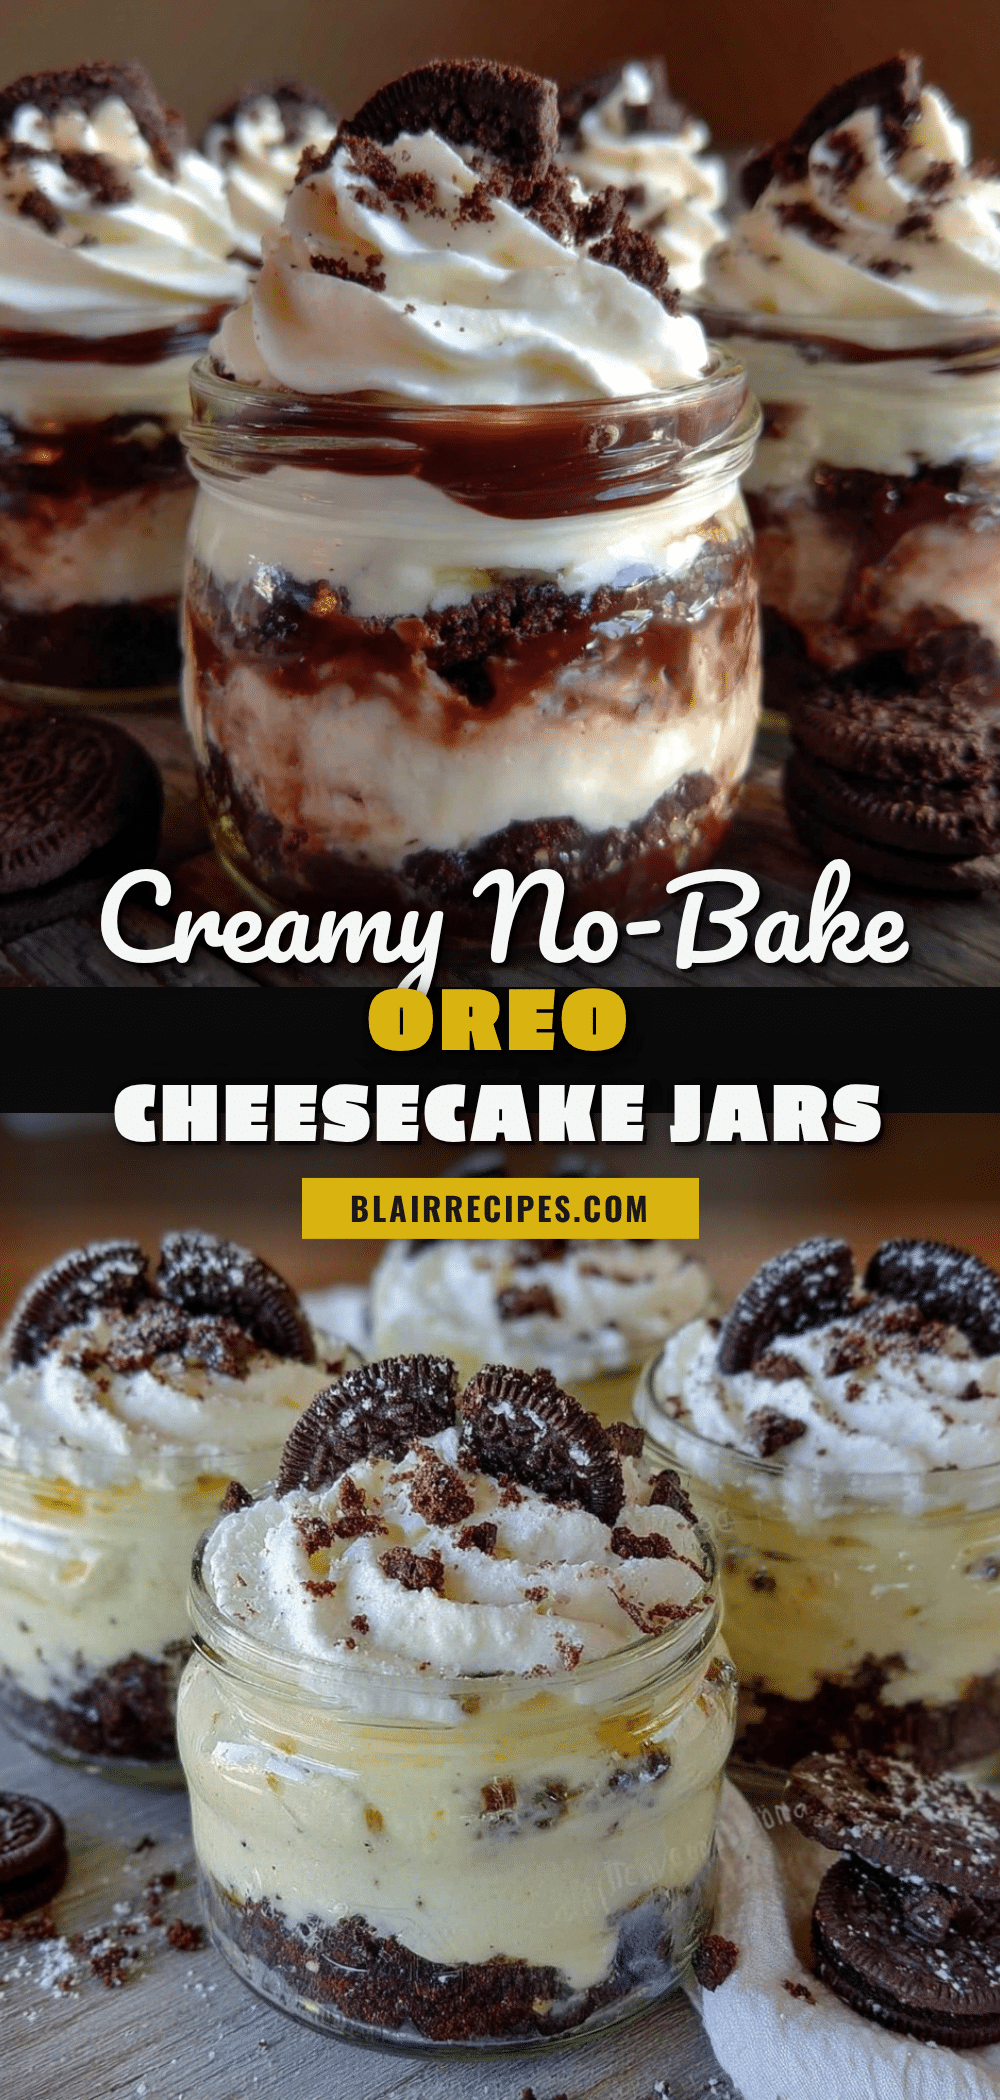
“You sure you don’t want the big slice?” my friend asked, holding up a towering slab of cheesecake. I’d just pulled out these little jars filled with this creamy no-bake Oreo cheesecake layered with fluffy whipped cream. Honestly, I was skeptical about the whole “no-bake” thing—cheesecake always felt like a serious project, you know? But this recipe came out of a lazy Sunday afternoon where the oven was broken, and I had a sudden craving for something sweet and indulgent without all the fuss.
What started as a quick fix turned into a full-on obsession. I found myself making these jars multiple times that week, layering crushed Oreos and smooth cheesecake filling topped with clouds of whipped cream. The texture was silky, the Oreo crunch was just right, and the best part? No oven involved. Plus, the jars made it feel a little fancy—perfect for sharing with friends or sneaking bites late at night. It’s funny how something so simple became my go-to treat, a little slice of joy that’s easy to whip up and impossible to resist.
There’s something about these creamy no-bake Oreo cheesecake jars with whipped cream layers that sticks with you. Maybe it’s that balance of rich and light, or the nostalgia of Oreos mixed with grown-up cheesecake vibes. Either way, I keep coming back to this recipe, and I bet you will too.
Why You’ll Love This Creamy No-Bake Oreo Cheesecake Jars Recipe
After testing and tweaking this recipe over several weeks (and yes, eating way too many jars), I’m confident this no-bake Oreo cheesecake jars recipe stands out for all the right reasons. It’s a quick, fuss-free dessert that doesn’t skimp on flavor or texture. Here’s why it’s a winner:
- Quick & Easy: Ready in under 30 minutes, making it perfect for last-minute dessert cravings or when you’re juggling a million things.
- Simple Ingredients: No need for fancy or hard-to-find items—just classic Oreos, cream cheese, heavy cream, and a few pantry staples.
- Perfect for Entertaining: These jars look charming on any dessert table and are great for potlucks, casual get-togethers, or a cozy night in.
- Crowd-Pleaser: Kids and adults alike rave about the creamy texture and familiar Oreo crunch.
- Unbelievably Delicious: The whipped cream layers add a lightness that makes the richness of the cheesecake filling feel balanced and indulgent without being heavy.
This recipe isn’t just another no-bake cheesecake. The trick is blending the cream cheese until ultra-smooth before folding in the whipped cream gently, creating that perfect, velvety texture. Plus, layering the crushed Oreos throughout the jar adds a delightful crunch and surprise in every bite. If you want a dessert that’s both fuss-free and feels special, this one’s got your name on it.
What Ingredients You Will Need
This creamy no-bake Oreo cheesecake jars recipe relies on straightforward ingredients you might already have in your kitchen. The components come together to create layers of texture and flavor without complicated prep.
- For the Oreo Crust and Layers:
- 24 Oreo cookies, crushed (reserve some whole for garnish if desired)
- For the Cheesecake Filling:
- 16 oz (450 g) cream cheese, softened (I prefer using Philadelphia for its smooth consistency)
- ¾ cup (150 g) granulated sugar
- 1 tsp vanilla extract (pure vanilla makes a noticeable difference)
- For the Whipped Cream Layers:
- 1 ½ cups (360 ml) heavy cream, chilled
- 2 tbsp powdered sugar
- ½ tsp vanilla extract
If you want to get creative, you can swap the granulated sugar for honey or maple syrup for a different sweetness note, or use dairy-free cream cheese and coconut cream to make a vegan version. For a gluten-free take, just grab gluten-free sandwich cookies instead of Oreos.
Equipment Needed
- Mixing bowls – at least two: one for the cheesecake filling and one for whipping cream
- Electric mixer or stand mixer – essential for getting the cream cheese smooth and whipping the cream to stiff peaks
- Spatula – to gently fold whipped cream into the cream cheese mixture
- Measuring cups and spoons – for accurate ingredient portions
- Serving jars or small glasses – about 8 jars of 6 oz (180 ml) size work perfectly
Don’t stress if you don’t have a stand mixer; a handheld mixer works just fine. For whipping the cream, chill your mixing bowl and beaters in the fridge beforehand for faster results. I’ve also used mason jars when hosting, which add a rustic charm and are easy to transport. Plus, you can reuse them for storage or other desserts later.
Preparation Method
- Crush the Oreos: Place 24 Oreo cookies in a large zip-top bag and crush them with a rolling pin until you get mostly crumbs with some small chunks for texture. Set aside about ½ cup (50 g) crumbs for garnish.
- Make the cheesecake filling: In a large bowl, beat 16 oz (450 g) softened cream cheese with ¾ cup (150 g) granulated sugar and 1 tsp vanilla extract until smooth and creamy. This should take about 3-4 minutes on medium speed. Make sure no lumps remain—that’s key for that silky texture.
- Whip the cream: In a chilled bowl, whip 1 ½ cups (360 ml) heavy cream with 2 tbsp powdered sugar and ½ tsp vanilla extract until stiff peaks form. This usually takes 3-5 minutes. Be careful not to overwhip; you want it fluffy but not grainy.
- Fold whipped cream into cream cheese: Gently fold about one-third of the whipped cream into the cream cheese mixture to lighten it, then fold in the remaining whipped cream carefully. This creates the luscious, airy texture that sets this recipe apart.
- Assemble the jars: Start by spooning a layer of crushed Oreos (about 2 tbsp) into each jar. Next, add a generous layer of the cheesecake filling (about ¼ cup). Follow with a layer of whipped cream (about 2 tbsp), then repeat the layers once more—Oreos, cheesecake filling, and finish with whipped cream on top.
- Garnish and chill: Sprinkle the reserved Oreo crumbs on top and, if you like, add a mini Oreo cookie or a few chocolate shavings for flair. Cover and refrigerate the jars for at least 4 hours, preferably overnight, to let the flavors marry and the texture set.
Pro tip: If your cream cheese isn’t soft enough, pop it in the microwave for 10-15 seconds—it makes mixing way easier. When folding the whipped cream, use a light hand to keep it fluffy and avoid deflating the mixture.
Cooking Tips & Techniques for Success
Making no-bake cheesecake jars might look simple, but there are a few tricks that make all the difference in texture and flavor. First, softening the cream cheese fully is a must. I once tried skipping this step and ended up with a lumpy filling—not fun. Also, chilling your mixing tools when whipping cream accelerates the process and improves volume.
When folding in the whipped cream, avoid stirring vigorously. Think of it like folding in egg whites for a souffle—gentle motions keep the air trapped, making the dessert light and fluffy. Overmixing leads to a dense, heavy filling, which is not what you want here.
Layering is another place to be mindful. Even layers make each bite balanced without a clump of crushed Oreos or too much filling. I like to use a small spoon or piping bag for neater layers, especially if you’re serving guests. Lastly, chilling the jars is crucial. It helps everything set properly and lets the flavors meld; rushing this step will lead to a runny mess.
Multitasking tip: While the jars chill, you can whip up a quick side like the vibrant sautéed green beans with lemon zest and pine nuts for a light dinner or slow cooker green bean casserole for a cozy side dish. Sweet and savory balance, yes please.
Variations & Adaptations to Customize Your Dessert
This creamy no-bake Oreo cheesecake jars recipe is flexible and welcomes creative twists. Here are some ideas to switch things up:
- Seasonal Fruit Addition: Layer fresh strawberries, raspberries, or blueberries between the cheesecake and whipped cream for a fruity pop that cuts through the richness.
- Peanut Butter Swirl: Gently fold in ¼ cup (60 g) creamy peanut butter into the cream cheese mixture before layering for a nutty twist that pairs beautifully with Oreos.
- Chocolate Lover’s Dream: Mix 2 tbsp unsweetened cocoa powder into the cream cheese base or add mini chocolate chips in the layers for extra chocolate punch.
- Dairy-Free Version: Use dairy-free cream cheese and whip chilled coconut cream instead of heavy cream. The texture changes slightly but it’s still creamy and delicious.
I once swapped in crushed peppermint Oreos during the holidays, adding a festive minty surprise that everyone loved. Feel free to experiment with cookie flavors or add crunchy nuts on top for contrast.
Serving & Storage Suggestions
Serve these cheesecake jars chilled straight from the fridge for the best texture and flavor. They make a lovely individual dessert for dinner parties or a fun treat for kids’ lunches. Presentation-wise, adding a few extra Oreo crumbs or a sprig of fresh mint on top makes them look extra special without any added effort.
For storage, keep the jars covered tightly with lids or plastic wrap in the refrigerator. They’ll stay fresh for up to 3 days, making them great for prepping ahead of time. If you want to save some for later, you can freeze the jars for up to a month—just thaw overnight in the fridge before serving.
Reheating? Nah, these are best cold, but if you want a softer texture, let them sit at room temperature for 10-15 minutes. Over time, the flavors meld beautifully, so they actually taste better the next day.
Nutritional Information & Benefits
Each serving of these no-bake Oreo cheesecake jars contains roughly 350-400 calories, depending on portion size, with a balance of fats and sugars. The cream cheese provides protein and calcium, while the heavy cream adds richness. Oreos are obviously a treat ingredient, so moderation is key here.
For those watching carbs or sugar, swapping granulated sugar for a natural sweetener like monk fruit or erythritol can reduce sugar content without sacrificing sweetness. Using dairy-free alternatives can also cater to lactose intolerance. This recipe is gluten-containing due to the Oreos, but gluten-free cookie substitutes work well.
While indulgent, this dessert can fit into a balanced diet, especially when paired with nutrient-dense sides like the honey roasted butternut squash with rosemary for a full meal experience that nourishes and satisfies.
Conclusion
This creamy no-bake Oreo cheesecake jars recipe has become a staple for me when I want a fuss-free dessert that feels a little indulgent but never overwhelming. Its creamy texture, crunchy Oreo layers, and fluffy whipped cream topping make every spoonful a little celebration. What I love most is how easy it is to customize—whether you’re adding fruit, chocolate, or swapping ingredients to suit dietary needs.
Give it a try when you want a quick, impressive dessert that doesn’t require baking or fancy skills. I’m pretty sure you’ll find yourself making these jars again and again, just like I did. And if you experiment with your own twists, I’d love to hear about it in the comments below.
Happy layering and indulging!
FAQs about Creamy No-Bake Oreo Cheesecake Jars with Whipped Cream Layers
Can I make these cheesecake jars ahead of time?
Yes! In fact, making them the day before helps the flavors meld and the texture set perfectly. Store them covered in the fridge for up to 3 days.
What can I use instead of Oreos?
You can substitute with any sandwich cookies or gluten-free cookies if needed. Graham cracker crumbs or crushed pretzels also work for a different flavor and texture.
Do I have to use heavy cream for the whipped layers?
Heavy cream whips best for this recipe, but you can try chilled coconut cream for a dairy-free alternative. Just ensure it’s very cold before whipping.
How do I keep the whipped cream from deflating when mixing?
Fold the whipped cream gently into the cream cheese mixture using a spatula, using light, sweeping motions rather than stirring vigorously.
Can I double the recipe for a larger crowd?
Absolutely. Just double all ingredients and use larger jars or more individual jars. The layering process stays the same.
Pin This Recipe!
Creamy No-Bake Oreo Cheesecake Jars

A quick and easy no-bake dessert featuring layers of crushed Oreos, smooth cheesecake filling, and fluffy whipped cream served in charming jars. Perfect for last-minute cravings or entertaining without the oven.
- Prep Time: 15 minutes
- Cook Time: 0 minutes
- Total Time: 4 hours 15 minutes
- Yield: 8 servings 1x
- Category: Dessert
- Cuisine: American
Ingredients
- 24 Oreo cookies, crushed (reserve some whole for garnish if desired)
- 16 oz (450 g) cream cheese, softened
- 3/4 cup (150 g) granulated sugar
- 1 tsp vanilla extract
- 1 1/2 cups (360 ml) heavy cream, chilled
- 2 tbsp powdered sugar
- 1/2 tsp vanilla extract
Instructions
- Crush the Oreos: Place 24 Oreo cookies in a large zip-top bag and crush them with a rolling pin until you get mostly crumbs with some small chunks for texture. Set aside about 1/2 cup (50 g) crumbs for garnish.
- Make the cheesecake filling: In a large bowl, beat 16 oz (450 g) softened cream cheese with 3/4 cup (150 g) granulated sugar and 1 tsp vanilla extract until smooth and creamy, about 3-4 minutes on medium speed.
- Whip the cream: In a chilled bowl, whip 1 1/2 cups (360 ml) heavy cream with 2 tbsp powdered sugar and 1/2 tsp vanilla extract until stiff peaks form, about 3-5 minutes.
- Fold whipped cream into cream cheese: Gently fold about one-third of the whipped cream into the cream cheese mixture to lighten it, then fold in the remaining whipped cream carefully to create a velvety texture.
- Assemble the jars: Spoon a layer of crushed Oreos (about 2 tbsp) into each jar, add a generous layer of cheesecake filling (about 1/4 cup), then a layer of whipped cream (about 2 tbsp). Repeat the layers once more and finish with whipped cream on top.
- Garnish and chill: Sprinkle reserved Oreo crumbs on top and optionally add a mini Oreo or chocolate shavings. Cover and refrigerate for at least 4 hours or overnight to set.
Notes
Softening the cream cheese fully is essential for a smooth filling. Chill mixing bowls and beaters before whipping cream for better volume. Fold whipped cream gently to keep the mixture airy. Chill jars for at least 4 hours or overnight for best texture. Can substitute ingredients for vegan or gluten-free versions.
Nutrition
- Serving Size: One 6 oz jar
- Calories: 375
- Sugar: 25
- Sodium: 220
- Fat: 25
- Saturated Fat: 15
- Carbohydrates: 30
- Fiber: 1
- Protein: 5
Keywords: no-bake cheesecake, Oreo cheesecake, layered dessert, easy dessert, no oven dessert, creamy cheesecake jars, whipped cream dessert


