The smell of warm corn pudding with a gentle kick from green chiles instantly reminds me of cozy holiday gatherings with family. I first whipped up this irresistible corn pudding with green chiles on a chilly Thanksgiving, when I wanted something a little different from the usual sides. Honestly, it stole the show — creamy, sweet, with just enough heat to keep everyone intrigued. It’s become my go-to side recipe ever since.
This recipe blends the natural sweetness of fresh corn with the smoky, tangy bite of green chiles, creating a dish that feels both comforting and exciting. I’ve made it countless times, tweaking the heat levels and texture to find that perfect balance between creamy and light. Whether you’re cooking for a big holiday meal or a casual weeknight dinner, this corn pudding stands out as a crowd-pleaser that pairs beautifully with everything from roast turkey to grilled meats.
What I love most about this irresistible corn pudding with green chiles is how effortlessly it comes together. You don’t need fancy ingredients or hours in the kitchen, and it’s perfect for busy cooks who want something impressive without the stress. Friends often ask me for the recipe after tasting it, which always makes me smile — because this humble side dish really shines.
Why You’ll Love This Recipe
- Quick & Easy: Ready in under an hour, you can prep and bake this corn pudding while finishing up your main dishes.
- Simple Ingredients: No need for specialty stores — canned corn and green chiles work just fine, though fresh corn adds a lovely touch.
- Perfect for Holidays: Ideal for Thanksgiving, Christmas, or any festive meal where you want a side that brings warmth and flavor.
- Crowd-Pleaser: Kids and adults alike rave about the creamy texture with a subtle spicy twist.
- Unbelievably Delicious: The pudding’s silky smoothness paired with green chile’s kick makes it a memorable dish.
This corn pudding isn’t just another casserole. What sets it apart is the way the green chiles are folded in — not just tossed on top. This method infuses every bite with a gentle heat without overpowering the natural corn sweetness. Plus, a light sprinkle of sharp cheddar cheese on top adds the perfect golden crust. The balance of flavors and textures is something I’ve perfected after many trials, so you’re getting my best version every time.
Trust me, this recipe delivers comfort food vibes with a little zip, making it perfect for anyone wanting a side that’s both familiar and fresh.
What Ingredients You Will Need
This recipe uses simple, wholesome ingredients to deliver bold flavor and satisfying texture without the fuss. Most are pantry staples, and you can easily swap a few items to suit your preferences.
- Corn kernels: 3 cups fresh or frozen (thawed) corn kernels (fresh adds a sweet crunch, but frozen or canned works well too)
- Green chiles: 1 cup diced, canned mild or medium (I prefer Hatch green chiles for their smoky flavor)
- Eggs: 3 large, room temperature (they bind everything together)
- Milk: 1 cup whole milk (for creaminess; swap with almond or oat milk for dairy-free)
- Sour cream: ½ cup (adds tang and richness; Greek yogurt can substitute)
- Butter: 4 tablespoons unsalted, melted (adds flavor and moisture)
- All-purpose flour: ½ cup (helps thicken the pudding; use gluten-free flour blend if needed)
- Granulated sugar: 2 tablespoons (balances the heat and enhances corn sweetness)
- Salt: 1 teaspoon (to taste, but don’t skip — it pulls flavors together)
- Baking powder: 1 teaspoon (lightens the texture)
- Cheddar cheese: ½ cup shredded sharp cheddar (optional, for topping that golden crust)
Pro tip: Look for small-curd cottage cheese if you want to experiment with texture variations, or add a splash of cream for extra decadence. If you like it spicier, toss in a few dashes of hot sauce or use medium instead of mild chiles.
Equipment Needed
- Mixing bowls: At least two — one for wet ingredients, one for dry.
- Whisk and spatula: For blending ingredients smoothly.
- Measuring cups and spoons: Precision is key here for texture.
- Baking dish: A 9×9-inch (23×23 cm) square or equivalent round casserole dish works best.
- Oven: Preheated to 350°F (175°C).
- Optional: Food processor or blender: If you prefer a very smooth corn pudding, you can pulse the corn and chiles briefly.
I’ve tried making this in both glass and ceramic dishes — both work fine, but glass heats more evenly, giving you a nice crust. If you don’t have a 9×9 dish, a loaf pan or two smaller ramekins can do the trick. For budget-friendly options, thrift stores often carry great bakeware.
Detailed Preparation Method

- Preheat your oven to 350°F (175°C). Grease your baking dish generously with butter to prevent sticking and add flavor. (5 minutes)
- Prepare the dry ingredients: In a medium bowl, whisk together ½ cup all-purpose flour, 1 teaspoon baking powder, 1 teaspoon salt, and 2 tablespoons sugar. This mix ensures your pudding has the right lift and sweetness. (3 minutes)
- Mix the wet ingredients: In a large mixing bowl, beat 3 large eggs until slightly frothy. Add 1 cup whole milk, ½ cup sour cream, and 4 tablespoons melted butter. Whisk together until smooth. (4 minutes)
- Combine corn and chiles: Stir in 3 cups corn kernels and 1 cup diced green chiles into the wet mixture. If you want a smoother texture, pulse the corn and chiles briefly in a food processor before adding. (2 minutes)
- Incorporate dry ingredients: Gradually fold the flour mixture into the wet ingredients until just combined. Avoid overmixing — a few lumps are okay! The batter should be thick but pourable. (3 minutes)
- Pour into baking dish: Transfer the batter evenly into the prepared dish. Smooth the top with a spatula. Optional: sprinkle ½ cup shredded sharp cheddar cheese evenly over the surface for a golden, cheesy crust. (2 minutes)
- Bake: Place the dish in the oven and bake for 45-50 minutes. The pudding should puff up slightly, and a toothpick inserted in the center should come out mostly clean with a few moist crumbs. (45-50 minutes)
- Cool slightly before serving: Let the corn pudding rest for 10-15 minutes to set; it will firm up and be easier to slice. (10-15 minutes)
Common pitfall: If your pudding is too runny, check that your flour is fresh and don’t over-pour milk. Also, avoid opening the oven door frequently to keep the temperature steady.
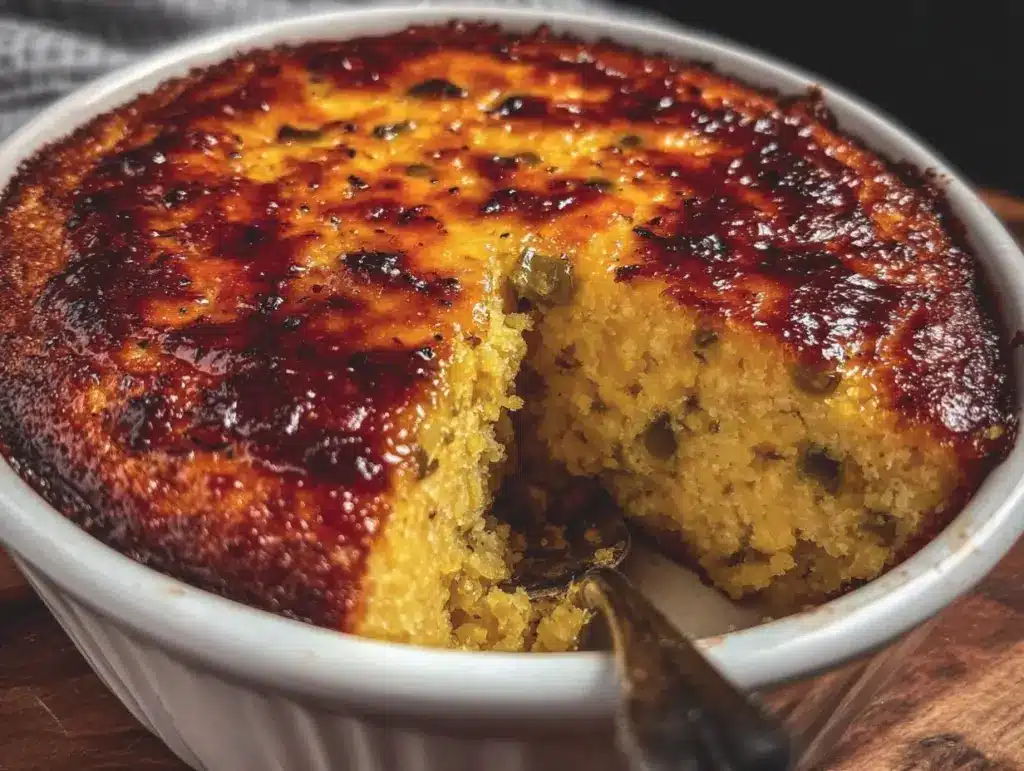
When done right, the top should be golden and slightly crisp, with a creamy, custard-like interior studded with sweet corn and spicy green chiles. Trust me, the wait is worth it!
Cooking Tips & Techniques
Here are some lessons I’ve picked up after many batches of this corn pudding:
- Don’t skip room temperature eggs: They blend more evenly and help with the pudding’s smooth texture.
- Use melted butter, not softened: It mixes better with liquids and gives that rich mouthfeel.
- Fold, don’t overmix: Overworking the batter can make the pudding dense and tough.
- Adjust baking times based on your oven: I’ve found that some ovens run hot, so start checking at 40 minutes to avoid overbaking.
- Let it rest: Pudding tastes better when it’s had a chance to cool and set — plus, it slices more neatly.
- Multitasking tip: While the pudding bakes, use that time to prep your main dishes or whip up a fresh salad.
One time, I accidentally used skim milk instead of whole, and the pudding came out a bit dry. Lesson learned: full-fat dairy really makes a difference here. Also, for a smoky touch, some folks swear by roasting fresh corn before mixing it in, which I’ve tried and loved. Experimenting with different green chile brands can also subtly change the flavor, so find one you enjoy.
Variations & Adaptations
This corn pudding recipe is super flexible — here are some ways to make it your own:
- Spicy kick: Add diced jalapeños or a pinch of cayenne for more heat.
- Cheese swap: Swap cheddar with pepper jack or a creamy queso fresco for a different flavor profile.
- Vegan version: Use plant-based milk, vegan sour cream, and an egg replacer like flax eggs.
- Gluten-free: Use a gluten-free flour blend instead of all-purpose flour.
- Herbs: Stir in fresh chopped cilantro or green onions for a fresh, herbal note.
Personally, I once tried adding cooked bacon bits and caramelized onions — it was decadent and made for a heartier side perfect for winter dinners. You can also bake this in individual ramekins for personal servings or double the recipe for larger crowds.
Serving & Storage Suggestions
This irresistible corn pudding with green chiles is best served warm, straight from the oven. The golden crust and creamy inside make it perfect on its own or alongside roast meats, grilled chicken, or even a fresh salad.
For drinks, I like pairing it with a crisp white wine or a lightly spiced cider during cooler months. It also holds up well as part of a holiday buffet.
To store leftovers, cover the pudding tightly with foil or plastic wrap and refrigerate for up to 3 days. Reheat gently in a 325°F (160°C) oven for 15-20 minutes or in the microwave until warmed through. Avoid overheating to keep the custard creamy.
Freezing is possible, but I recommend freezing individual portions to preserve texture. Thaw overnight in the fridge and reheat as usual. Interestingly, the flavors meld beautifully after a day, making leftovers even tastier!
Nutritional Information & Benefits
This corn pudding offers a comforting balance of carbs, protein, and fats. Here’s a rough estimate per serving (based on 8 servings):
| Nutrient | Amount |
|---|---|
| Calories | 180-220 kcal |
| Protein | 6-8 g |
| Fat | 9-12 g |
| Carbohydrates | 20-25 g |
| Fiber | 2-3 g |
Corn provides dietary fiber and antioxidants, while green chiles add vitamin C and a metabolism boost. The eggs and dairy supply quality protein and calcium. For those avoiding gluten or dairy, simple substitutions can make this recipe inclusive.
From a wellness perspective, this side feels indulgent but also nourishing — a reminder that comfort food can be part of a balanced diet when made thoughtfully.
Conclusion
Irresistible corn pudding with green chiles is a dish I keep coming back to, whether for special occasions or casual dinners. It’s creamy, flavorful, and just the right amount of spicy, making it a unique addition to any meal. You can easily tweak the heat, texture, and toppings to match your tastes — that’s what makes it so fun and reliable.
Give this recipe a try next time you want to impress without stress. I’d love to hear how you customize it or what your favorite variations are — drop a comment below! Sharing this with friends and family means you’re spreading a little delicious joy, and honestly, that’s what cooking is all about.
Happy cooking, and here’s to many cozy meals with this unforgettable corn pudding!
Frequently Asked Questions
Can I use canned corn for this recipe?
Yes! Drain it well before adding. Fresh corn gives the best sweetness and texture, but canned works perfectly in a pinch.
How spicy is the corn pudding with green chiles?
It has a mild to medium heat depending on the chiles you use. You can adjust by choosing mild or medium green chiles or adding jalapeños for more kick.
Can I make this ahead of time?
Absolutely! Prepare the batter, store it in the fridge overnight, then bake fresh before serving for the best texture.
Is this recipe gluten-free?
Not as written, but you can substitute the all-purpose flour with a gluten-free blend to make it safe for gluten intolerance.
How do I store leftovers?
Cover tightly and refrigerate for up to 3 days. Reheat gently in the oven or microwave to keep the creamy texture.
Pin This Recipe!

Irresistible Corn Pudding with Green Chiles

A creamy, sweet corn pudding with a gentle kick from green chiles, perfect as a comforting and flavorful holiday side dish.
- Prep Time: 15 minutes
- Cook Time: 45-50 minutes
- Total Time: 60-65 minutes
- Yield: 8 servings 1x
- Category: Side Dish
- Cuisine: American
Ingredients
- 3 cups fresh or frozen (thawed) corn kernels
- 1 cup diced canned mild or medium green chiles
- 3 large eggs, room temperature
- 1 cup whole milk
- ½ cup sour cream
- 4 tablespoons unsalted butter, melted
- ½ cup all-purpose flour
- 2 tablespoons granulated sugar
- 1 teaspoon salt
- 1 teaspoon baking powder
- ½ cup shredded sharp cheddar cheese (optional)
Instructions
- Preheat your oven to 350°F (175°C). Grease your baking dish generously with butter.
- In a medium bowl, whisk together flour, baking powder, salt, and sugar.
- In a large mixing bowl, beat eggs until slightly frothy. Add milk, sour cream, and melted butter; whisk until smooth.
- Stir in corn kernels and diced green chiles. For a smoother texture, pulse corn and chiles briefly in a food processor before adding.
- Gradually fold the dry ingredients into the wet ingredients until just combined; avoid overmixing.
- Pour the batter evenly into the prepared baking dish and smooth the top. Optionally, sprinkle shredded cheddar cheese over the surface.
- Bake for 45-50 minutes until the pudding puffs slightly and a toothpick inserted comes out mostly clean with a few moist crumbs.
- Let the pudding rest for 10-15 minutes before serving to set and firm up.
Notes
Use room temperature eggs for better texture. Melted butter blends better than softened butter. Avoid overmixing the batter to keep pudding light. Adjust baking time based on your oven and start checking at 40 minutes. Let pudding rest before slicing for best results. For a smoky flavor, roast fresh corn before mixing. Substitute gluten-free flour and dairy-free milk/sour cream for dietary needs.
Nutrition
- Serving Size: 1/8 of the pudding
- Calories: 200
- Sugar: 6
- Sodium: 350
- Fat: 10
- Saturated Fat: 6
- Carbohydrates: 23
- Fiber: 2.5
- Protein: 7
Keywords: corn pudding, green chiles, holiday side, creamy corn casserole, easy corn pudding, Thanksgiving side dish


