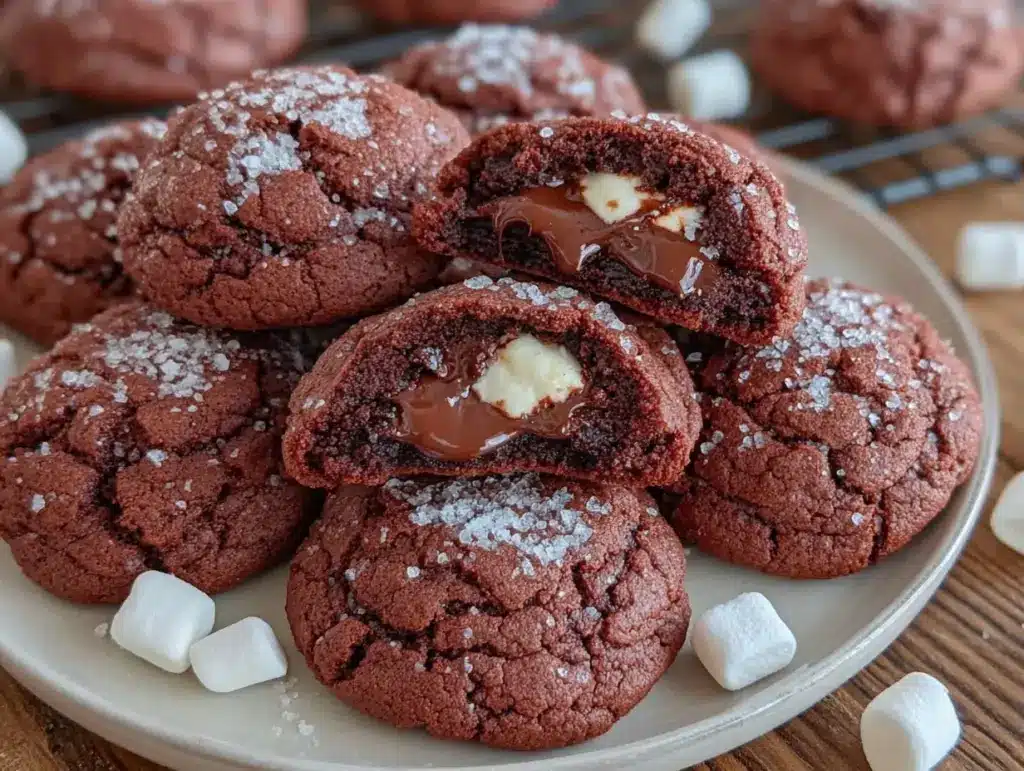
Imagine biting into a warm, chocolatey cookie only to discover a gooey marshmallow filling hiding inside—it’s the ultimate comfort treat! These Perfect Hot Chocolate Cookies with Marshmallow Filling bring all the flavors of your favorite cozy drink into cookie form, and they’re bound to become a family favorite. The combination of rich cocoa, melted chocolate chips, and sweet marshmallow is irresistible. Trust me, once you make these, you’ll be hooked!
This recipe came to life during a chilly winter evening when I was craving the warmth of hot chocolate but wanted something I could munch on. After a few trials (and a lot of taste-testing), I landed on the perfect balance of soft, chewy chocolate cookies with pockets of ooey-gooey marshmallow inside. Whether it’s a snowy afternoon or you’re just looking for a fun dessert to share, these cookies will make any day feel special.
Why You’ll Love This Recipe
- Perfect Texture: Soft and chewy chocolate cookies with a surprise marshmallow center that melts in your mouth.
- Easy To Make: No fancy tools or techniques required—just mix, bake, and enjoy.
- Kid-Friendly: These cookies are always a hit with little ones! The marshmallow filling makes them extra fun.
- Great for Gifting: These cookies are perfect for holiday cookie exchanges, party platters, or just as a thoughtful homemade treat.
- Hot Chocolate in Cookie Form: This recipe captures the cozy magic of hot chocolate in every bite.
What makes these cookies stand out is the marshmallow filling. It’s not just a topping—it’s sealed inside, so every bite has that gooey, melted surprise. Plus, the rich chocolate flavor is amplified by the cocoa powder and melted chocolate chips, making them decadently satisfying. If you’re looking for a dessert that feels indulgent but doesn’t require hours of work, this is it. Oh, and let’s not forget—they pair perfectly with…hot chocolate!
What Ingredients You Will Need
This recipe uses simple, pantry-friendly ingredients to create cookies that taste bakery-worthy. Here’s what you’ll need:
- Unsalted Butter: Softened to room temperature (adds rich flavor and makes the cookies tender).
- Granulated Sugar: For sweetness and that classic cookie texture.
- Brown Sugar: Adds moisture and a hint of caramel flavor.
- Large Eggs: Room temperature (helps bind the dough).
- Vanilla Extract: A must for enhancing the chocolate flavor.
- All-Purpose Flour: Provides structure to the cookies.
- Unsweetened Cocoa Powder: For the rich chocolate flavor (I recommend Dutch-processed for deeper color).
- Baking Soda: Ensures the cookies rise properly and stay soft.
- Salt: Balances the sweetness and enhances the cocoa.
- Chocolate Chips: Semi-sweet or dark—your choice! Melted into the batter for extra chocolatey goodness.
- Mini Marshmallows: The secret ingredient for the gooey filling.
If you’re missing an ingredient, don’t worry! You can swap mini marshmallows with regular marshmallows cut into smaller pieces or even marshmallow fluff for a slightly creamier filling. Gluten-free flour works well if you need an alternative, and you can use coconut sugar instead of brown sugar for a slightly less processed option.
Equipment Needed
You don’t need fancy gadgets to whip up these cookies—here’s what you’ll need:
- Mixing Bowls: One for wet ingredients and one for dry.
- Hand Mixer or Stand Mixer: Makes creaming the butter and sugar a breeze (but you can use a sturdy whisk if you prefer).
- Baking Sheets: Line them with parchment paper for easy cleanup.
- Cookie Scoop: Helps you portion the dough evenly (or use a tablespoon if you don’t have one).
- Cooling Rack: Essential for letting the cookies firm up without overbaking.
If you don’t have a cookie scoop, a spoon works just fine. And if you don’t have parchment paper, greasing your baking sheet lightly with butter or cooking spray works in a pinch!
Detailed Preparation Method

Let’s break this down step by step for cookie perfection:
- Preheat the oven: Set your oven to 350°F (175°C) and line two baking sheets with parchment paper.
- Mix the wet ingredients: In a large mixing bowl, cream together the softened butter, granulated sugar, and brown sugar until light and fluffy (about 2-3 minutes). Add the eggs one at a time, mixing well after each addition, then stir in the vanilla extract.
- Combine dry ingredients: In a separate bowl, whisk together the flour, cocoa powder, baking soda, and salt. Gradually add the dry mixture to the wet ingredients, mixing just until combined.
- Add chocolate chips: Stir in the melted chocolate chips until the dough is rich and chocolatey.
- Prepare marshmallows: Take one marshmallow and flatten it slightly by hand (this helps it fit inside the cookie dough).
- Shape the cookies: Scoop about 2 tablespoons of dough and flatten it slightly in your hand. Place a marshmallow in the center, then wrap and seal the dough around it completely to form a ball.
- Bake: Place the cookie dough balls on the prepared baking sheets, leaving about 2 inches between each one. Bake for 10-12 minutes, or until the edges look set but the centers are soft.
- Cool: Let the cookies cool on the baking sheet for 5 minutes before transferring them to a cooling rack. Enjoy warm for maximum gooeyness!
If the marshmallow starts to seep out during baking, don’t panic—it adds a fun, rustic look! Just make sure the dough completely covers the marshmallow for the best results.
Cooking Tips & Techniques
- Don’t Overmix: Once you’ve combined the dry and wet ingredients, mix just until the dough comes together. Overmixing can make the cookies tough.
- Room Temperature Ingredients: Make sure your butter and eggs are at room temperature for smoother mixing and better texture.
- Seal the Marshmallow: Take the time to completely cover the marshmallow with dough—otherwise, it might leak out while baking.
- Chill the Dough: If your kitchen is warm, refrigerate the dough for 20-30 minutes before shaping the cookies. This helps them hold their shape better.
- Check for Doneness: The cookies should look slightly underbaked in the center when you pull them out of the oven. They’ll firm up as they cool.
Trust me, I’ve had my fair share of marshmallow explosions in the oven, and chilling the dough really makes a difference. Plus, working with room-temperature ingredients ensures everything blends smoothly!
Variations & Adaptations
- Gluten-Free Version: Swap the all-purpose flour with a 1:1 gluten-free baking flour. Works like a charm!
- Seasonal Twist: Add a pinch of cinnamon or nutmeg to the dough for a holiday-inspired flavor.
- Different Fillings: Swap the marshmallows with a teaspoon of peanut butter or Nutella for a fun variation.
- Dairy-Free Option: Use vegan butter and dairy-free chocolate chips, and replace marshmallows with a plant-based alternative.
One time, I tried adding crushed candy canes to the dough for a little peppermint crunch—it was a festive hit! Don’t be afraid to experiment and make this recipe your own.
Serving & Storage Suggestions
These cookies are best served warm to fully enjoy the gooey marshmallow filling. Pair them with a cup of hot chocolate for the ultimate cozy dessert or serve them alongside coffee or milk for a snack that feels indulgent.
- Storage: Store leftover cookies in an airtight container at room temperature for up to 3 days.
- Freezing: Freeze the unbaked cookie dough balls for up to 3 months. Bake directly from frozen, adding 1-2 minutes to the baking time.
- Reheating: Warm cookies in the microwave for 10 seconds to revive the gooey marshmallow center.
Fun fact: The flavors deepen overnight, so they might taste even better the next day!
Nutritional Information & Benefits
Each cookie is approximately:
- Calories: 150
- Fat: 6g
- Carbohydrates: 22g
- Protein: 2g
While this recipe is definitely a treat, cocoa powder offers antioxidants, and marshmallows are fat-free. You can balance the indulgence by enjoying these cookies as part of a well-rounded day!
Conclusion
If you’re craving a dessert that feels like a warm hug, these Perfect Hot Chocolate Cookies with Marshmallow Filling are your answer. The combination of rich, soft chocolate and gooey marshmallow is hard to beat. Whether you’re baking for yourself, your family, or a holiday party, these cookies are guaranteed to steal the show.
I love this recipe because it’s so versatile—you can play around with flavors or keep it simple. Let me know how you make it your own! Leave a comment below, share this recipe with your friends, and don’t forget to pin it for later. Happy baking!
FAQs
Can I use regular marshmallows instead of mini marshmallows?
Yes! Just cut the regular marshmallows into smaller pieces to fit inside the cookie dough.
Can I freeze the cookies after baking?
Absolutely! Let them cool completely, then store them in an airtight container in the freezer for up to 2 months.
Why did my marshmallows leak out?
This happens if the dough doesn’t completely seal the marshmallow. Take extra care to wrap the dough fully around the filling.
Can I make these cookies ahead of time?
Yes, you can prep the dough and refrigerate it for up to 24 hours or freeze it for longer storage.
What’s the best way to reheat these cookies?
Pop them in the microwave for 10-15 seconds to revive the gooey marshmallow center.
Pin This Recipe!

Perfect Hot Chocolate Cookies with Gooey Marshmallow Filling

Soft and chewy chocolate cookies with a gooey marshmallow center, capturing the cozy magic of hot chocolate in every bite.
- Prep Time: 20 minutes
- Cook Time: 12 minutes
- Total Time: 32 minutes
- Yield: 24 cookies 1x
- Category: Dessert
- Cuisine: American
Ingredients
- 1 cup unsalted butter, softened to room temperature
- 1 cup granulated sugar
- 1 cup brown sugar
- 2 large eggs, room temperature
- 2 teaspoons vanilla extract
- 2 1/4 cups all-purpose flour
- 1/2 cup unsweetened cocoa powder (preferably Dutch-processed)
- 1 teaspoon baking soda
- 1/2 teaspoon salt
- 1 cup semi-sweet or dark chocolate chips, melted
- 1 cup mini marshmallows
Instructions
- Preheat the oven to 350°F (175°C) and line two baking sheets with parchment paper.
- In a large mixing bowl, cream together the softened butter, granulated sugar, and brown sugar until light and fluffy (about 2-3 minutes).
- Add the eggs one at a time, mixing well after each addition, then stir in the vanilla extract.
- In a separate bowl, whisk together the flour, cocoa powder, baking soda, and salt.
- Gradually add the dry mixture to the wet ingredients, mixing just until combined.
- Stir in the melted chocolate chips until the dough is rich and chocolatey.
- Take one marshmallow and flatten it slightly by hand.
- Scoop about 2 tablespoons of dough and flatten it slightly in your hand. Place a marshmallow in the center, then wrap and seal the dough around it completely to form a ball.
- Place the cookie dough balls on the prepared baking sheets, leaving about 2 inches between each one.
- Bake for 10-12 minutes, or until the edges look set but the centers are soft.
- Let the cookies cool on the baking sheet for 5 minutes before transferring them to a cooling rack. Enjoy warm for maximum gooeyness!
Notes
[‘Don’t overmix the dough to avoid tough cookies.’, ‘Ensure butter and eggs are at room temperature for better texture.’, ‘Completely seal the marshmallow with dough to prevent leakage during baking.’, ‘Chill the dough for 20-30 minutes if your kitchen is warm to help the cookies hold their shape.’, ‘Cookies should look slightly underbaked in the center when removed from the oven; they will firm up as they cool.’]
Nutrition
- Serving Size: 1 cookie
- Calories: 150
- Fat: 6
- Carbohydrates: 22
- Protein: 2
Keywords: hot chocolate cookies, marshmallow filling, chocolate cookies, dessert, holiday cookies, kid-friendly cookies


